
New PCM Features

Since our July/August newsletter, the following features have been added to PCM:
• Prescription Writer has changes to accommodate new SureScripts policies of leaving all Sig instructions out of the prescription notes. Therefore, the Rx Screen is now clearly labeled with "Sig Other", containing all the additional items that used to be in the "Special" combo that are now labeled "Pharm. Notes".
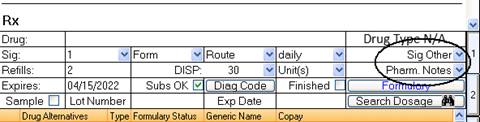
The user can still build multiple items to the sig by choosing one item from the combo box, then another, etc.
o You can also still type what you want.
o If you double click on either combo, an input box pops up so you can type additional text easier.
o The maximum length for all the Sig text is 140 characters, and the maximum length for the Pharm. Notes is 210 chars, so, to fit all the information, the margin gets changed to the far left side.
o The NY form will always appear truncated, as there is no way to fit this length of text on the form. On the NY form, most of the time, it is best to not use any notes, then the font size will be reduced for the sig to get most of it to show just fine. Whenever there are too many chars for either the Sig other, or Pharm. Notes, there is an auto popup of the editor which shows in red that there are too many chars.
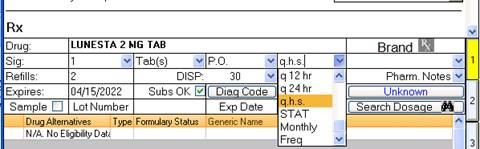
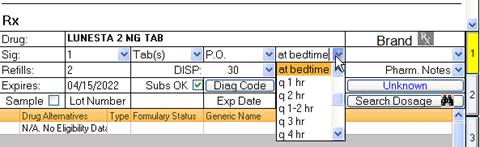
• In Prescription Writer, ‘q.h.s’ and ‘at bedtime’ has been added to the frequency drop-down menu:
• On the Drug Search Screen, a new [Med Hx] lookup button was added so that it can all be accessed from the same screen:

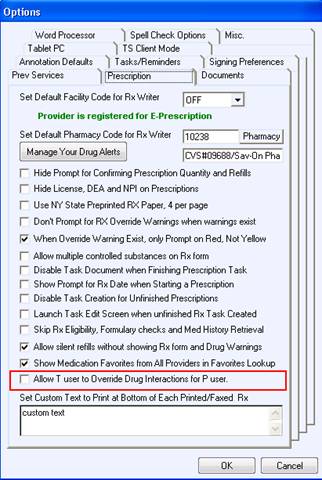
• On Prescription Writer, User Options, under the prescription tab, there is a new option for providers to show the favorite medication lists from all of the providers, not just their own:
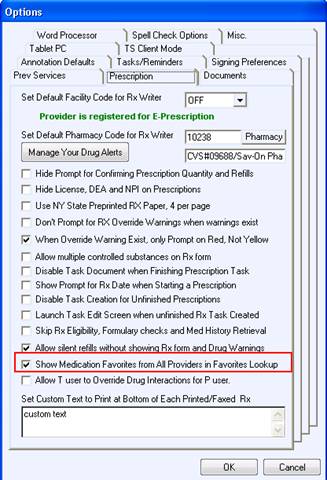
• On Prescription Writer, User Options, under the prescription tab, there is a new option "Allow T user to Override Drug Interactions for P user." The prescription signer (provider) can check this option to allow the T users to override drug interactions in order to continue the prescription when the T user is not the signer:
• When sending an eRx, you will see the “Sending Prescription” message, and, after that, the screen will close automatically. In the past, a “Sent successfully” message displayed, you had to click [OK], and then manually close. Now, it closes automatically. Also, if for any reason the program does not respond while trying to send an eRx, the user can now click the [Close] button, and the prompt to exit or not. Before, there was no way of ending the task from the send eRx screen.
• In regard to Emailing Documents, the patient’s DOB no longer appears in the subject line, just the name and MR Number.
• When Changing Document Signer from the mailboxes, the Chart Reviewer user can now change the signer of a document directly from the mailbox by right clicking on the document name, choosing properties, and then Doc Signer.
• For PCM Printers, the PCMPDF printer driver and DOCUJETPRO drivers are no longer required for PCM.
• For converting Text Documents to Tiff, and PDF to TIF, a progress bar was added so that you can see the progress and know that the program is responding.
• While Exporting Charts to PDF, you will now see the size of the exported PDF in the progress bar window. Also, while exporting, the document list will scroll so users can always see the name of the document being processed. Miscellaneous other export chart errors have also been fixed.
• On the Daily Appointment List in PCM and No Show patients, appointments that have been marked as NO SHOW in Intellect will now no longer be removed from the PCM Daily Appointment List. This was done so that doctors are aware that the patient was scheduled but did not show. If the patients are marked as ‘No Show’ and get removed from the list, the doctor has no way of knowing that day that the patient did not show up. The recommended way of charting is to attach a note in the chart and make a note that the patient was scheduled for a follow up, and was a ‘No Show’. This keeps a history of the patients’ appointments and helps the doctor with treatment and decision making, and it’s good for documentation.
Additionally, you can set up a room called ‘No Show’. The patient will be in the list, the MAs can update that room as NO SHOW, and the doctor can easily see that they did NOT show.
• There were a couple of changes to the OB Form:
o A button was added on page 7 to check/uncheck all plan items.
o When you add a sticky note, highlight, or redact annotation, it shows in the Preview pane. And, when printing, faxing or e-mailing, if a sticky note is present, you will be asked if you want to include that or not.
o The Practice Name, Address, Phone, and Fax now shows on the top of each page.
o Printing the OB form in edit mode is no longer supported because saving occurs on closing. This was done to ensure that all of the saved data is included in the print out.
o An issue was fixed which reported that, at times, an initial EDD was showing but the checked box was not checked, no date set exists, and the columns were locked. Now, if a user tries to click on those columns, it will unlock.
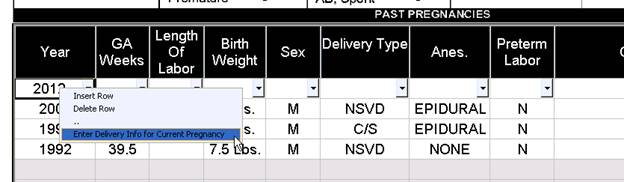
o Under Pregnancy History, Past Pregnancy, on page 1, after the patient delivers, you can now right-click on the grid and enter the information for the current OB form. Doing so locks the entire form, except this grid, so that no more changes may be made. Sticky notes/annotations can still be added, but that is all.
o For PCM Spell Check, when using PCM Remotely RDP or PCM TS Client, and you open the word processor (to attach a text document), the Spell Check option defaults to disabled. The user can still check the spelling by using the [ABC] button from the word processor’s main toolbar. This was done because significant problems with slowness and unresponsiveness were found when having this option enabled and used remotely.
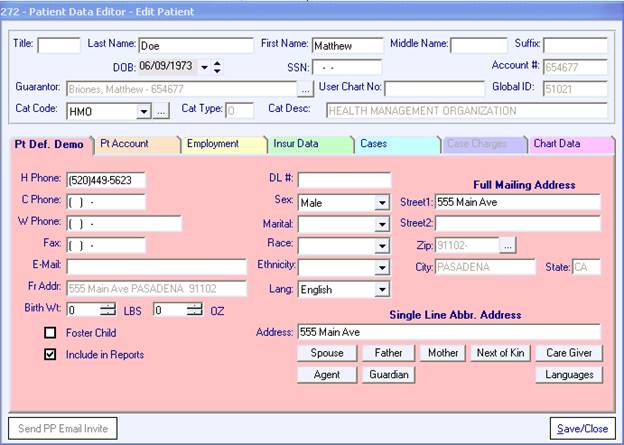
• On the Patient Data Editor, some of the fields were rearranged to keep all of the name fields in the upper part of the screen. We are no longer using the long first name and last name boxes.
•
There was a change to Meaningful Use Menu Set Measures Measure 6
Patient-Specific Education Resources.
Please refer to the following CMS reference: Patient-Specific Educational Resources. It specifically states that “Certified EHR
technology is certified to use either the patient’s problem list, medication
list, or laboratory test results to identify the patient-specific educational
resources. These, or additional elements, can be used in the identification
of educational resources that are specific to the patients needs.”
In
order to meet the above requirements, the following will no
longer automatically qualify for this credit.
Note: If these methods are used, the Meaningful Use table must be manually
updated and this will not be supported next year.
o Mapping educational documents to be printed on check-in/check-out
o Checking off of documents that have been flagged as Educational Materials from the list of forms to attach for email/print/fax
The following will continue to qualify for this credit:
o Treatment Plans. Since these are document and patient condition specific, we continue to support the educational document associated with the treatment plan. The Treatment Plan can be applied from within a text document or directly from the Order.
o Entry/Treatment Plan Screen. A copy of the printed document will be saved into the patient’s chart.
This is setup in the document setup/document mapping screen. A document flagged as educational material must be mapped and routed to be printed with the condition being “Treatment Plan”.
• Meaningful Use Menu Set Measures Measure 5 Provide Patients with Timely Electronic Access to their Health Information (Patient Portal) Calculation has changed to the following. Note that the patient has to have been invited to Patient Portal or have created their own account prior to the end date of the measurement period. Also, the Patient Portal account cannot have been disabled. Prior to this change, the date invited was being used for calculations, but now that patients can create their own account without being invited, we had no way to track that for MU calculations.
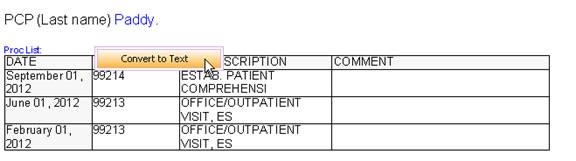
• Text Documents now allow you to right-click on any blue database field and choose to convert to text. This way, tables can be typed in, and data imported from a database can be edited. After converting these fields to text, there is no going back. Anything typed, of course, would not be added back to database, and users can no longer double click to open tables, etc. If the right-click is done on a blue "@" sign, the @ sign is removed.
•
Remote Scanning had support added for commercial 3rd party remote
scanning utilities, beginning with ThinStuff TSX Scan, http://www.thinstuff.com/downloads-support/downloads/.
In the user options screen for TS Client, you can check the box to use
this feature. This will also require the new PCM TS Client Ver 5.5.1003
and BatchScan TS Client, as all scanning uses the third party tool over
RDP, and NOT PCM's remote scan utility. This is mainly for users that
experience errors frequently with remote scanning when using Batch scanner
or TS Client, including the scanning of Barcodes to open a chart.
Note: The status of this check box is only used when PCM TS Client is use,
as the Batch Scanner just looks at the local TS client computer to see
if the software is installed, and, if so, by default uses the remote scan
software. It cannot be turned off. This is because with a batch scanner,
we don't know what user is logged on to check their defaults.
• Support was also added for TerminalWorks TS Remote Print product, http://terminalworks.com/remote-desktop-printing/. This adds three printer drivers to the server that can be used on the workstations. The TS print default can be mapped to the document printer on the local workstation, so when TS Client users/RDP users connect, none of them allow sharing of their own printers, which makes printing this way much cleaner. This requires the new PCM TS Client Ver 5.5.1003.