
Intellect™
Update Installation Procedures from Version 9.12.35 or Greater
for the Server and Workstations
for Version 16.06.30 and Greater
NOTE: If you are upgrading from a software version prior to 9.12.35, please contact Prime Clinical Support. Failure to do proper installation from versions prior to 9.12.35 could result in data corruption.
Before your update
Review all the Release Notes from your current version up to and including the version you are updating to. Distribute the Release Notes to each department so they can prepare for the update and reduce possible confusion after your system is updated. Please follow these steps to ensure you are reading all applicable Release Notes:
Your version:
Begin by getting the version you are currently on. The version number is displayed on the left side of the bar located at the top of your screen:

Release Notes:
To open the Online Release Notes, select menu option Help, then select Release Notes.
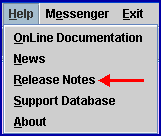
Once the online project opens, again select Release Notes. The Release Notes for each version are listed in chronological order, with the most current release on top. Print, or read online, the Release Notes for all versions greater than the one your server is running. Be sure to have the users in each department review the section of the release notes which applies to them:

The update installation procedure needs to be done on both the server and all workstations using the Intellect software. The server should be updated before the workstations are updated.
Everyone must log out of Intellect while Live Update is run on the server to avoid freezing the update process
Before updating your system, PCS requests that you complete the Authorization form and email it to support@primeclinical.com or fax it to (626) 449-5615.
When updating your system, Intellect verifies that your software maintenance contract is current. If not, a message displays indicating that your contract is not current.

Please refer calls regarding your software maintenance contract to Armineh Albarian at (626) 449-1705, option 2.
NOTE: The instructions for updating the server and for updating the workstations are different. Please read the entire document and be sure to follow the correct set of instructions for each.
To update to the most current version of Intellect, proceed as follows:
1. Go to Utility --►Tools --►LiveUpdate
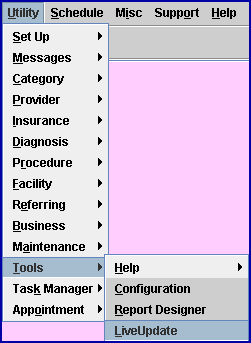
The Intellect LiveUpdate Applet displays:

2. Select [Next] to move to the selection display. Select Prime Clinical Systems' server, as shown below.
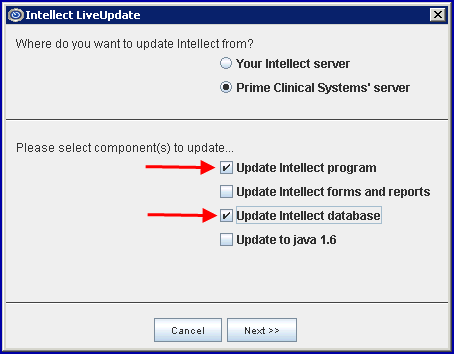
3. Click on ☐ Update Intellect program and ☐ Update Intellect database (as shown above) and then click [Next] to begin the update. Progress bars display, as shown below:

4. When the Overall progress status reaches 100%, the [Cancel] button is replaced by the [Finish] button. Select [Finish].

5. Two more sections of the program need to be updated. From Intellect's main menu, go to Utility --►Tools --►LiveUpdate again to display

6. Select [Next] to move to the selection display. Select Prime Clinical Systems' server, as shown below.
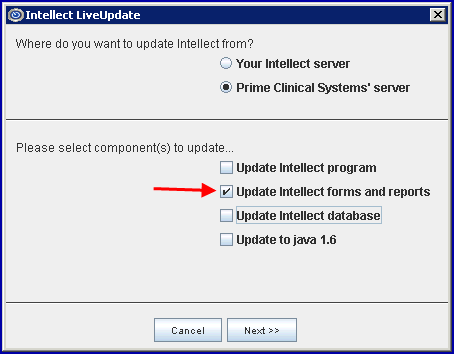
7. Click on ☐ Update Intellect forms, as shown above. Then click [Next] to begin the update. Progress bars display, as shown below:

8. When the Overall progress status reaches 100%, the [Cancel] button is replaced by the [Finish] button. Select [Finish].

Before updating the workstations you MUST 'Restart the Service' after loading the current Live Update onto the Server. Until this step is completed, the new version will not be active. Do NOT 'Restart the Service' on local workstations, only the Server!
'Restart the Service' by doing the following:
1. From the Main Server desktop click Start and then Control Panel:

2. Select Administrative Tools

3. Select Services

The Services Directory opens:

4. If your Services Directory shows OnStaff Web Server services, as shown below, it must be restarted. Right-click on OnSTAFF Web Server and select 'Start' or 'Restart' from the drop-down menu, depending on whether your server was stopped or paused.

Also in the Services directory, right-click on OnSTAFF Server. Depending whether your server was stopped or paused, select 'Start' or 'Restart,' respectively.

When the program has completed the 'Restart' process, you are returned to the Administrative Tools/Services screen. Review the ‘Status’ column:
If 'Status' = 'Error', please call PCS support.
If 'Status' = 'Started', you may close each of the directories until you are back at the desktop.
Note: When updating your system, Intellect verifies that your software maintenance contract is current. If not, a message displays indicating that your contract is not current.

Please refer calls regarding your software maintenance contract to Armineh Albarian at (626) 449-1705, select option 2 or email to accounting@primeclinical.com.
Once the server update is completed and Services has been restarted, you may update your workstations.
Note: PCS recommends you update workstations only a few at a time. Depending on your server's available memory and your network, updating all the workstations at the same time may cause the task to run very slowly, and can freeze the processes.
1. Log in to Intellect. As you log in, a dialog box displays advising The Server Version is more current than the workstation version' -- select [Ok].
The Intellect Live Update Applet displays:

2. Select [Next] to move to the selection display.
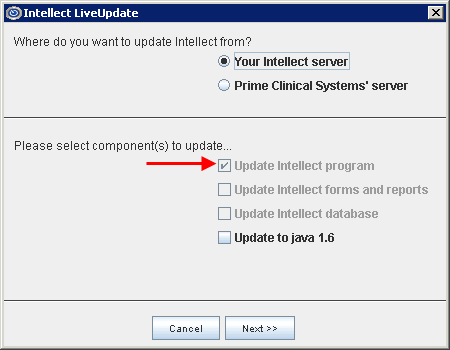
Note: If your screen does NOT include the ☐ Update to java 1.6 option shown above,
press [Cancel] and call Prime Clinical Support for assistance.
The Applet display changes to the screen shown above. The correct setting should already be selected for you. Do NOT change the setting. Update your workstation from your Intellect server.
3. Select [Next] to begin the update. Progress bars display, as shown below:

4. When the Overall progress status reaches 100%, the [Cancel] button is replaced by the [Finish] button. Select [Finish].

5. One more section of the program needs to be updated. From Intellect's main menu, go to Utility --►Tools --►LiveUpdate again to display:

6. Select [Next] to move to the selection display. Select Prime Clinical Systems' server, as shown below.

7. Click on ☐ Update Intellect forms, as shown above. Then click [Next] to begin the update. Progress bars display, as shown below:

8. When the Overall progress status reaches 100%, the [Cancel] button is replaced by the [Finish] button. Select [Finish].
