
IntellectTM
IMPORTANT PROGRAM MODIFICATIONS

The following Release Notes include the features and modifications made in the current update. PCS suggests you provide each department a copy of the Release Notes so they are aware of the changes which may affect their department.
In order to be aware of ALL changes in the software, please read all release notes from the version you are currently on through to the version to which you are updating.
Update may include items labeled ATTENTION which will IMMEDIATELY affect Billing and other daily tasks. Please be sure to notify all departments which will be affected.
If you would like to update to the latest version, please click here for authorization forms and instructions.
Note: The instructions to update to version 16.02.22 and greater differ from previous update instructions. Please be sure to follow the instructions specifically for the version you are on.
Effective version 17.06.09
Release Date: June 9, 2017
Version 17.06.09 New/Enhanced Features Announcement
Our New and Advanced Features Webinar is held the 1st Friday of every month from 1:00 - 2:00 p.m. PDT. Register today.
NEW FEATURE/BUTTON Registration --►Regular --►Patient andRegistration --►Worker --►Worker
Effective in this release, an [Additional Demographics] button was added to the bottom of the PATIENT screen to accommodate adding extra patient demographic information needed to meet Meaningful Use requirements:
![]()
Clicking the [Additional Demographics] button pops up a window with the extra fields. The screen below shows the default fields for this window. Additional fields may be added.
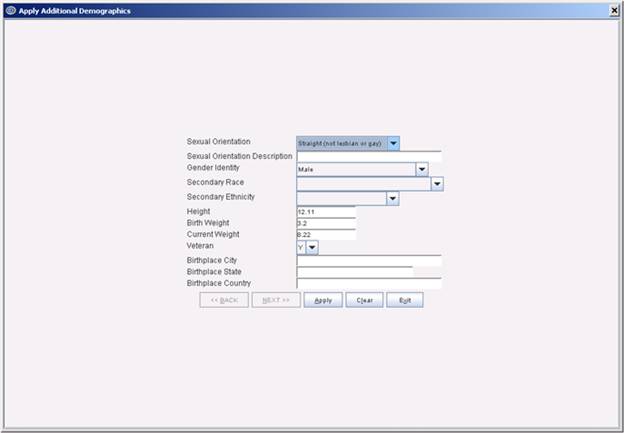
Definitions for these fields are given in the Registration--►Patient online documentation.
In addition to Meaningful Use information, this option may be used to add family members such as grandparents, or other information applicable to your clinic.
Fields are added via Utility--►Set Up--►Screen Fields to the Additional Demographics screen:
![]()
For details on adding fields to a screen, see Utility--►Set Up--►Screen Fields in the online documentation.
Note: The additional demographic information is not sent to PCM.
FIX Registration --►Regular --►Patient andRegistration --►Worker --►Worker
In a prior software version, it was reported that an account in a clients' system had a charge record without any demographic information. This problem occurred when the user pressed the [X], [Clear], or [Esc] buttons in the middle of adding a patient or after passing the <Patient Account Number> without entering patient <First Name>, <Last Name>, or other required fields. To prevent this, a change was made in the way the program handles screen exits. These changes affect exiting from the Utility screens, and the Patient, Patient Insurance, Worker, and Worker Insurance screens.
NEW FEATURE Charges --►Charge -- PQRS Pop-Up Window
As of January 1, 2017, PQRS was replaced by the Quality performance category under the Merit-based Incentive Payment System (MIPS). There are 74 Quality Measures which can be reported through claims submission. The actual CPT Category II code(s) and/or HCPCS Level II code(s) used for reporting the Quality measures are referred to as Quality Data Codes (QDCs) in CMS documentation.
Effective in this Intellect update, users can control which QDC (also known as G codes) are posted, and are subsequently reported, when posting charges. QDCs must be set up in Intellect to enable this option. See set up details in our online documentation under Charges--►Speciality Charges --►MIPS Quality Measures (formerly PQRS), Set Up for Claims-based Reporting in Intellect. In this release note, see also Utility --►Set Up --►Parameter <Quality Data Codes Method>, Utility --►Insurance --►Insurance <Report PQRS>, and Utility --►Procedure --►Procedure <Quality Data Codes>.
Once set up is completed, when a user posts a charge with a Panel Code linked to a QDC, a pop-up window displays with the linked QDCs. For example:
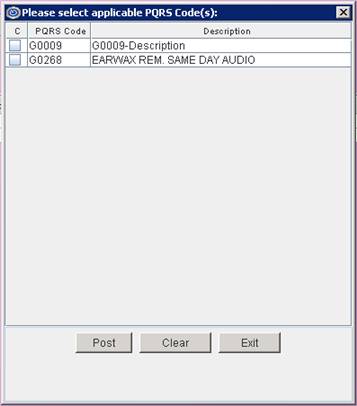
Click on each QDC that should be reported.
Note: For the procedure to be posted, users must click on the box to the left of the procedure until the ‘CHECK’ mark displays: ![]() .
.
[Post]: Click the [Post] button to include the selected QDC(s) on the multi-line display on the Charges--►Charge screen. For example, assume set up has been completed for panel code 99214 with QDCs G0009 and G0268. Entering 99214 on the Charge screen places 99214 on the multi-line display (see sample below) and pops up the window shown above.

Clicking on the QDCs in the pop-up window and then clicking [Post] adds the QDC codes to the multi-line display:

[Exit]: Click [Exit] to close the screen without adding QDCs to the multi-line display.
[Clear]: If QDC codes have been selected; i.e., there is a check mark in the box to the left of the procedure, clicking [Clear] removes all selections/check marks from the screen.
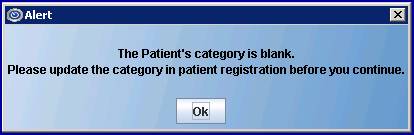
MODIFICATION Charges --►Charge and Schedule --►Appointment --►Full Day --►Surgery Tab
A change was made to prevent users from entering a charge for a patient with a blank name or category by displaying a message in the Charge screen and Appointment/Surgery screen:
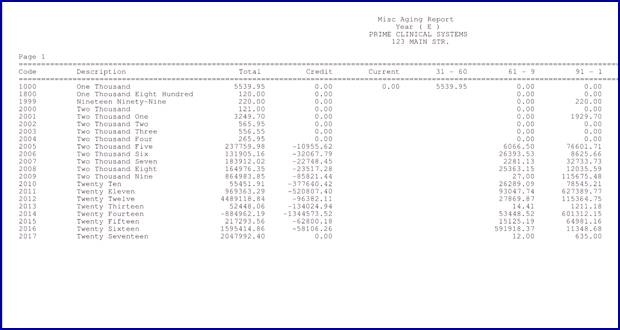
MODIFIED REPORT Management --►Aging -- Misc Aging Report
As of this update, the following changes have been made to this report:
• Insurances with a zero balance (i.e., where the amount in the Total column would be zero) no longer display on the report.
• The report is now sorted according to the Description column instead of the Code column.
• When users generate the Misc Aging report and choose 'Year' for the <Group By> field, the date is written in text format in the Description field:
FIX Management --►Aging --►Report Aging
Previously, when 'Balance' was selected for the <Sorted by> field, the output data was in random order. This problem has been corrected so that the report now prints in Balance order, highest to lowest.
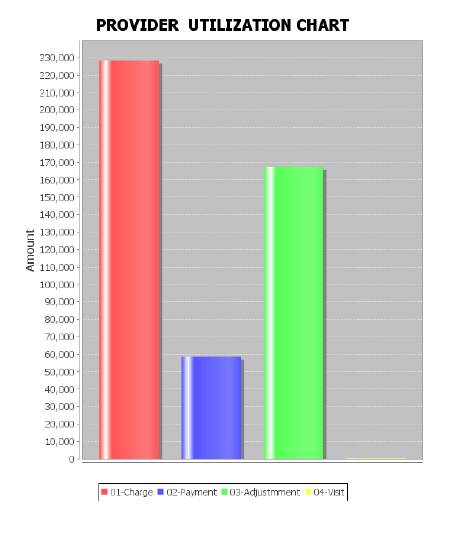
FIX Management --►Analysis --►Utilization -- Provider Utilization Report
In software version 17.02.17, when running the Management--►Analysis--►Utilization Provider Utilization Report and 'Cash' was selected in the <Cash/Accrual> field, the program was not calculating totals correctly for Charges, Payments, and Adjustments so the totals did not match those shown on the charts. This problem has been corrected.

FIX Management --►Analysis --►Detail -- Financial Analysis Report
In prior a prior software version, when running the groups as CPT for the first group and Insurance for the second group, the report would error out.

However, when Insurance was selected for the first group and CPT was selected for the second group, the report ran correctly. As of this update, the report works correctly no matter what order CPT and Insurance are selected.
MODIFICATION Management --►Detail -- Detail Payment/Adjustment Report
As of this update, changes were made to a portion of this report:
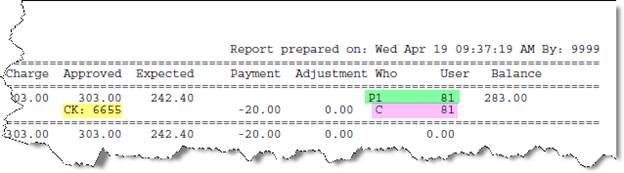
• The yellow highlighted area now displays the check number for the payment. The check number can be up to 16-characters in length, and is pulled from either Charges--►Charge <Payment>, or any of the payment options in the Payment Menu when the check number is included as part of the transaction.
• As a point of reference, the green highlighted area indicates the responsible party for the Who at the time the charge was posted, and the user who posted the charge.
• The pink highlighted area above indicates who is now responsible for the balance of the charge after the payment was made.
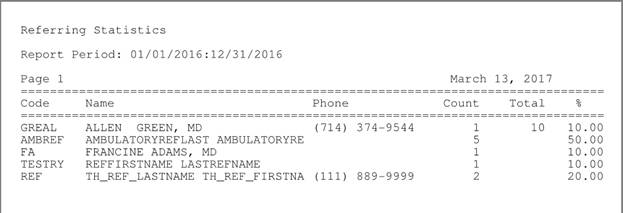
NEW REPORT Management --►Custom Report -- Referring Statistic Report
A new report is now available which is comprised of statistical information based on the referring providers/sources in Intellect. This report pulls the information from the patient registration records when a referral is populated in the <Referring Name> field.
The report information includes the referral name, count, total of referring, and percentage for each provider. Please note:
Count:The count is once per patient and pulled from the Registration/Referring
Total: Total per the report for ALL Referrals.
%: Percentage of the Total per referring.
NEW FIELD Utility --►Set Up --►Parameter -- <Quality Data Codes Method>
Effective this release, a <Quality Data Codes Method> field was added to the Modify PARAMETER screen:
![]()
This field affects which Quality Data Codes (also known as G codes) are posted when posting charges. To insure that charges posted with Quality Data Codes (QDCs) are reported, select the method applicable to your office ( 'Auto' is the default):
Auto: When 'Auto' is selected, every QDC associated with a procedure code on both Intellect and PCM are automatically posted. QDCs may be deleted on the Charges--►Charge Review screen.
Manual: With this option selected, when a charge is posted with a procedure code linked to a QDC, a window pops-up on the Charge screen which allows users to select which Intellect QDCs should be reported (see Charges --►Charge in this release note for information on the pop-up window). Note: PCM posts the QDCs automatically.
Both: The 'Both' option is a combination of the 'Manual' and 'Auto' options. With this option selected, Intellect responds the same as if 'Manual' were selected; i.e., a pop-up box displays on the Charge screen allowing users to select the QDCs they want posted. PCM responds the same as if 'Auto' were selected; i.e., all PCM QDCs are automatically posted. Note: QDCs may be deleted on the Charges--►Charge Review screen.
For additional QDC information in this release note, see Charges --►Charge, Utility --►Insurance --►Insurance <Report PQRS>, and Utility --►Procedure --►Procedure <Quality Data Codes>.
FIELD ACTIVATED Utility --►Insurance --►Insurance -- <Report PQRS>
A <Report PQRS> field was added to the Add INSUR_CO screen in the 17.02.17 release but was not active. As of this release, the field is now active to facilitate automatic reporting of quality measures, and operates as indicated below.
![]()
The 'Yes/No' options work as follows:
• Select 'Yes' from the drop-down for each insurance that is used in a claim involving quality measures.
Note: Quality Date Codes (QDC) must be set up in Utility --►Procedure --►Procedure <Quality Data Codes> for automatic reporting. See online documentation for Charges--►Speciality Charges--►MIPS Quality Measures (formerly PQRS) for additional information.
• The default for this field will be 'No', does not support PQRI reporting.

For additional QDC set up information in this release note, see Charges --►Charge, Utility --►Set Up --►Parameter <Quality Data Codes Method>, and Utility --►Procedure --►Procedure <Quality Data Codes>.
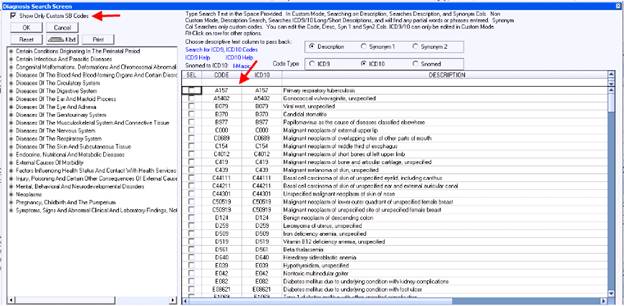
NEW FIELD Utility --►Diagnosis --►Diagnosis -- <PCM Favorite>
PCM users only. As of this update, a <PCM Favorites> field was added to the Add DIAGNOSIS screen so that PCM users will not have to search for frequently used diagnosis codes:
![]()
Selection choices are 'blank' (the default) and 'ZZZ101'. Leave this field blank for infrequently used diagnosis codes; enter 'ZZZ101' in this field for each diagnosis code that is a clinic favorite. Diagnosis codes with 'ZZZ101' in Intellect's <PCM Favorite> field will display on PCM's favorites list:
FIELD ACTIVATED Utility --►Procedure --►Procedure -- <Quality Data Codes>
A <Quality Data Codes> field was added to the Add PROCEDURE screen in the 17.02.17 release but was not active. As of this release, the field is now active for ease in reporting PQRI quality measures.
![]()
This field allows Quality Date Codes (QDC) to be linked to Procedure Codes which then enable Intellect to automatically send Quality Date Codes to Medicare when the associated procedure code is charged. For additional QDC set up information in this release note, see Charges --►Charge, Utility --►Insurance --►Insurance <Report PQRS>, and Utility --►Set Up --►Parameter <Quality Data Codes Method>.
MODIFICATION Utility --►Task Manager -- Subject Line on Reports
Effective in this release, clients can change what displays in the Subject line of the email for reports and/or files sent via the Task Manager. Please contact Support for more information.
FIX Utility --►Task Manager -- New Task option
In software version 16.10.11 a <Time> column was added to the Task Manager Task Table allowing each task to have its' own start time:
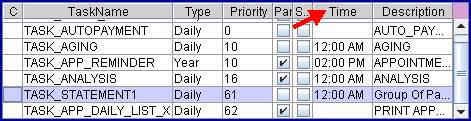
However, since its' initial release, when a new task was set up with a different time and parsed, the task just continued to run.
For example, as shown on the screen shot above, if a clinic has tasks scheduled via the Utility--►Set Up--►Clinic <Schedule Time> field (the Time column is blank), tasks scheduled at 12:00 AM, and then a task was scheduled at 2:00 PM, the task scheduled at 2:00 PM would just continue to run indefinitely.
This problem has been corrected in this release.
MODIFICATION Schedule --►Appointment --►Full Day --►Modify Appointment -- Cancel Twilio appointment
As can be seen below, a new pale pink confirmation code was added to the 'N' column to differentiate between appointments that are canceled by the patient via a Twilio appointment reminder and appointments that are canceled in the office:
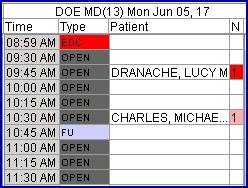
• Appointments display as red in the 'N' column when a patient receives an appointment reminder via Twilio and presses '2' to cancel the appointment. When a patient cancels his/her appointment, the <Confirmation> field displays the new option 'Patient Canceled':
![]()
• Appointments display as light pink in the 'N' column if they are canceled manually in the office by selecting 'Canceled' in the <Confirmation> field:
![]()
Note: For offices that do not have Twilio, office staff may change the color code in the 'N' column, as determined by their office, by choosing 'Patient Canceled' for red or 'Canceled' for pink.
Addendum
Appended 06/15/2017
MODIFICATION Schedule--►Appointment--►Full Day --►Appointment List Tab
As of this update, you may click on a column heading and drag it to a new location in the displayed column order. Closing the schedule and then reopening it returns the screen to the default order.