
Intellect™
IMPORTANT PROGRAM MODIFICATIONS
This update list includes the features and modifications made in the current update. Please review the entire document and pay close attention to the any items which have ATTENTION before the description of the feature as these will IMMEDIATELY affect Billing and other daily tasks:
Note: The update file for this version contains a zipped file. In order for the program to be able to unzip the file you MUST run Live Update twice. Once to pick up the unzip utility, and a second time to actually unzip the file. The file was too large to transfer unzipped. Due to the tables affected during this update, your office must be logged out of Intellect when updating the server. Clients who have already been updated have taken between 30 to 90 minutes to update the server. The time the update will take is dependent upon your server and the internet connection speed. For installation instructions, see the March Update 2010 Installation Procedure located in the Release Notes section.
If your office has previously updated to either version 9.12.01 or greater, you do NOT need to run the update tasks twice on either the server or the workstations.
You still must ‘Restart Services’ after updating the server.
Note: Due to the tables affected during this update, your office must be out of all tasks on the Charges and Payment menus while the update takes place. Dependent upon the speed of the connection to your server and your server speed, the update process should take approximately 60 to 90 minutes.
Note: If your office updates the Intellect program, you must ‘restart services’ when the update is completed. Directions to ‘Restart Services’ may be found in the OnLine Documentation. Search for Restart Service.
Effective version 9.12.03
Release March 23, 2010
Payment
NEW FEATURE Payment --►Open Item – displays Copay and Deductible:
It is now possible to see what the deductible and copay are for insurances other than the primary (P1) insurance. After pressing [Enter] on your keyboard after entering an amount in the <Amount Paid> field, Intellect will display a new popup screen to select the payment source. An example is shown below:

Choose the desired source and press [Enter] again to populate the <Deductible> and <Copay> fields in the Payment --► Open Itemscreen, as shown below. The information for the <Deductible> and <Copay> fields is pulled from the selected insurance.

For example, in the first sample screen above, you can select the secondary (S1) insurance and the <Deductible> and <Copay> fields will be populated with the deductible and copay of the S1 insurance. If you select CPAY, GUAR or REFUND, the program will display the deductible and copay for the patient’s current primary (P1) insurance.
Utility
NEW FEATURES Utility--►Set Up--►Security--►Login Users
There are two changes to the Login (password) set up in this update. The changes were made to help facilitate the management of operator’s passwords. Management may now modify an operator’s security, appointment group, etc without knowing the operator’s current password.
NOTE: With the changes to the Login User table, duplicate User (Operator) Numbers are not permitted. Therefore, if you have multiple Login User records with the same User Number, the update will reassign a new User Number to all but the first record it encounters with a duplicated User Number, including old users. Therefore, you may wish to review your Login User records and delete any which are no longer used, particularly if they have duplicated User (Operator) Numbers.
User Number: This is the unique number assigned to each operator. The number is used to track work done by each person and can be viewed in places such as the Ledgers and Appointment Schedule. To allow management to access an operators Login record without having the password, the <User No> field has been moved so it is now the first field on the screen. If modifying a record and you have the User No, enter it at the <User No> field and press [Enter]; if not, press the F2 key twice. A complete list of operators for the clinic will be display. Scroll down to the person whose record you wish to modify and press [Enter].
Temporary Password: This field allows you to reset an operator’s password. If set to ‘Y’ (yes), the next time the operator logs in the following message will pop up prompting them to enter a new password:
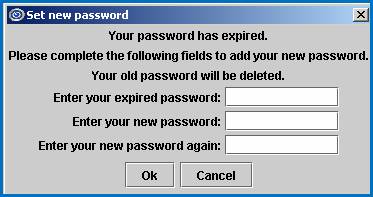
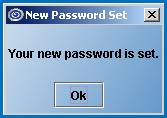
Using the Temporary Password feature will maintain the same security levels, operator number, and set up of the original password. After completing the fields and selecting [Ok], the following message will pop up confirming the new password has been set up successfully:
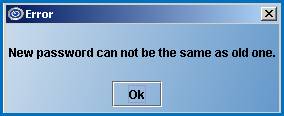
If the operator attempts to enter the same password, the following message will pop up. After selecting [Ok], the focus will return to the Set new password window.
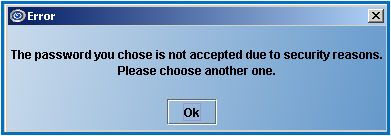
In some circumstances the new password may not be accepted, in which case the following message will pop up. After selecting [Ok], the focus will return to the Set new password window.
ATTENTION Prime Clinical Systems recommends that immediately after the update, management assure that access is provided to only those individuals who should have it by checking the following areas:
Settings for the Login Users menu
Security levels of all operators in each clinic
Settings for the Login User Menu
Verify the security setting for the Login User menu as follows:
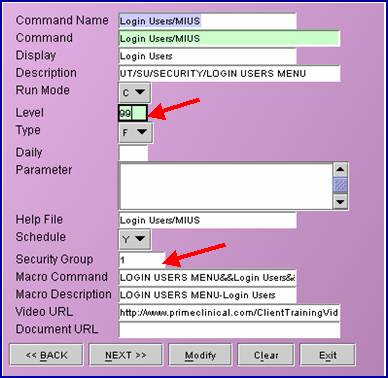
1. Go to Utility--►Set Up--►Menus--►Programs. At the Command Name field enter Login Users/MIUS. Your screen should look similar to the following. Note the security level and security group assigned to the Login User menu in your system in fields <Level> and <Security Group>.
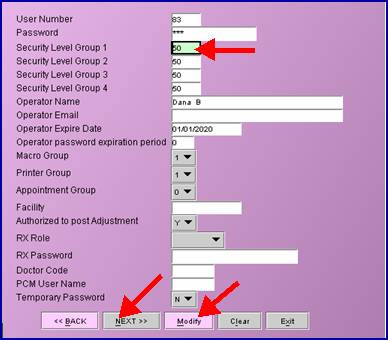
2. Go to Utility-►Set Up-►Security-►Login Users-►Modify. At the <User Number> field press [F2] and then, from the Search window, press [F2] again. This will list all of the users in this clinic. See example:

3. Highlight the first record and press [Enter] and then press [Enter] a second time. This will bring up the operator’s login record. Verify the Security Level for the applicable group. In our example it is Security Level Group 1.
4. Verify the security levels of all operators in each clinic as described below.
Security Levels of All Operators
For this procedure, start where you ended above and refer to the sample screen given in step 3.
To verify each operator’s login record, click on the [Next] button to go to the next record in the list. If you modify the operator’s security level, you must click on the [Modify] button to save the change before clicking [Next].
NOTE: Do NOT change User Number 999 and 998.
If your office would like assistance in verifying or modifying the security levels on your system please contact our Training Department.
Effective version 9.12.02
Release March 18, 2010
Billing
FIX Billing--►Tele Com --►Submit Claims – Electronic Billing of Secondary Claims
Previously, the Utility--►Insurance secondary insurance address was not submitted, and the payor office code was submitted as Paper in the COBA segment. In this update the payor office code has been included in the secondary electronic claims. When the payor office code is included, the address is not required. The secondary electronic billing issue has been fixed in the update.
Management
FIX Management--►Journal
Journal H – Payment History. When selecting to print for a specific operator, the program was selecting the operator who posted the charge, not the operator who posted the payment. This has been corrected in this version.
FIX Management--►Detail
In some circumstances, when Management --► Detail Report Code C was requested and the task was set to run as a local task, the report could not be printed. The issue has now been resolved in this version.
Utility
FIX Utility--►Insurance --►Insurance --►Print
In the past an “Ambiguous Column undefined” error would occasionally display when trying to print. This problem has been resolved.
FIX Utility--►Procedure --►Surgery Items --►Print
In a previous version, an error message would display after clicking the [Print] button. This has been corrected.
Schedule
FIX Schedule--►Appointment --►Print – Selection S
In the past when a specific provider was requested, the report treated it as a wild card and all providers were printed in the report. As of this release, the report now prints for just the requested provider.
FIX Schedule --►Appointment --►Full Day – Search/Reschedule or Cancel:
Effective in the 9.12.1 update, if you used the ‘right-click – Search option’ to find a patient’s appointment, and then selected to either Reschedule, Cancel, Postpone or Delete the appointment from the Appointment Search screen, the ‘Continued’ time slots were still displayed in the schedule. This has been corrected in the update.
Highlighting the appointment in the schedule, using right-click and selecting Reschedule, Cancel, Postpone or Delete from the drop-down menu did not have the same issue.
Effective version 9.12.01
Released March 8, 2010
Note: The update file for this version contains a zipped file. In order for the program to be able to unzip the file you MUST run Live Update twice. Once to pick up the unzip utility, and a second time to actually unzip the file. The file was too large to transfer unzipped. Due to the tables affected during this update, your office must be logged out of Intellect when updating the server. Clients who have already been updated have taken between 30 to 90 minutes to update the server. The time the update will take is dependent upon your server and the internet connection speed. For installation instructions, see the March Update 2010 Installation Procedure located in the Release Notes section.
If your office has previously updated to either version 9.12.01 or greater, you do NOT need to run the update tasks twice on either the server or the workstations.
You still must ‘Restart Services’ after updating the server.
Beta Test: With this update there are several new features which are still in a beta test phase. The features and descriptions are included in this release note and are flagged: BETA. If your office would like to begin using any of the features while they are still in beta test mode: please contact Prime Clinical Systems for additional information and set up.
E-Prescribing
Claims Scrubbing
Real Time Eligibility
Direct connection from Intellect to PCM
Note: Due to the tables affected during this update, your office must be out of all tasks on the Charges and Payment menus. Dependent upon the speed of the connection to your server and your server speed, the update process should take approximately 20 minutes.
Note: If your office updates the Intellect program, you MUST ‘restart services’ when the update is completed. Directions to ‘Restart Services’ may be found in the OnLine Documentation; search for Restart Service.
Registration
FIX Registration--►Worker
In the past, when trying to modify the Worker’s Insurance on Windows 2008 servers, there would be ambiguity errors. This has now been corrected.
FIX Registration--►Worker--►Insurance
In the past when insurance was modified, the [NEXT] button wouldn’t take you to the next insurance screen; it would only display the P1 insurance. This has now been corrected.
FIX Registration-►Registration-►Print
In a previous update an error occurred when searching for a patient the Printer Dialog box would not pop up, and you were not able to print a Registration form. This has been fixed with the update.
NEW OPTION Registration--►Regular--►Patient - <Hispanic> field
The <Hispanic> field is now available as an optional field on the Regular Patient registration screen. The <Hispanic> field accommodates the UDS report question of, “Do you consider yourself to be Hispanic?”.
![]()
![]()
Select [Yes] if the patient considers himself/herself to be Hispanic
Select [No] if the patient does not consider himself/herself to be Hispanic
NOTE: This field is optional and therefore will not automatically be inserted on your patient screen. If you are interested in having the Hispanic field added please contact Prime Clinical Systems.
Charges
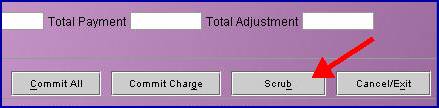
BETA NEW FEATURE Charges--►Charges - Claims Scrubbing
A new [Scrub] button has been added to the Charges screen to facilitate claims scrubbing. This feature is a real-time accuracy check that can be used while entering charges. The scrubber checks:
Validity of Codes: verifies the CPT, ICD9, Modifier and Place of Service codes submitted are valid codes.
Suspicious units (Medically Unlikely Edits, or MUE): verifies the validity of the units submitted for a CPT code.
CCI Edits: This includes over 1 million edits published by the Centers for Medicare and Medicaid, which adds edits on a monthly basis.
Age and Gender: the age and gender of the patient will be validated against the codes submitted.
RVU Ordering: will notify if the highest RVU procedure is not the first procedure submitted. Only the first procedure is verified.
The [Scrub] button is located in the bottom right corner of the Charges screen, as shown below:
To use Claim Scrubbing, you must be running Intellect software version 09.12.01 or greater. Additionally, the server and each workstation which will use the Claim Scrubbing feature must have a current jre file. The file is included in the program update, and is located in the home/staff/app/tmp folder, named jre1.6.zip. Manually unzip the file by right clicking and selecting Extract All. Failure to do this will result in the error message "Could not find trusted certificate".
Before using this feature, the system needs to be set up as follows:
1. Sign-up with Silver Bill-It at http://www.silverbillit.com.
2. Set up an Insurance Co. Code called CCI. This is not a real insurance company, but a CCI insurance code needs to be set up for scrubbing to work.
2.1 Go to Utility--►Insurance--►Insurance--►Add.
2.2 To set up the CCI insurance code, only the following fields need to be filled:
<Insurance Co. Code>: Enter CCI
<Name>: Enter CCI – do not delete
2.3 Click on the [Add] button.
3. After the CCI insurance company code has been added, the CCI insurance needs to be set up at Utility--►Insurance--►Tele Com--►Add. The only fields that need to be filled in on this screen are as follows:
<Insurance Code>: Type in CCI
<Login>: Enter the login as given to you by the vendor.
<Password>: Enter the password as given to you by the vendor.
<Transmission Method>: From the drop-down list, select Silver Bill.
<FTP Site>: Select the Silver Bill-It site as shown below:
![]()
4. Once the claims scrubbing feature has been set up, it can be used on the Charges screen located at Charges--►Charges.
NEW OPTION Charges--►Encounter--►Generic--►<Medicare Status> field
Medicare status codes are required for Charpentier claims (in all other circumstances, these codes are optional). To accommodate the status codes, the <Medicare Status> field now has a drop-down screen as shown below:
![]()
![]()
With the pointer in the <Medicare Status> field, press [F2] to display descriptions for each of the choices:
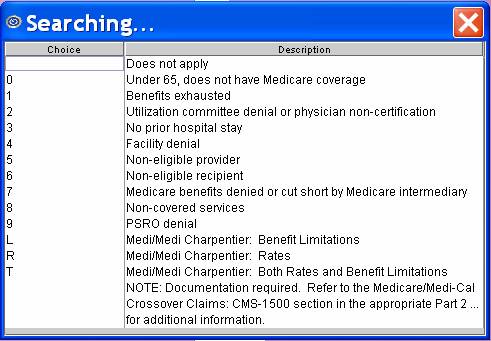
NOTE: For all options except ‘0’, documentation is required. Refer to the Medicare/Medi-Cal Crossover Claims: CMS-1500 Section in the appropriate Part 2 Manual for additional information.
NEW FIELD Charges--►Encounter--►OB/GYN
A new field, as shown below, has been added to the Add OBGYN screen.
![]()
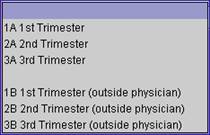
This field is used primarily with UDS reports. Only ONE response is allowed per pregnancy.
If the patient’s first appointment for this pregnancy was in your office, choose from:
1A First Trimester
2A Second Trimester
3A Third Trimester
If the patient’s first appointment for this pregnancy was by a physician OUTSIDE your office, choose from:
1B First Trimester (outside physician)
2B Second Trimester (outside physician)
3B Third Trimester (outside physician)
Payment
FIX Payment--►Apply Receipt
In prior versions, OSI was not able to post receipts based on ‘Entry Date of Receipt’. This has now been corrected.
In prior versions, Apply Receipt was not noting in the treatment history file that the source of payment was from the patient. Therefore, if printing only insurance payments on the HCFA claim form, the payment was including the patient payments posted using Apply Receipt. This has been corrected in the update.
MODIFIED FEATURE: Payment--►Open Item
To simplify payment posting when a deductable has been applied we’ve implemented two changes in Payment Open Item if using Method A (in the header section of the screen), and Command column option M.
1 - Prior to this update the program always calculated the Payment when using the above combination by multiplying the Approved by the Percentage.
Effective this update if you enter a 0 (zero) in the Payment column: the program will not over- ride the zero payment you entered by calculating the Approved times the Percentage.
2 – Prior to this update the payment would calculate by multiplying the Approved by the Percentage. If a Deductable was entered: the payment was not reduced.
Effective this update if you enter a Deductable amount: the program will calculate the payment by multiplying the Approved by the Percentage then subtracting the Deductable. In this case do NOT enter a zero in the payment column.
Ledger
FIX Ledger--►Accounting and Open Item--► Display --►Comment screen
When claims are billed the amount is placed in the comment line on the second screen of both Ledgers. However, an incorrect claim amount was inserted when the Utility Telecom <Special Requirement> field was set to “U”. Note: “U” is used only for electronic billing of Institutional Claims summarized by Revenue Code. This has now been fixed.
MODIFIED FEATURE Ledger--►Accounting and Open Item--► Display --►’V’
If a remark was entered in the Ledger for a specific charge (by highlighting the charge and pressing A) the letter R is displayed in the far, right column of the Accounting Ledger.
![]()
When pressing ‘V’ in the command line of the charge Intellect, displays the remark.
![]()
In the past, when pressing ‘Q’ in the command line, the focus would go to the doctor/balance screen. With this update, pressing ‘Q’ will work the same as pressing ‘B’ in that it returns focus to the first screen of the Accounting Ledger.
Billing
NEW OPTION Billing--►Insurance - Paper Claim
ATTENTION Due to changes to the MediCal Anesthesia billing requirements for Box 19, effective by MediCal 11/1/2009, it is no longer necessary to print the Anesthesia Start and Stop times, and Total time.
NEW FEATURE Billing--►Statement
When printing the patient name and address on the patient statement, Intellect now has the ability to print the first name and last name separately.
NOTE: The change has NOT been applied to your statement. If you would like to have the formatting of the patient name modified please contact Prime Clinical Systems.
FIX Billing --►Statement --►Batch or Group of Patients – Statement Grouping by Provider
Effective this update: if the Utility Provider <Statement Group> field was left blank or set to 0, causing the treatment history record to have an invalid group code, when printing statements the program will group the charges in Statement Group 1.
NOTE: This change affects only charges when at the time of posting the Utility Provider Statement Group field was left blank, or had an invalid option entered.
FIX Billing --►Worker --►Attorney
In the past, under specific circumstances, the Attorney Statement would not print. This has been corrected.
Management
FIX Management--►Analysis report code HH
In a prior version, the Adjustment by Provider report was not printing when the <To Date> selected was still open. This bug has been fixed.
NEW FEATURE Management--►UDS Report – New Reports
Uniform Data System (UDS) reports allow you to print out patient information based on several criteria. Six Uniform Data System (UDS) reports have been added to the Management menu: Patients by Zip Code, Patients by Age by Gender, Patients by Race and Language, Patients Characteristics, Patients by Diagnosis and CPT, and Patients Quality of Care Indicators. These correlate to UDS reports and can be accessed as shown below.
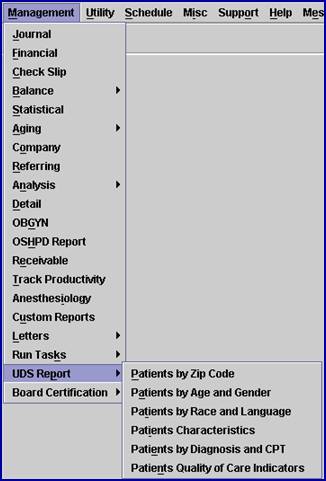
A brief description of each report follows. For additional information on setting up and running these reports, please contact PCS support or consult the online documentation: Management--►UDS Report.
1. Patients by Zip Code:
For patients that have had charges within the date range, the Patients by Zip Code report, which correlates to UDS Report Patients by Zip Code, gives a unique patient count displayed by home address zip code. If the zip code field on the Registration screen is left empty, a total for unknown zip codes appears as the last entry and the zip code column will be blank as it matches the value entered in the zip code field on the Registration screen. This report can be limited by Facility or the Category of the patient at the time charges were posted.
2. Patients by Age and Gender
For patients that have had charges within the date range, the Patients by Age and Gender report, which correlates to UDS Report Table 3A: Patients by Age and Gender, offers a unique patient count by age and gender. The information on the report is displayed by age for each year up to 24-years old. After 24-years-of-age, the age is displayed in age groups. Each age listing is divided by male and female. The patient’s age is calculated for the date entered in the <Date> field (6/30/YYYY) when selecting the report.
3. Patients by Race and Language:
For patients that have had charges within the date range, the Patients by Race and Language report, which correlates to UDS Report Table 3B: Patients by Hispanic or Latino Identity/Race/Language, displays patient information by both race and language, and gives a unique patient count for all patients whose language is NOT English. This information is picked up from the Patient <Ethnicity> and <Language> fields.
4. Patients Characteristics
The Patients Characteristics report provides patient counts for UDS Report Table 4. This report presents the Table 4 information in four sections. Each section is listed below, along with its' selection criteria:
1. Income as Percent of Poverty Level
This part of the report groups the patients based on the patient's poverty level.
2. Principal Third Party Medical Insurance Source
Line 7 of this section includes all patients set in any of the conditions that follow:
Patient Category type = G (Patient/Guarantor)
Patient Category type not = C (Company Account)
Patient without insurance coverage = P1 and coverage to is completed in P2 or P3.
Line 8a-12 groups the patients based on their insurance category, as set up in Utility>Insurance, for patients where:
Patient Category type not = G (Patient/Guarantor)
Patient Category type not = C (Company Account)
Patient has only one Primary insurance (P1) where <Coverage To> is blank
3. Managed Care Utilization
This section is left blank.
4. Characteristics-Special Populations
Lines 14 and 15 are based on the Patient <Status> field
Lines 17-22 are based on the Patient's living value shown in the <Residing At> field
Line 24 calculates the number of patients with Place of Service = School , as set up in Utility --> Facility
5. Patients by Diagnosis and CPT
For patients that have had charges within the date range, the Patients by Diagnosis and CPT report provides patient and visit counts for UDS Report Table 6A based on the <UDS Group> setting in Utility/Diagnosis and Utility/Procedure. All services and diagnosis codes billed by the practice are not included on this report.
6. Patients Quality of Care Indicators
For patients that have had charges within the date range, the Patients Quality of Care Indicators report provides patient counts for UDS Report Table 6B. This report presents the Table 6B information in four sections. Each section is listed below, along with its' selection criteria:
Age of Prenatal Patients, where the data is based on patients within a range of ICD9 Codes.
Trimester First Seen for Prenatal Care, where the patients are grouped based on the value of the Trimester in the Encounter Screen
Childhood Immunizations, indicated on line 10, which displays the patients that had CPT codes with a <UDS Group> of UDS 24.
Pap Tests, indicated on line 11, which displays the patients that had CPT codes with <UDS Group> of UDS 23.
For more information about UDS reporting requirements, refer to the U.S. Department of Health and Human Services information at http://hrsa.gov/data-statistics/health-center-data/reporting.
FIX Management--►Track Productivity
The Track Productivity report would sometimes encounter a problem when running the task on the server. This has now been fixed.
FIX Management--►Journal
When printing a journal and selecting Sort Option F, order of posting, the report was not sorting in the correct order. This has been fixed in the update.
FIX Management--►Detail
When requesting the Detail report option P or A, it printed the charges, payments, and adjustments separately instead of having them all together. This has now been fixed.
NEW OPTION Management--►Board Certification
A new Board Certification option has been added to the Management menu which allows providers to send an excel file to certification boards on-line. This option has the two sub-options of Board Report and Board Excel File that can be accessed as shown below.
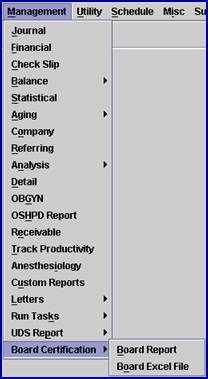
The Board Report option provides a printed report which also includes data that is not required in the Excel file but may be useful if your office is reviewing records; for example, Patient Name, Date of Birth, and the Facility Code. Running this report is optional to print, and is not a requirement of board certification.
The Board Excel File formats the Board Report into Microsoft Office Excel format. Note that this report includes only the required information of Case#, Age, Gender, DOS, ICD-9 Code, and CPT, E&M or HCPCS Codes. Headings must be manually entered by your office before submitting the file to the certification board.
For additional information on setting up and running these reports, please contact PCS support or consult the online documentation.
Utility
NEW FIELD Utility--►Diagnosis – <UDS Group>
To accommodate Uniform Data System (UDS) information, a <UDS Group> field has been added to the DIAGNOSIS screen, as shown below:
![]()
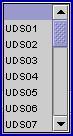
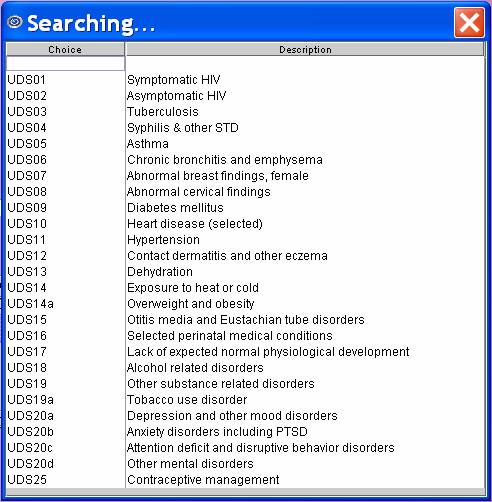
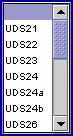
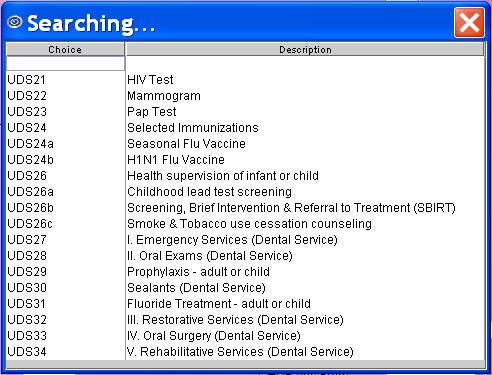
When updating your server to the current version: the UDS Group will be updated for you. If you add any new codes in the future you will need to select the correct UDS Group. This field MUST be completed if your office runs UDS reports. If your office does not use UDS reports, accept the “blank” default; otherwise, use the drop-down list to select the UDS Group that corresponds to this DX. Pressing [F2] in the <UDS Group> field will display the following list of UDS codes and their descriptions.
FIX Utility--►Procedure <Billing>
Even though they were not transmitted electronically and were for an Electronic Billing Carrier other than the carrier selected, claims whose <Billing> field equaled ‘Paper Claims Only’ were included on the Electronic Billing Report with the note “Not sent” displayed in the comment column. This has now been corrected.
NEW FIELD Utility--►Procedure--►Procedure - <UDS Group>
To accommodate Uniform Data System (UDS) information, a <UDS Group> field has been added to the PROCEDURE screen, as shown below:
![]()
When updating your server to the current version: the UDS Group will be updated for you. If you add any new codes in the future you will need to select the correct UDS Group. This field MUST be completed if your office runs UDS reports. If your office does not use UDS reports, accept the “blank” default; otherwise, use the drop-down list to select the UDS Group that corresponds to this Procedure. Pressing [F2] in the <UDS Group> field will display the following list of UDS codes and their descriptions.
FIX Utility--►Provider
In prior versions there was a bug in the Provider Screen which prevented the user from saving changes when modifying the <Cost Ctr/Dr> field from C to D and the number of provider licenses purchased was equal to the number of provider records having ‘D’. This has been fixed.
NEW FEATURE Utility--►Tools--►iReport
The iReport option is available for clients to write custom reports. To access the iReport option, go to Utility --►Tools --►iReport. Since iReport is an off-the-shelf product made available for software developers’ use, Prime Clinical Systems does not provide training or a manual for iReport. Clients who choose to use this option must purchase a manual from a third-party software vendor.
NEW FIELD Utility--►Insurance--►Insurance
A new <Category> field has been added to the Insurance screen, as shown below.
![]()
This field is for use with UDS reports and supports information given on UDS’ Table 4 Selected Patient Characteristics. Each of the options supports third party medical insurance sources, as defined below. The following chart is available by pressing [F2] in the <Category> field.
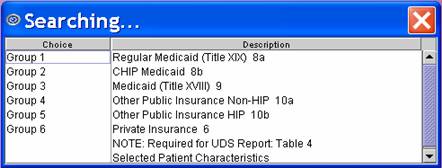
NOTE: Although initial use of this field is for UDS reports, in the future it will be used for other Intellect reports.
BETA Direct connection from Intellect to PCM
NEW FIELD Utility--►Set Up --►Clinic
A new field, as shown below, has been added to the Add CLINIC screen. This field has been added to facilitate a future interface between Intellect and PCM. If you are interested in finding out more about this feature, or would like to begin using it during the beta test phase contact Prime Clinical Systems Intellect support.
![]()
![]()
[No] indicates the client does not currently have PCM.
[Yes] indicates the client does have PCM.
NEW FIELD Utility--►Set Up --►Security --►Login Users
The Add SECURITY screen now has the new field shown below. This field has been added to facilitate a future interface between Intellect and PCM. If you are interested in finding out more about this feature, or would like to begin using it during the beta test phase contact Prime Clinical Systems Intellect support.
![]()
Schedule
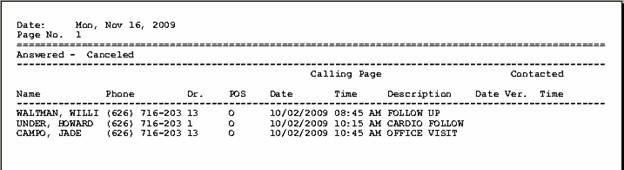
FIX Schedule--►Appointment--►Print
The CallSTAFF report code B would sometimes fail dependent upon the date range entered. This bug has been fixed and the heading was also modified. See report sample below.
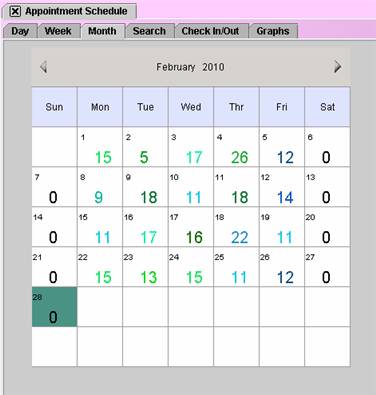
FIX Schedule--►Appointment--►Full Day--►Search – Month
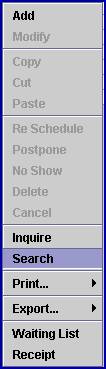
When viewing the Month screen (see below), the total appointments for dates were not calculating correctly. The problem occurred when using the Appointment Schedule right-click Search option (see below) to do a Search for patient’s appointments and then an appointment on the Search list was rescheduled. The change was not reflected on the Month schedule. This has now been corrected.
FIX Schedule--►Appointment--►Full Day--►rt click Search – Reschedule
When rescheduling an appointment from the right-click Search option: when pasting the appointment to the new time slot: the wrong appointment type and length were copied. This has been fixed.
NEW OPTION Schedule--►Appointment--►Receipt--►Print Report Receipt
A new <Date Selection> field has been added to the Print Report Receipt screen, as shown below:
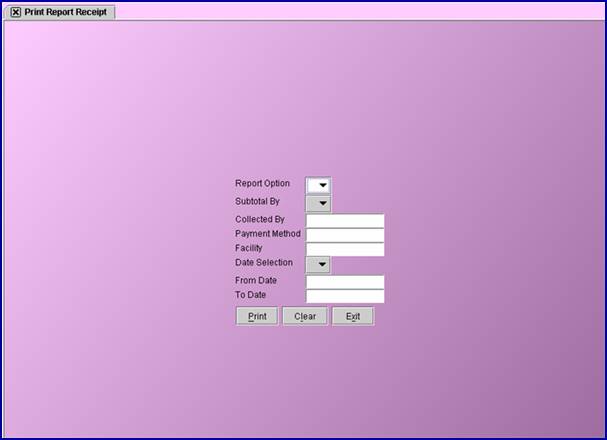
The <Date Selection> field has a drop-down menu which allows the user to choose whether to use the date the receipt was entered or the date of service.
![]()
![]()
[E] Use the calendar date the receipt was entered.
[S] Use the actual date services were provided.
NEW OPTION Schedule--►Appointment--►Print
It is now possible to have a referring phone number and/or a fax number on the appointment report. If you would like this option, please contact Prime Clinical.
NEW OPTION Schedule--►Appointment--►Full Day -- CallSTAFF
CallSTAFF clients may now place multiple calls to patients with scheduled appointments. For example, a patient may now be called two weeks prior to his/her appointment and then again two days prior to his/her appointment. The second message may be different than the initial message. For more information contact PCS.
BETA NEW OPTION Schedule--►Appointment--►Full Day -- Eligibility
Intellect now offers an Eligibility option for real-time, immediate verification of patient insurance. Eligibility may be verified either from the Appointment Add screen at the time the appointment is scheduled, or by right-clicking on an already scheduled appointment and selecting either Inquire or Eligibility. All three screens have a button for [Eligibility] located at the bottom of the window.
Another available option is submitting a batch file for all patients with an appointment scheduled for a single day. This method of Eligibility Verification would usually be set up as an automated task, but could be manually run by the client if they wish to.
The eligibility information is kept indefinitely and may be viewed at any time.
Before using this feature, the system needs to be set up as follows:
1. Sign-up with Ingenix/ENS, Gateway, or P-Verify. When your enrollment is complete, provide PCS with your login and password for set up.
2. Enter your vendor-assigned login and password information into the Tele Com screen at Utility--►Insurance--►Tele Com--►Add. The only fields that need to be filled in on this screen are <Submission Script>, <Login>, <Password>, <Transmission Method>, and <FTP Site>. Depending on your system, a new Utility Insurance record may need to be added. Contact PCS if you need assistance.
3. NEW FIELD Enter the insurance code of the vendor into the <Default Eligibility> field on the Parameters screen located at Utility --►Set Up --►Parameter
4. Go to Utility--►Insurance --►Insurance --►Modify and complete the <Eligibility> field for the vendor’s record and all eligible insurance carriers based on the Payor lists provided by the vendor.
For additional information, please contact your trainer.
Electronic prescribing or ‘e-prescribing’ is a way of prescribing which is paperless. Physicians use their computer, with software which has been tested and certified, to electronically route the prescription to the patient’s choice of pharmacy. Pharmacists may electronically send renewal requests to the physician’s office for approval.
Electronic prescriptions are sent from your server through NewCrop, a third-party vendor. Clients interested in E-Prescribing through Intellect must first register with NewCrop. There are no monthly fees paid to Prime Clinical Systems, though NewCrop charges a monthly fee per each authorized person writing E-Prescriptions.
Other services available through NewCrop include Medical benefit checking, and Formulary Checking with the Rx Hub. When the patients’ prescription is received, the insurance is automatically assigned to it, and formulary checking begins to verify if the medication is covered. The Rx Hub also tracks and reports what other drugs the patient has been prescribed and, when needed, can list therapeutic alternatives. To learn more about NewCrop's services, visit their web site at www.newcroprx.com
Intellect Interface
NewCrop’s E-Prescribing can be accessed via Intellect either through the Appointment Schedule or from Intellect’s main menu by using the Clinical option.
1. Intellect Appointment Schedule
In the Appointment Schedule option, NewCrop’s E-Prescribing can either be accessed from new buttons located at the bottom of the Inquire Appointment screen or from the new options on the right-click menu.
1.1 Inquire Appointment Screen
NEW OPTIONS Schedule--►Appointment --►Full Day – Inquire
To access E-Prescribing, use the new [Compose RX], [Data Entry], and [RX Status] buttons at the bottom of the Inquire Appointment screen, as shown below.
![]()
[Compose RX] The Compose RX button allows a Doctor, or someone at the correct password level, to access E-Prescribing to generate a prescription for a patient.
[Data Entry] The Data Entry button allows access to NewCrop’s E-Prescribing to all four different types of users; i.e., Doctor, Nurse, Staff, and Mid-level.
[RX Status] The RX Status button allows a Doctor, or someone at the correct password level, to access E-Prescribing to check on the status of a prescription for a patient.
When one of the buttons described above is selected for a user who is set up on the system, a pop-up window will ask for that user’s password. This password is set up on the Add SECURITY screen. Successfully entering the user password takes the user to the NewCrop program. Once a user enters the NewCrop program from Intellect, an [OnStaff Intellect] button displays at the bottom of the screen to facilitate re-entry into Intellect from the NewCrop program.
1.2 Right-Click Menu
NEW OPTION Schedule--►Appointment --►Full Day – RX
When using the Appointment Schedule right-click menu, shown below, access E-Prescribing menu options by clicking on the new [RX] option.
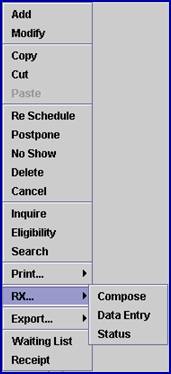
After you click on one of the new sub-options of [Compose], [Data Entry], or [Status], a pop-up window will ask you for your password. This password is set up on the Add SECURITY screen. Successfully entering your password takes you to NewCrop’s E-Prescribing program.
Once a client enters the E-Prescribing program from Intellect, an [OnStaff Intellect] button displays at the bottom of the screen to facilitate re-entry into Intellect from the E-Prescribing program.
2. Intellect Main Menu
Additionally, an [RX] button and Clinical menu option have been added to Intellect’s main menu to facilitate ordering prescriptions and checking on the status of prescriptions already ordered.

2.1 NEW FEATURE [RX] Button
The RX button can be a solid white, green, yellow, or flashing red and white.
White: Indicates the server is connected and there are no pending pharmacy calls (refills) or faxes.
Green: Indicates there are pending pharmacy calls (refills), or faxes. The system checks the status every 5 minutes, but you can also re-login to update.
Yellow: Indicates the jre file needs to be updated to 1.6. Contact Prime Clinical Systems and open an Intellect support reference.
Flashing Red and White: Flashing can occur when the server can not be reached. Hovering a mouse over the flashing [RX] button will display a statement stating the reason the button is flashing.
Someone at the correct password level, such as a doctor, can click on this button and be taken directly to Intellect’s Clinical--►Check RX Status option. This option is described below.
2.2 NEW OPTION Clinical
The new Clinical menu option has three sub options: Compose RX, Check RX Status, and RX Data Entry, as described below.
2.2.1 NEW OPTION Clinical --► Compose RX
The Compose RX option allows a Doctor, or someone at the correct password level, to access E-Prescribing to generate a prescription for a patient.
2.2.2 NEW OPTION Clinical --► Check RX Status
The Check RX Status option allows a Doctor, or someone at the correct password level, to access E-Prescribing to check on the status of a prescription for a patient.
2.2.3 NEW OPTION Clinical --► RX Data Entry
The RX Data Entry option allows access to NewCrop’s E-Prescribing to all four different types of users; i.e., Doctor, Nurse, Staff, and Mid-level.
3. Intellect Set Up
NEW FIELDS In order to use the E-Prescribing option, the following new fields in Intellect also need to be set up according to your trainer and/or online documentation.
3.1 Utility--►Set Up--►Clinic
Set up the <RX Server (Production or Preproduction)> field on the Add CLINIC screen.
3.2 Utility--►Set Up--►Security
Set up the <RX Role>, <RX Password>, and <Doctor Code> fields on the Add SECURITY screen.
3.3 Utility--►Set Up--►System
Set up the <RX> field on the Add SYSTEM screen.
3.4 Utility--►Provider--►Provider
Set up the <RX> field on the Add DOCTOR screen.
Contact your trainer or consult the online documentation for additional information.
Miscellaneous Items included in the update:
The following three modifications are applicable only for clients who import charges from Patient Chart Manager to OnSTAFF Intellect.
NEW FEATURE: When the PCM Individual Users--►Program Set Up--►Misc <Charge Posting Hold/Send Ins> is set to the default value Y and charges were imported into Intellect, the charges were not linked to the patient’s primary insurance. As a result, the charge would need to be modified before billing the insurance. For example, the correct primary insurance (P1 or P2, etc), the pay plan, approved amount from the fee schedule, etc. needed to be entered.
With this update, when Individual Users--►Program Set Up--►Misc <Charge Posting Hold/Send Ins> = Y, the import program will assume the insurance is the P1 Primary Insurance and use that insurance to find the correct pay plan and approved amount, and the insurance code will be inserted into the treatment history record. This change will reduce the amount of work and changes needed after importing charges.
NEW FEATURE: When the PCM charges were imported into Intellect, the charges were not linked to the Utility--►Procedure <Modifier>. The modifier would either need to be entered in PCM before the charges were imported, or in Intellect after the charge was imported.
With this update, as the charges are being imported, the program will look to see if a modifier was entered in PCM. If it was, no change will be made.
If a modifier was not entered in PCM, the program will pick up the patient’s primary insurance and check the Utility --►Insurance <Code (R,C,E,U)> field to determine which Utility --►Procedure <Modifier> to add to the charge.
NEW FEATURE: Imported Charges report. When charges are imported from PCM to Intellect, the program will automatically print a report defining charges which were inserted into the treatment history table and those which could not be imported.
For each imported file, a report is automatically sent to your designated printer. Please advise Prime Clinical which printer to set up to print the report.
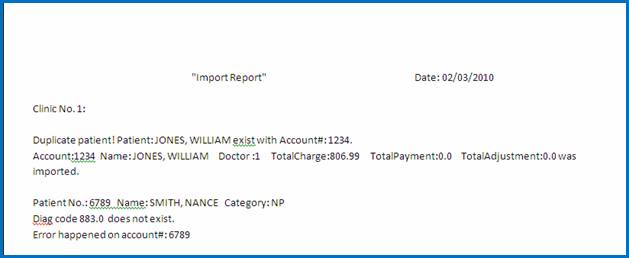
A file for this report is also kept in the report folder. To find the location of your report folder, go to Utility --►Set Up--►Parameter--►View and complete the <Clinic No.> field. Once the screen has populated, the <Path File> field will display the directory of the report folder.