IntellectTM
IMPORTANT PROGRAM MODIFICATIONS

The following Release Notes include the features and modifications made in the current update. PCS suggests you provide each department a copy of the Release Notes so they are aware of the changes which may affect their department.
In order to be aware of ALL changes in the software, please read all release notes from the version you are currently on through to the version to which you are updating.
Update may include items labeled ATTENTION which will IMMEDIATELY affect Billing and other daily tasks. Please be sure to notify all departments which will be affected.
If you would like to update to the latest version, please click here for authorization forms and instructions.
Note: The instructions to update to version 16.02.22 and greater differ from previous update instructions. Please be sure to follow the instructions specifically for version 16.02.22 and greater.
Effective version 16.05.20
Release Date: May 20, 2016
Version 16.05.20 New/Enhanced Features Announcement
Our New and Advanced Features Webinar is held the 1st Friday of every month from 1:00 - 2:00 p.m. PDT. Register today.
Known Issue:
Worker's Comp
In version 16.05.20 there was a Known Issue in that the program did not pull electronic billing attachments when claims were being transmitted.
This problem will be corrected in the next update.
Management--►Analysis--►Detail -- Financial Analysis Report
In both versions 15.10.15 and 16.05.20 there was a Known Issue that when a Financial Analysis Report was run, if 'Accrual' was selected for the <Cash/Accrual> field, Intellect displayed this pop-up message:
This problem will be corrected in a future update.
MODIFICATION Charges--►Encounter -- <Internal Control> Field
In prior versions, for the ICN to be included in the Electronic Claims, the ICN had to be entered in the <Internal Control> field. Effective this version, Intellect now pulls the ICN number from the charge. This is handled by Intellect when Autoposting is used to post payments from the payers. This modification is NOT retroactive. Additionally, this ICN now also prints on the printed EOB from Intellect.
MODIFICATION Charges--►Encounter--►Global and Charges--►Encounter--►OB/GYN -- <Box 19 Claim Notes> Field Size Increased
A new requirement for OB Patients for Global Billing requires providers to now include 13 ante partum visits on the HCFA 1500, whether sent on paper or electronically.

To accommodate this change, the <Box 19 Claim Notes> field has been increased to allow more characters.
HCFA 1500 form changes will be available on a later release.
NEW FIELD Payment--►Auto Payment -- EB Internal Control Number
When an Electronic ERA is used to post payments, an Internal Control Number (aka ICN) is always included in the file. With this version of Intellect, the ICN number is now included in the Electronic claim file when billing the secondary.
FIX Payment--►Auto Payment -- Printing Secondary
In previous versions, when selecting to print the secondaries for the non-crossover claims and patients have multiple payments included in separate checks on the same ER/835, Intellect was printing the same charges that HAD PREVIOUSLY BEEN PRINTED within the same transaction.
This issue has been resolved in the current version so that when the same scenario is played out on the Autopost, Intellect now only prints those secondaries that have not yet been printed and marked as billed.
Billing
FIX Billing--►Tele Com--►Eligibility -- PCP
In software version 16.02.22, there was a Known Issue with eligibility related to the PCP where the PCP's name displayed as last name, last name, although the ELIG return did have the first name. This problem has been corrected in this update.
FIX Billing--►Insurance--►Group of Patients--►EOB
In version 16.02.25, when one selected the GOP for the EOB print and a patient in the batch didn’t meet the Insurance criteria, the entire process would fail with an error – Record Not Found’.
In this version, the program has been corrected to allow the report to complete; however, the patient with the issue will not print.
Management
FIX Management--►Analysis--►Utilization - Month to Date Utilization by Provider Report
In software version 16.02.25, when running the Month to Date Utilization by Provider report there was a Known Issue in that payments and adjustments were not included. This problem has been corrected in this update.
NEW REPORT Management--►Detail - Benchmarking Report
The new Benchmarking Report shows the cost effectiveness of procedures performed by an individual provider. See a sample Benchmarking Report in the online documentation. Before the Benchmarking Report may be run, all the supplies used in each procedure performed by each provider must be set up in Utility--►Procedure--►Supply . See Utility--►Procedure--►Supply in the online documentation for details.
Utility
MODIFICATION Utility--►Set Up--►Clinic
To match terminology used by authorize.net, two field names have been changed:
<Credit Card Authorization Login> is now <Credit Card API Login ID>
<Credit Card Authorization Password> is now <Credit Card Transaction Key>
NEW FIELD Utility--►Set Up--►System--►Modify - <Supply> Field
A new <Supply> field was added to allow clinics to share Utility--►Procedure--►Supply information:
![]()
Users must enter the clinic number that holds the original data. See NEW MENU OPTION Utility--►Procedure--►Supply in this release note for additional information.
NEW FIELD Utility--►Set Up--►Appointment--►Appointment Type--►Modify - <Add Task> FIeld
In this release, an <Add Task> field has been added to the Modify APPOINTMENT TYPE screen. As of this update, only the 'None' and 'Manual' options are functional -- new fields will be added to this screen in a future release to support the 'Automatic' option.
With 'Manual' selected in the <Add Task> field for an appointment type, when an appointment is scheduled for that appointment type, the Office Task Manager option pops up. Through the Office Task Manager, the person making the appointment can assign a task that needs to be completed in conjunction with the appointment. For example, if the appointment type is Surgery, a task could be assigned for completion of pre-surgery lab work. See Office Task Manager in this release note or in the online documentation for additional information. See also Schedule--►Appointment--►Full Day - Add Appointment Dialog Box in this release note.
Note: Each appointment type can only be set to either allow the Task Manager to display when scheduling an appointment, or it can be set to allow patients to check-in/self-schedule appointments through patient portal -- it cannot be set to perform both functions.
To utilize the Task Manager option, the <Self Sched Treating Provider> and <Self Sched First Avail> fields must be set to 'N', the <Self Sched Description> field must be empty, and the <Add Task> field must be set to 'Manual'.
For more information on patient appointment scheduling, see the online documentation.
NEW FIELD Utility--►Set Up--►Parameter - <Create PCM Chart> Field
For PCM users only. If set to YES, the new <Create PCM Chart> tab automatically creates a Chart/MEDICAL RECORD # in PCM whenever a patient is added in Intellect through the Registration screen or while scheduling. Note: The first time the new ACCOUNT/CHART is accessed in PCM, a message displays stating the patient folder is not created. Users simply need to click the [OK] button to set up the folder and then continue with their task.
The default for this field is NO. When NO is selected, a PCM account is not created.
MODIFICATION Utility--►Provider--►Provider
To match terminology used by authorize.net, two field names have been changed:
<Credit Card Authorization Login> is now <Credit Card API Login ID>
<Credit Card Authorization Password> is now <Credit Card Transaction Key>
FIX Utility--►Procedure--►Surgery Items--►Add
In software version 16.02.25, after the <Surgery Code> was entered, the system was not adding items. This problem has been corrected in this update.
NEW MENU OPTION Utility--►Procedure--►Supply
A new 'Supply' option allows users to enter all the supplies used in each procedure for each provider. Once the supplies have been entered, offices can track costs for procedures that require supplies via the new Benchmarking Report. See Management--►Detail - Benchmarking Report in this release note for additional information.
FIX Utility--►Diagnosis--►Crosswalk -- <Priority> field
In prior software versions, the priority level entered in the <Priority> field was being ignored and diagnoses were displayed on the charge screen in random order. This problem has been corrected and the diagnoses are now displayed in priority order.
FIELD MODIFICATION Utility--►Procedure--►Procedure -- <CHDP Seq> field
Effective for dates of service on or after October 1, 2015, CHDP includes alpha-numeric codes for Meningococcal B vaccines. In prior software versions, the <CHDP Seq> field only accepted numerical codes. As of this update, alpha-numeric codes are now accepted in the <CHDP Seq> field.
Providers should note the new alpha-numeric format of the service codes. Providers are also encouraged to bill retroactively if they provided Meningococcal B vaccines on or after October 1, 2015. CHDP will be releasing shortly a program letter and Provider Information Notice about these two vaccines.
NEW OPTION Schedule--►Appointment--►Full Day - Add Appointment Dialog Box
As of this update, the Office Task Manager may be accessed while scheduling an appointment for an appointment type with "Manual" selected in the <Add Task> field on the Modify APPOINTMENT TYPE screen.
When Office Task Manager opens, some fields display information pulled from the Add Appointment dialog box.
For the following Add Appointment dialog box
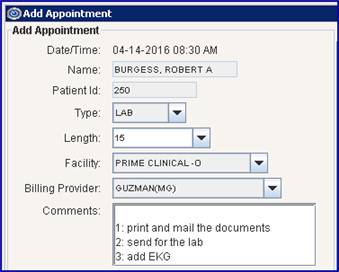
the Office Task Manager is filled as follows:
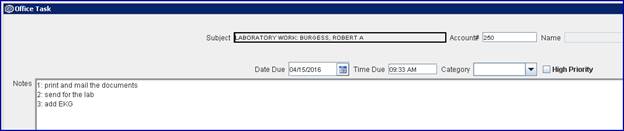
• <Subject> pulls information from the <Name> and <Type> fields
• <Account> pulls the <Patient Id> information
• <Date Due> and <Time Due> are filled via the <Date/Time> field
• <Notes> may be filled several ways:
- If the Appointment Type is set up as a <Message Code> in Utility--►Message--►Message, the information shown on the Modify Message screen (see below) displays in the <Notes> section for a Lab appointment (see Office Task screen above).

- If info is typed in the Add Appointment Comments box, it displays in the <Notes> section.
- Additional info may also be typed directly into the Office Task <Notes> section.
See Office Task Manager in this release note or in the online documentation for either the Office Task Manager or Add Appointment Dialog Box.
NEW OPTION Schedule--►Appointment Reminder - Multiple Text Messages
Effective this release, your office may have multiple customized text messages. For additional information, please contact PCS Support.
NEW FEATURE Main Menu Toolbar - Office Task Manager
As of this update, Intellect now has an Office Task Manager, which is accessed via an icon on the toolbar at the top of Intellect’s main screen:
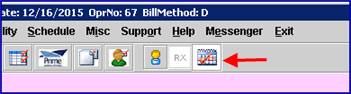
The Office Task Manager is an organizational tool used to keep track of action items either in association with PCM patient charts or documents in charts, or the Task Manager may be used for general "to-do" items not associated with patient charts. Users with PCM will find that this new Intellect feature is similar to the PCM Task Manager.
For detailed information on using the Task Manager, please see the online documentation.
NEW FEATURE Print Dialog Box - Ability to Print via the View Option
In previous versions, when a user sent a file to print, and selected 'View' from the <Printer> drop-down list on the Print Dialog Box, it resulted in a blank page. As of this version, a new print driver in the Intellect program allows users to print any printable item displayed when selecting the View option.
To use this new function:
• For the file/report, in the Print Dialog Box, select 'View' from the <Printer> drop-down list
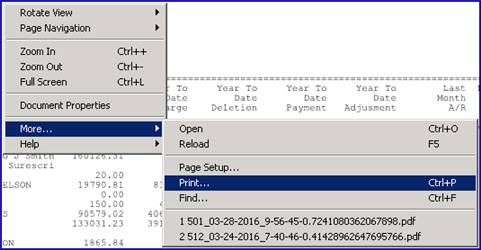
• Place the curser on the displayed document and right-click to access a box of menu options
• Click ‘More’ to display additional options
• Click on 'Page Setup' if the orientation of the paper needs to be changed; i.e., from portrait to landscape, or vice versa
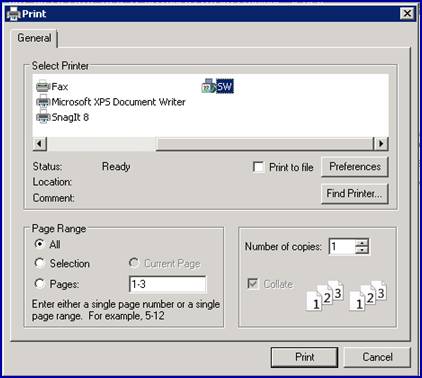
• Place the curser on the document again and right-click to display the menu options. This time, click on ‘More’ and then click 'Print':
A print box displays, allowing the user to select a physical printer where the file/report should be printed: