
Intellect™
SCHEDULE MENU OPTIONS

Appointment
Full Day
Special Features
Automated Email Appointment Reminder without Confirmation
and
Appointment Reminder
Email Appointment Reminder without Confirmation
NOTE: Non-commercial email carriers have a cap on the number of emails that may be sent per day. If a clinics' current email carrier does not support the number of emails needed to be sent on a daily basis, they need to contract with a commercial email vendor.
Intellect offers the ability to automatically email patients to remind them of an upcoming appointment, eliminating the time and expense of manually reminding patients of their appointments, and reducing the cost of missed appointments.
There are two options for email appointment reminders:
• Email reminders which do not allow patient response/confirmation. This is the only option for clinics with software versions prior to 9.12.10. A custom message and/or an attachment may be added to Intellect’s standard reminder format.
Video Available: Click Email Appointment Reminder to access the link. Depending on the system set up, the media player may need to be activated. Speakers need to be attached to the workstation to hear the instructions.
Note: To view the videos, log-in through the www.primeclinical.com website. Current support is required.
• Email reminders which allow patient response/confirmation. This option became effective in version 9.12.10. See Schedule --►Appointment Reminder --►Email Appt Reminder with Confirmation for set-up and usage information for this option.
In this Topic:
1.1 Go to Utility --►Tools --►Configuration
To send an email reminder, these fields should be set up based on information obtained from your DSL carrier:
• <SMTPSERVER>
• <USERNAME>
• <PASSWORD>
Enter the information, press [MODIFY], and exit from Intellect to save.
Note: Additional fields also need to be set up on this screen to allow a patient to respond to email reminders. For additional information and/or set up, please contact PCS Support.
1.2 Go to Utility --►Set Up --►Security --►Login Users --►Modify
• <Operator Email>: Clinics have to use the email address registered by the DSL provider.
NOTE: The security records of all users who intend to email must include the same <SMTPSERVER> address that was entered in the <SMTPSERVER> field of Utility --►Tools --►Configuration (see above).
1.3 Utility --►Task Manager --►Add (Prime Clinical sets this up)
‘TASK_APP_REMINDER_EMAIL’
NOTE: The CLIENT needs to provide a Printer name and indicate how many days in advance the patient should be sent an email.
In the following example, the text in red indicates the Printer name and number of days, as submitted by the client and as subsequently set up by Prime Clinical.
<task task_name="ELECTRONIC_APPOINTMENT_REMINDER" printer_name="HP" email_addresses="" fax_numbers="" secondry_printer="EXCEL" number_of_copies="1">
<parameter name="FROM_DATE" value="TODAY + 2"/>
<parameter name="TO_DATE" value="TODAY + 2 "/>
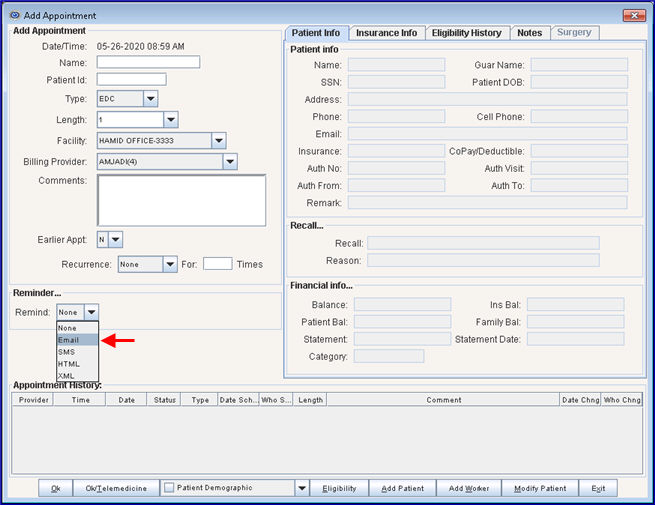
1.4 Go to Schedule --►Appointment --►Full Day --►Add Appointment Dialog Box
On the Add Appointment dialog box, there is a <Reminder> field. Select Email from the Reminder drop-down list for an email reminder to be sent immediately to the patient's registered email address when an appointment is added, rescheduled, or modified.
For email reminders which do not allow patient response/confirmation (software versions prior to 9.12.10), go to Utility --►Set Up --► Appointment --►Appointment Type and complete these fields:
2.1 <Email File>: 
This field is used to attach a custom document to the appointment reminder email. Enter the path (URL) of the source file to attach. Uses for the attachment might include:
• A map to the office
• Pre-appointment instructions
• A registration form
2.2 <Email Message>: 
This field is used to change the default message that is sent in the appointment reminder email. Type the message to include.
Note: To see how this field works for software versions 9.12.10 and greater, which allow patients to respond to email reminders, go to Schedule --►Appointment Reminder --►Email Appointment Reminder with Confirmation, section Intellect Set Up, step 5, and Using Patient Response to Email Reminders.
3. Hardware Set Up (to allow patients to respond to email reminders)
Additional set up needs to be done by PCS Support to allow a patient to respond to email reminders. For more information and/or set up, please contact PCS Support.
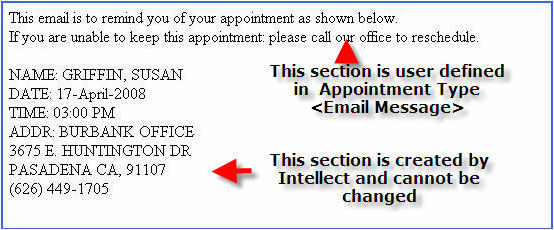
4. The Email Message (to which patient's cannot reply)
NOTE: This does not apply to the Patient Response to Email Reminders option added in software version 9.12.10. For email message set up information for that option, please refer to Schedule --►Appointment Reminder --►Email Appt Reminder with Confirmation.
The email has two sections. The first section is the Header information. This is the message: 'This email is to remind you about your scheduled appointment. If you are unable to keep this appointment, please call our office to reschedule.' The header information may be changed by the client.
The second section is the appointment information. This information MAY NOT be changed.
This reminder may be set for automation.
Go to Utility --►Task Manager --►Modify
5.1 In the top box, use the scroll bar to find and select the TaskName TASK_APP_REMINDER_EMAIL with the Daily Type – see below:
5.2 Click in the box to the left of TASK_APP_REMINDER_EMAIL (indicated above), type a capital ‘M,’ and press [Enter]. The parameters for TASK_APP_REMINDER_EMAIL display in the Parameter box (see below).
5.3 In the Parameter box, check these areas and make changes as needed:
5.3.1 For the line that reads <parameter name="REMIND_METHOD” value="EMAIL”/>, change EMAIL to EMAIL_HTML. See sample below:

5.3.2 Verify that the printer name is correct; if necessary, enter the correct printer name. The printer is generally listed in the first line. In the examples both above and below, the printer name is 'HP.'

5.3.3 Indicate how many days prior to the appointment the patient should be sent an email. In the following example, the number two indicates that the email reminder should be sent two days from today. Change the number, if needed.
5.3.4 Additional information is available in Utility --►Task Manager --►Tasks for Twilio and Email.
5.4 If changes were made, click on the [Apply Changes] button.