Intellect™
SCHEDULE MENU OPTIONS

Appointment
Full Day
Appointment Booking and Management
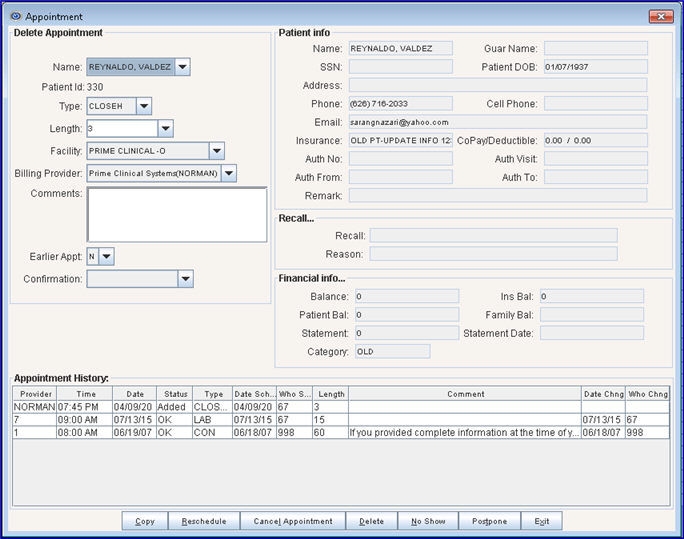
Delete Appointment Dialog Box
Appointments may be deleted several ways. Appointments may be deleted one at a time, or, effective version 14.02.04, selected groups of appointments may be deleted or canceled all at once.
Additionally, the action buttons at the bottom of the Delete Appointment screen allow appointments to be copied, rescheduled, canceled, identified as a 'no show', or postponed.
Note: On the Appointment History table, Type, Length, and Comments display, but may not be modified. Additionally, the informational screens are the same as the other dialog boxes in Appointment Schedule.
1. Select an appointment and right-click. When the right-click menu appears, click on Delete to open the Delete Appointment screen.
- OR -
2. Select an appointment, and then type the letter 'D' to open the Delete Appointment screen:

3. If there are multiple patients booked in the same time/day slot, use the <Name> drop-down to select the desired patient.
4. Click ![]() . [Delete] is used when an operator error is made adding the appointment on the schedule.
. [Delete] is used when an operator error is made adding the appointment on the schedule.
4.1 In versions less than 9.12.35: Click [Delete] to close the dialog box, remove that appointment from the schedule, and update the Status column to Deleted in the Appointment History.
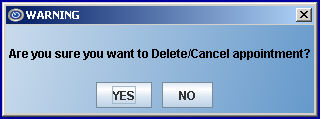
In version 9.12.35 and greater: Click [Delete] to display this warning:

• Click [Yes] to delete the selected appointment.
• Click [No] to close the warning message and the selected appointment remains as scheduled.
4.2 Appointments whose Appointment History Status column (at the bottom of the screen) display as Deleted, Cancelled, Re Scheduled, or Postponed (Re scheduled) cannot receive further actions because what is listed is only the record of the original appointment.
4.3 Attempting to Delete appointments with these statuses causes this error message to display:

Effective version 14.02.04, selected groups of appointments may be deleted or canceled all at once:
1. On the Appointment Schedule:
• Right-click on the patient for whom the appointments should be deleted/canceled (it does not matter which appointment is selected), and right-click to display the context (right-click) menu.
- OR -
• Right-click in any open time slot to display the context (right-click) menu.
2. Select ‘Search’ from the right-click menu.
3. Enter the search criteria for the patient and press [Enter].
4. In the Appointment History section at the bottom of the screen, click on the first appointment to delete/cancel. Hold down the [Shift] key on the keyboard and use the up/down arrows to select the remaining appointments that need to be deleted/canceled.
5. Once the appointments are selected, click on the  or
or  button, as appropriate. Intellect displays:

• Click [Yes] to delete/cancel the selected appointments. Note: The status does not change until the [Exit] button at the bottom of the screen is pressed. Then re-enter the Appointment History screen.
• Click [No] to return to the Appointment History screen. The selected appointments remain highlighted. To un-highlight the appointments, click anywhere on the list of appointments.
Note: This modification does not apply to the ReSchedule option.
The action buttons at the bottom of the Delete Appointment screen allow appointments to be copied, rescheduled, canceled, identified as a 'no show', or postponed.
![]()
1. Copy ![]()
1.1 Click on Copy to copy the name and information of that patient onto the computer's clipboard. If desired, the patient's name can then be pasted into the Patient field of the appointment schedule using the Paste option on the right-click menu.
2.1 On the appointment schedule, scroll the focus to select the desired patient using [Enter], the up arrow [↑], or down arrow [↓], or using the mouse to select an appointment to reschedule.
2.2 Type the letter 'D' to open the Delete Appointment dialog box.
2.3 Click [Re Schedule] to close the dialog box. Click [Reschedule] to copy the selected appointment information to a clip board to be pasted into a desired schedule Time/Date slot, and update the Appointment History's Status column to show the original appointment as recsh and a new appointment as Added.
Warning: Users may only Reschedule and Paste for the SAME Doctor. To reschedule with a different doctor, select [Reschedule] and then Add from the right-click menu.
2.4 Deleted, Cancelled, Re Scheduled, or Postponed (Re scheduled) shown the Appointment History Status column cannot receive further actions because what is listed is only the record of the original appointment.
2.5 Attempting to Re Schedule appointments with these statuses cause this error message to display:

3.1 On the appointment schedule, scroll the focus to select the desired patient using [Enter], the up arrow [↑], or down arrow [↓], or using the mouse to select an appointment to cancel. Canceling indicates the appointment will eventually be rescheduled.
3.2 In versions less than 9.12.35: Click [Cancel Appointment] to close the dialog box, remove that appointment from the schedule, and update the Appointment History's Status column to Cancelled.
In version 9.12.35 and greater: Click [Cancel Appointment] to display this warning:

• Click [Yes] to cancel the selected appointment.
• Click [No] to close the warning message and the selected appointment remains as scheduled.
3.3 Appointments whose Appointment History Status column display as Deleted, Cancelled, Re Scheduled, or Postponed (Re scheduled) cannot receive further actions because what is listed is only the record of the original appointment.
3.4 Attempting to Cancel appointments with these statuses causes this error message to display:

4.1 [Delete] is used when an operator error is made adding the appointment on the schedule.
4.2 On the appointment schedule, scroll the focus to select the desired patient using [Enter], the up arrow [↑], or down arrow [↓], or using the mouse to select an appointment to delete. Deleted appointments indicate scheduling errors.
4.3 In versions less than 9.12.35: Click [Delete] to close the dialog box, remove that appointment from the schedule, and update the Status to Deleted in the Appointment History.
In version 9.12.35 and greater: Click [Delete] to display this warning:

• Click [Yes] to delete the selected appointment.
• Click [No] to close the warning message and the selected appointment remains as scheduled.
4.4 Deleted, Cancelled, Re Scheduled, or Postponed (Re scheduled) shown in the Appointment History Status column cannot receive further actions because what is listed is only the record of the original appointment.
4.5 Attempting to Delete appointments with these statuses cause this error message to display:

5.1 On the appointment schedule, scroll the focus to select the desired patient using [Enter], the up arrow [↑], or down arrow [↓], or using the mouse to select an appointment to mark as a 'No Show'.
5.2 Click [No Show] to close the dialog box, and update the Status column to No Show in the Appointment History, include the patient on a Missing Appointment report, and generate a letter to patient, if configured to do so. See Schedule --►Recall --►Add for information on configuring letters to be generated for 'No Show' appointments.
5.3 Additional scheduling actions may be performed on No Show appointments.
6.1 On the appointment schedule, scroll the focus to select the desired patient using [Enter], the up arrow [↑], or down arrow [↓], or using the mouse to select an appointment to Postpone.
6.2 Click [Postpone] to close the dialog box, copying the selected appointment information to a clip board to be pasted into a desired schedule Time/Date slot, and updating the Appointment History Status column to show the original appointment as Postponed and a new appointment as Added. This has the same effect as Re Schedule, but implies the action originated from the Clinic (i.e., the Doctor has to postpone the appointment for a later time).
7. Exit ![]()
7.1 Click [Exit] to close the Search box.