Intellect™
MISC MENU OPTIONS

FAX Set Up
This documentation is primarily for sending faxes via modem and phone line. Intellect works with the third-party vendor faxage.com to send faxes via the internet. Please refer to the Faxage documentation for faxage.com set up information. See also Sending Faxes.
To send faxes via modem and phone line, a modem should be installed on the system. Intellect Fax can share the modem with Intellect eBilling but it can not share it with PCM Fax, therefore, if the system has PCM then there should be at least two modems on the system. The recommended modem brand is USRobotics.
Utilizing the fax capability in Intellect requires these configuration steps:
1. Ensure that a 'FAX Device' is Enabled
3. Activate Fax Spooler in Windows
1. Ensure that a 'Fax Device' is Enabled
Often Intellect will have a default Fax device which is set up like a Print device. This document includes only the information necessary to configure a Fax device. See the documentation in Utility --► Set Up --►Printer --►Devices --►Add to set up a Print device.
To add a Fax device in Intellect, go to Utility --► Set Up --►Printer --►Devices --►Add:

The Add PRINTER_CODE screen displays:

1.1 Printer Code 
1.1.1 If not already configured, type a code for this device that indicates its purpose; i.e., Fax.
1.2 Direction 
1.2.1 Select 'F' from the drop-down list, as shown in the [F2] screen below:

1.3 Capability Code 
1.3 1 Leave the default.
1.4 Save as Chart 
1.4.1 This field does not apply to email.
1.5 When the information is completely entered, select one of these options:

• Click [Add] to save the information entered on the screen.
• Click [Clear] to remove information from the screen and start over.
• Click [Exit] to leave the Add Printer Code screen and return to the main Intellect screen.
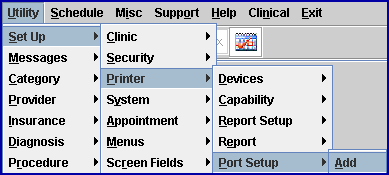
Go to Utility --► Set Up --►Printer --►Port Setup --►Add:

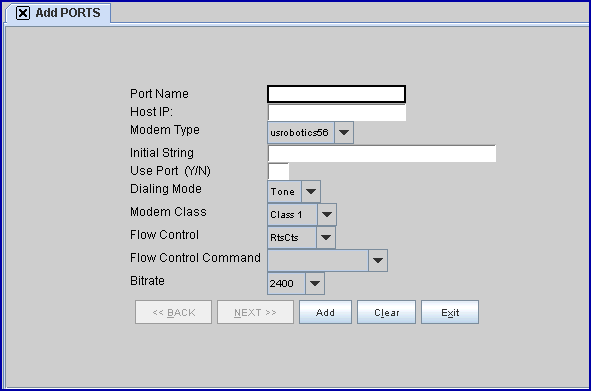
The Add PORTS screen displays:

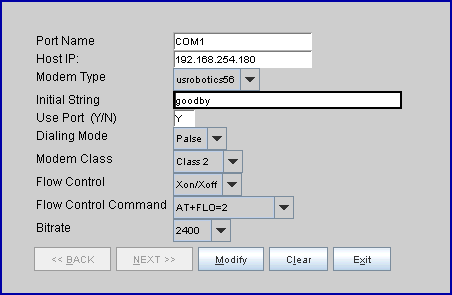
NOTE: The standard USROBOTICS modem set up is:

2.1 Port Name 
2.1.1 Type the Com port that this device will use: 6235 is the Fax Spooler Port. This must be set for the Intellect Fax server machine as well as any machine which uses the fax service.
2.2 Host IP 
2.2.1 Type the IP address of the location for the Fax server.
2.3 Modem Type 
2.3.1 This is not important for Fax set up.
2.3.2 Accept the default USROBOTICS OR use the drop-down list to make an alternate selection.
2.4 Initial String 
2.4.1 Type the modem’s required initial string; i.e., enter ATV1Q0 (zero).
2.5 Use Port (Y/N) 
2.5.1 Enter 'Y' if the port is shared.
2.5.2 Enter 'F' for a fax-only port.
2.6 Dialing Mode 
2.6.1 Accept the default 'Tone' for most systems.
2.7 Modem Class 
2.7.1 Accept the default 'Class 1.'
2.8 Flow Control 
2.8.1 Accept the default 'RtsCts' for most modern modems.
2.9 Flow Control Command 
2.9.1 Use the drop-down to select 'AT&H1'.
2.10 Bitrate 
2.10.1 The 9600 rate is standard. Use the drop-down, if necessary, to select a different bitrate.
3. Activate Fax Spooler in Windows
Note: Depending on the version of Windows being used, screens may vary from the screen saves shown below.
3.1 Locate the home directory and double-click the InstallFaxSpoolerService icon. This enables the service to run with Windows:

3.2 Go to the Control Panel. For example: Start --► Settings --►Control Panel:

3.2.1 Select Administrative Tools:

3.2.2 Select Services:

3.2.3 Select OnSTAFF Fax Spooler and, if necessary, Start the service:

Status must be set to 'Started'. If not started, select the item, then click on Start.
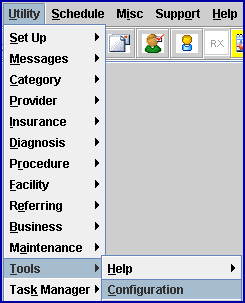
To complete the Fax Server configuration in Intellect, go to Utility --► Tools --► Configuration:

The Modify CONFIG screen displays:

Intellect allows for 3 methods to send faxes. Each method requires different fields on this screen to be populated. Follow the instructions for the fax method you are using.
4.1.1 Populate these fields:
• <Fax Spooler Address>: Enter the IP address of the Fax server (the machine that holds the FAX device).
• <Fax Spooler Port>: Enter the default Spooler port '6235'.
4.2.1 Clinics must have an account with faxage.com before using this option. See the Faxage documentation for additional information. Clinics with a faxage.com account should populate these fields:
• <Fax Provider>: Use the drop-down to select 'Faxage'. PCM users: Please note that Faxage is also compatible with PCM.
• <Fax Username>: Enter the information provided by Faxage when signing up.
• <Fax Password>: Enter the information provided by Faxage when signing up.
• <Fax Company#>: Enter the information provided by Faxage when signing up.
4.3 Press the [Modify] button then shut down Intellect and re-log on so the settings take effect.
