
Intellect™
LEDGER MENU OPTIONS

Create Collection File
This menu option is used to create a collection file for accounts with unpaid balances. Once created, the file is first displayed, then it may be viewed by either 'Worked' or 'Un-worked' status. It is designed for internal use. If a file is created and some accounts are left 'Un-worked', those accounts are NOT included in future Collection Files until they have been 'Worked'.
See details on creating a collection file.
Videos Available: Click Create Collection File and/or Collection Overview to access the link. Depending on the system set up, the media player may need to be activated. Speakers need to be attached to the workstation to hear the instructions.
Note: To view the videos, log-in through the www.primeclinical.com website. Current support is required.
Updates:
Effective version 15.02.17 - Modification
Intellect saves the operator code and the clinic date whenever a charge is modified in Charges --►Charge Review, Ledger --►Create Collection, and/or the Ledger --►Review Collection screens.
Effective version 9.12.14, if creating an XML file from the Create Collection or Review Collection screens, the phone number for all insurances on file for the patient, and the patient home phone number, are included in the XML file.
Note: The XML file is usually used to provide patient, insurance, and charge information to the out-of-office collection agency.
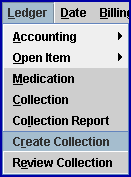
1. To create a Collection File in Intellect, go to Ledger --►Create Collection File:
This warning displays:

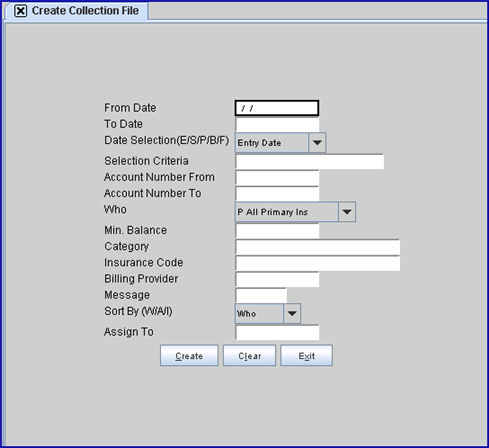
Select [OK] to go to the Create Collection File screen:
.
2.1 Type the beginning date of the range of charges to include in the Collections File, based on the <Date Selection> field criteria.
2.2 It is important to set this date, otherwise Intellect defaults the current calendar date and no results are found.
3. To Date 
3.1 Type the ending date of the range of charges to include in the Collections File, based on the <Date Selection> field criteria.
3.2 Leaving this field blank includes any charge from the <From Date> (above) to the present calendar date, depending on all other entered criteria.
4.1 Accept the default 'Entry Date' (formerly 'E'), OR use the drop-down to make an alternate selection.
4.2 To view the list of codes with descriptions, press the [F2] key. To view the list of only the codes, either click on the arrow, OR press the → (right arrow) on the keyboard.
To select, double-click on the correct code, OR use the ↑ (up) and ↓ (down) arrows to highlight the correct code, and then press the [Enter] key to select.
Effective version 9.12.10

All versions prior to 9.12.10

5.1 This field is used to limit the file to patient accounts based on alphabetical criteria.
5.2 Leave blank to select all patients that meet all other criteria entered or define the parameter using a hyphenated alphabetical range, such as A-L, to return patient accounts where the last name begins with any letters in the range of A-L.
6. Account Number From 
6.1 This field is used to limit the file to patient accounts based on account numbers starting with this entry.
6.2 Leave this field blank to search all accounts starting from '1,' returning those that meet all other criteria.
6.3 It is not required to have a From / To set of dates.
7. Account Number To 
7.1 This field is used to limit the file to patient's accounts based on account numbers ending with this entry.
7.2 Leave this field blank to search all accounts starting from the <Account Number From> (see above), returning those that meet all other criteria.
7.3 It is not required to have a From / To set of dates.
7.4 Although optional, when leaving the two <Account Number> fields blank and the <Selection Criteria> field blank, Intellect displays this prompt:
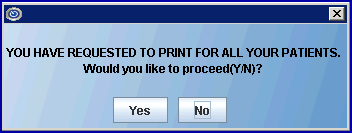
7.4.1 Select [No] to return the focus to the <Selection Criteria> field.
7.4.2 Select [Yes] to send the focus to the <Category> field.
8. Who 
8.1 This field is used to limit the file to accounts based on the responsible payer.
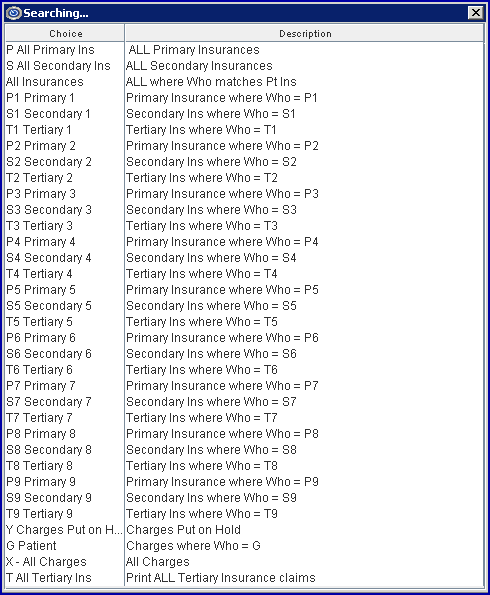
8.2 Effective version 9.12.10, accept the default 'P All Primary Ins' (ALL Primary Insurances) for the balance, OR use the drop-down to make an alternate selection. Prior to version 9.12.10, the default was 'G' guarantor/patient responsible for the balance.
8.3 To view the list of codes with descriptions, press the [F2] key. To view the list of only the codes, either click on the arrow, OR press the → (right arrow) on the keyboard.
To select, double-click on the correct code, OR use the ↑ (up) and ↓ (down) arrows to highlight the correct code, and then press the [Enter] key to select.
Effective version 9.12.10:
9. Min. Balance 
9.1 This field is used to limit individual charges which have a balance equal to or greater than the entered amount.
9.2 If this field is populated, it works as follows: Intellect totals the balance per patient on all the charges which match the selection criteria entered. It then compares the patient's total balance with the <Min Balance> entered:
9.2.1 If the total balance is greater than or equal to the amount entered in the <Min Balance> field, the patient records are added to the collection file.
9.2.2 If the patient's total balance is less than the amount entered in <Min Balance>, the charges are NOT added to the collection file. For example: If selecting Who = G and Date of Service is between 01/01/2008 and 05/31/2008 and Min Balance is entered as 100.00:
• If the patient balance is greater than or equal to $100.00, the records are added to the file.
• If the total is $99.99 or less, Intellect does not add to the collection file.
9.3 If the <Min Balance> field is left blank (the default), any patient balance greater than zero is added to the collection file.
10.1 This field is used to limit the file to accounts that have a particular Patient Category.
10.2 Type a Utility --►Category <Category Code> OR leave blank to select all patient categories. There is no default.
10.3 This field accepts multiple values:
• Category codes separated by commas with no spaces:

• an asterisk * to return all Categories starting with the portion of the code entered prior to the *. For example, M* prints all Categories whose code begins with M.

11. Insurance Code 
11.1 This field is used to limit the file to accounts that have a particular insurance company. Intellect looks to see what is in <Who>. If P is selected (primary) than the patient's primary insurance must match what is in <Insurance Code>. If <Who> is S, then the insurance in <Insurance Code> must be the secondary. The system looks for charge records where the Primary or Secondary (dependent upon <Who>) matches what is entered in <Insurance Code>.
11.2 Type the Utility --►Insurance --►Insurance <Insurance Co. Code> OR leave blank to select all insurances. There is no default.
11.3 This field accepts multiple values:
• Insurance codes separated by commas with no spaces:

• an asterisk * to return all Insurances starting with the portion of the code entered prior to the *. For example, B* prints all Insurances whose code begins with B.

12. Billing Provider 
12.1 This field is used to limit the report to a particular provider(s).
12.2 Type the Utility --►Provider --►Provider <Provider Code> OR leave blank to select all providers. There is no default.
12.3 This field accepts multiple values:
• Provider codes separated by commas with no spaces:

• a range of numbers separated by a hyphen and no spaces

• an asterisk * to return all providers starting with the portion of the code entered prior to the *. For example, 1* prints all Insurances whose code begins with 1.

13. Message 
13.1 This field is used to limit the file to accounts that have a particular Ledger --►Accounting <Message>.
13.2 Type the Ledger --►Accounting <Message>, OR leave blank to select all records. There is no default.
14.1 This field is used to select the sort order of the file.
14.2 Accept the default 'Who' (formerly 'W'), OR use the drop-down to make an alternate selection.
14.3 Press the [F2] key to display the valid choices:
Effective version 9.12.10

All versions prior to 9.12.10

15. Assign To 
15.1 Effective version 9.12.31 - New Field.
15.2 This field allows the operator who is creating the collection file to assign it to another operator. For example, as of version 9.12.31, a supervisor can create the files for the collection staff.
15.3 Press [F2] in this field to list all the operators within the client. Highlight and press [Enter], OR double-click to select the operator.
15.4 The collection person brings up the file through Ledger --►Review Collection the same as usual. If the person who created the file worked any accounts, they remain in the file assigned to the collection person and are marked as Worked, the same as usual.
16. When the information is completely entered, select one of these options:

16.1 If the conditions are valid, select [Create] to create and display the collection file.
16.1.1 If no records match, Intellect displays this message:
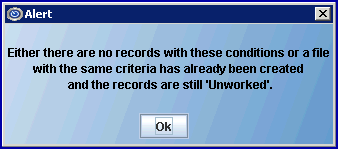
Press the [OK] button to display this message:

Press the [OK] button to return the focus to the <From Date> field.
16.2 Select [Clear] to clear all information and return the focus to <From Date> without saving.
16.3 Select [Exit] to clear the screen and return the focus to the main Intellect screen without saving.
Once valid conditions are set on the Create Collection File screen and the [Create] button is pressed, Intellect displays the newly created collection file with the focus on the first line on the multi-line display area. The file is sorted as requested per the <Sort By (W/A/I)> field (see above), and then grouped by ascending account numbers within the sort condition.
• Collection files first appear with all entries in an 'un-worked' status.
• All collection files are identified by the date they are created.
• Only one collection file can exist for any calendar date.
• Generating a new collection file, regardless of properties, on a date where a collection file already exists adds to the already-existing collection file.
• Once a collection file is created, the data is kept for future reference.
There are 3 areas within the collection file: the Display Header, the Multi-line Display, and the Action Buttons. See sample:
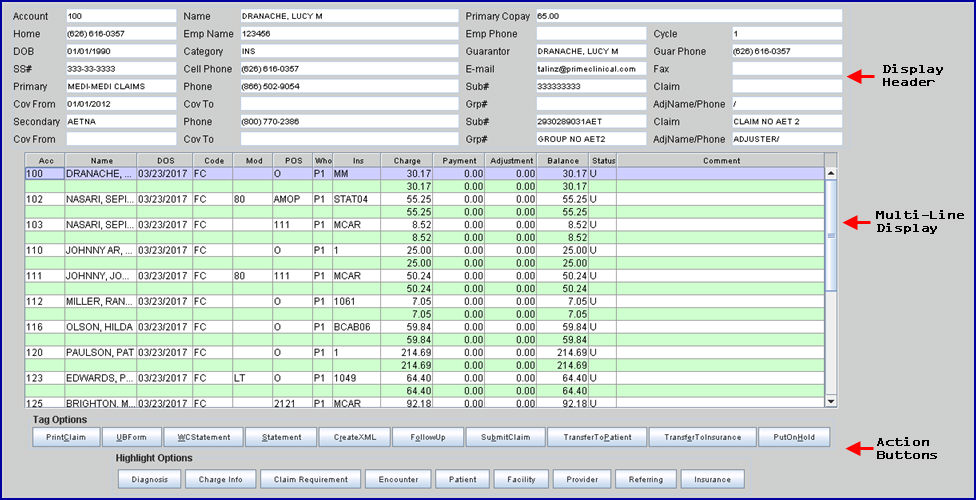
Note1: Several fields in the Multi-line Display area were modified in the version 9.12.11 update. See additional information in the Multi-line Display section.
Note2: Effective version 13.07.08, the previous Action Buttons are now titled 'Tag Options' and two new buttons were added. Additionally, 'Highlight Option' buttons are now available. See specifics in the Action Buttons section.
The Display Header includes:
• Patient demographics, as completed in the Patient Registration screen.
• Insurance-specific information, as completed in the Patient Insurance screen. This information reflects primary and secondary insurers at the time of posting for each procedure highlighted or tagged in the Multi-line Display. If there is a conflict between the insurance at the time posted and the patient Insurance, Intellect displays the insurance code in the Primary and Secondary fields in red.
The multi-line display shows the selected individual patient accounts. See column definitions below.
Note: The patient accounts are in order as requested per the <Sort By (W/A/I)> field on the Create Collection File screen, and then grouped by ascending account numbers within the sort condition.
Per the Version 9.12.11 update, several fields were modified:
• To make the screen easier to read, the 'total' line separating each patient displays in green.
• The focus may be moved by clicking on a desired line. Previously, the program required the use of the down arrow to move the focus.
• The <C> (command) column on the left side of the table has been removed, though all the same features are still available by clicking anywhere on the Collection File and pressing the [F2] key to display the valid choices.
When Collection Files are initially displayed, all entries appear in an 'un-worked' status. The entries may be worked using the Key's Help options, the Right-click Menu options, and the Action Buttons. Some of the options are designed to produce a printout, in which case a printer dialog box displays.
Multi-Line Display Column Definitions (as of version 9.12.11):
17. Acc: Indicates the patients' account number.
18. Name: Displays the patients' name.
19. DOS: Displays the date of service.
20. Code: In versions prior to 9.12.11, this column was titled Proc. It displays the Procedure Code.
21. Mod: This column was added in version 9.12.11 and displays the Modifier Code.
22. POS: This column was added in version 9.12.11 and displays the Place of Service Code.
23. Who: This column reflects the Who selected when the file is created. If the Transfer to Patient task was run, the Who has been changed to 'G' guarantor.
24. Ins: Displays the insurance at the time the charge was posted.
25. Charge: Displays the amount charged for the procedure indicated in the Code column.
26. Payment: Displays the payment amount for the procedure indicated in the Code column.
27. Adjustment: Displays adjustments, if any, to the payment.
28. Balance: Calculated based on the Charge - the Payment +/- the Adjustment = Balance.
29. Status: When the Collection File is created, the Status is always set to 'U', indicating un-worked. Once a procedure has had any of the Collection Tasks selected, the status automatically changes to 'W' (worked).
30. Comment: Once a procedure has had any of the Collection Tasks selected, a message is inserted into the Comment column.
30.1 If more than one task was performed on a charge on the same calendar day, all messages are saved in one Comment, with the notes regarding the most current task inserted at the beginning.
30.2 The Collection File Comments may also be viewed in the patient's ledger by pressing the letter 'V' from the command column in the first screen of the ledger, or when viewing the second screen of the ledger.
![]()
30.2.1 Date: Displays the calendar date the task was done through the Collection File screen.
30.2.2 Remark: Displays the message entered for the task.
30.2.3 Reminder: Displays the Date of Service of the charge.
30.2.4 Send To: When applicable, displays the Primary Insurance code.
30.2.5 Amount: Displays the charge amount.
30.2.6 Operator: Displays the Operator Number of the user who ran the Collection File task.
30.2.7 Flag: Always displays a 'T' when the task was run in the Collection File screen.
30.3 The Comment holds approximately 4,000 characters.
30.4 To view the full Comments, place the cursor in the Comment field, type 'M,' and then use the keyboard right arrow [→] to scroll through the entire message.
30.5 Each charge that is Tagged has a Collection File Comment inserted.
30.6 The Ledger Flag for the Collection File Comments is set to 'T'.
NOTE: In addition to the Collection File Comment, a second comment for the task is inserted in the second screen of the ledger with the Flag set to the type of task run. The Ledger Flags that apply to the collection screen are:
I Insurance Paper Claim generated
S Patient Statement generated
F Follow Up Letters generated
E Electronically Billed claim
The Key's Help options are shortcuts to perform tasks. Some of the tasks are designed to produce a printout, and, when selected, display a printer dialog box. See Printer Dialog Box below for details.
Click anywhere on the Collection File and press the [F2] key to display valid Key's Help options:
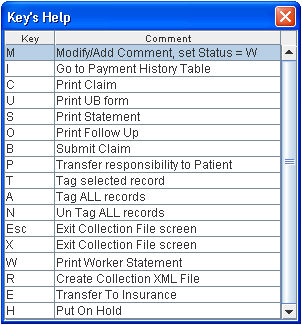
Note: For Key's Help commands C, U, S, O, B, P, W, and R, the procedure line must be tagged first.
To tag procedures, use Key's Help options:
• T (Tag Selected Record): With the procedure highlighted, press 'T' to tag a single line. Press 'T' again to remove the selected Tag.
• A (Tag ALL Records): Type 'A' to tag ALL lines.
• N (Untag ALL Records): Type 'N' to remove all Tags.
31. M: (Modify/Add Comment, set Status = W): With the procedure highlighted, press 'M' to send the focus to the Comment column where adding, modifying, or deleting a comment is permitted.
31.1 If a Comment is entered, the charge's <Status> is flagged as 'W' (worked).
32. I: (Go to Payment History Table): With a procedure highlighted, press 'I' either to change the display to the Payment History:

(Type 'Q' to return to collection ledger.)
OR, if there are no payments, Intellect displays this message:
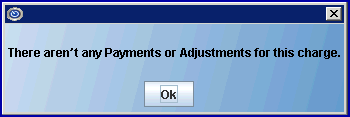
Click [OK] to return to the Command Column.
After tagging a procedure line(s), these key commands may be used:
33. C (Print Claim): With the procedure(s) tagged, press 'C' OR click on the [Print Claim] Action Button to open the Print HCFA dialog box. Only the lines tagged print. Tagged records should have charges, a balance, and Who = G.
34. U (Print UB Form): After tagging patient(s) records for which the UB forms should print, press 'U' OR click on the [UB form] Action Button to open the Print UB HCFA dialog box. Tagged records should have charges, a balance, and Who = G. Only the lines tagged print on the claim.
35. S (Print Statement): With the procedure(s) tagged, press 'S' OR click on the [Statement] Action Button to open this dialog box:

35.1 <Message>: Type [F2] to display items in Messages --►Message, including letters. Be sure to select only statement messages.
35.2 <From Date>: Enter the oldest date of activity to include on the statements.
35.3 <XML(Y/N)>: Use only if outsourcing statements. Accept the default of N to print paper statements, OR change to Y to create and submit an XML to an outsourced vendor.
35.4 <Statement Selection>: Defaults to the Parameter Statement Selection.
36. O (Print Follow Up): With the procedure(s) tagged, press 'O' OR click on the [Follow Up] Action Button to open this dialog box:

36.1 <Letter Code>: To view the list of letter codes with descriptions, press the [F2] key twice. To select, double-click on the correct code, OR use the ↑ (up) and ↓ (down) arrows to highlight the correct code, and then press the [Enter] key to select.

36.2 <Patient/Insurance>: Accept the default 'P' to print a letter addressed to the patient OR use the drop-down arrow to select 'I' to address the letter to the insurance.
36.3 <Include Diagnosis (Y/N)>: Accept the default 'Y' (Include) OR use the drop-down arrow to select 'N' to exclude the diagnoses.
37. B (Submit Claim): For Submitting Electronic Claims with the procedure(s) tagged, press 'B' OR click on the [Submit Claim] Action Button to open the dialog box. Only the items tagged are billing electronically.
NOTE: Tag only the same Insurance Code (where claims are submitted; i.e., MCAR, MCAL, or clearing house), same Carrier Type and same Claim Type. After selecting all claims which go to the same location, select the [Submit Claim] Action Button before tagging the next set of claims.
Submit Claim window for versions prior to 9.12.16:

Submit Claim window for versions 9.12.16 and higher:

37.1 <Insurance Code>: Enter the Insurance Code, OR type up to 6 characters of the name and press the [F2] key. To select the code from the list, either highlight the record and press the [Enter] key, OR double-click on the record. OR, after clearing the field, press the [F2] key twice to view the entire list of codes.

37.2 <Carrier Type>: Enter the Utility --►Insurance --►Insurance <Electronic Billing> code.
37.3 <Claim Type>: In software prior to version 9.12.16, accept the default '2' to submit claims in the professional (HCFA) format OR use the drop-down arrow to select '1' to submit in the institutional (UB) format.
In software version 9.12.16 and higher, accept the default 'Professional' to submit claims in the professional (HCFA) format OR use the drop-down arrow to select 'Institutional' to submit in the institutional (UB) format.
37.4 Primary/Sec/All: Effective version 9.12.16, this field was expanded to a multi-word description. For example, in prior versions the default is 'P,' in version 9.12.16 the default was expanded to 'P All Primary Ins'. Accept the default, OR use the drop-down arrow to make a different selection.
38. P (Transfer the Responsibility to Patient): With procedure(s) tagged, press 'P' OR click on [Transfer to Patient] to change the <Who> to 'G' Guarantor (shifting the responsibility to the patient), <Status> to 'Worked', and add a <Comment>.
39. Esc (Exit Collection File Screen): Press 'Esc' to go to Intellect's main menu.
40. X (Exit Collection File Screen): Press 'X' to go to Intellect's main menu.
41. W (Print Worker's Statement): With the procedure(s) tagged, press 'W,' OR click on the [WC Statement] Action Button, to open this dialog box:

41.1 Type Of Report: See Billing --►Worker --►Statement --►Batch of Patients <Type of Report(A/B/C/D/E)>.
41.2 Include Diagnosis: See Billing --►Worker --►Statement --►Batch of Patients <Include Diagnosis>.
41.3 Include Credits: Default is 'Y' (yes). See Billing --►Worker --►Statement --►Group of Patients <Include Credits>.
41.4 Statement Type: Default is '1' Statement Type. See Billing --►Worker --►Statement --►Group of Patients <Statement Type>.
41.4.1 Print HCFA: Default is 'Y' (yes).
41.4.2 Proof of Service: See Billing --►Worker --►Statement --►Batch of Patients <Proof of Service>.
41.4.3 Requested By: See Billing --►Worker --►Statement --►Batch of Patients <Requested By>.
41.4.4 Message: See Messages --►Message, including letters. Be sure to select only statement messages.
41.4.5 Cover Letter: Enter the file name of the cover letter, if any.
Selecting [OK] opens the printer dialog box. See Printer Dialog Box below for more information on printing.
42. R (Collection XML/Create XML): With the procedure(s) tagged, press 'R' OR click on the [Create XML] Action Button, to create a file. The <Status> is changed to 'Worked' and a <Comment> is added.
42.1 The first time this feature is used, it automatically creates a 'collection' folder in the directory designated in Utility --► Set Up --► Parameter <Path File>. Each subsequent time procedures are tagged and this option is used, an XML file is created in the 'collection' folder.
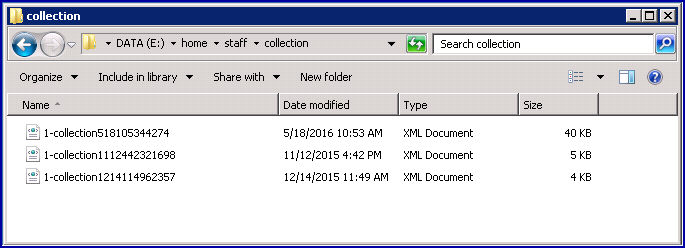
42.2 The XML file is formatted as an electronic statement file; it contains information about the patient, provider, insurance and charge details such as CPT codes, diagnosis codes, charges, payments, and adjustments.
43. E (Transfer the Responsibility to Insurance) Effective version 13.07.08: After tagging patient(s) records for which the current insurance should be transferred to a different insurance, press 'E' OR click on the [Transfer to Insurance] Action Button. This screen displays:

43.1 The default is P1 Primary 1. Selecting one of the options from the drop-down changes the Who value and shifts the responsibility to the patient's insurance.
43.2 You must select a valid option for the highlighted records. For example, if selecting P2 Primary 2 from the drop-down window, and the patient has only P1 insurance set up in registration, this message displays:

44. H (Put on Hold) Effective version 13.07.08: Tag patient(s) records which should be put on hold, press 'H' OR click on the [Put on Hold] Action Button. Selecting this option changes the Who value to Y, meaning the charges are on hold. No billing or statements are generated for the charges until the Who column is changed to either an insurance responsibility or patient responsibility.
Note: Statement Form 50 prints charges where the Who column is set to Y.
Selecting any of the above tasks that are designed to produce a printout (with the exception of Transfer to Patient), displays the printer dialog box:
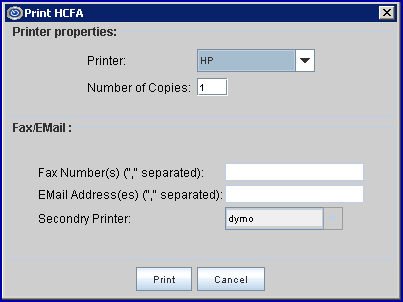
45.1 Printer Properties:
45.1.1 Printer: The default printer for the logged-in clinic and password is selected. To select a different printer, either click on the arrow, OR press the → (right arrow) on the keyboard to view the list of printer codes. In our example, the defaulted Printer is HP. This is just an example of a printer name and may or may not be set up on the system.
To select the printer type, click on the code, OR use the ↑ (up) and ↓ (down) arrows to highlight the correct code, and then press the [Enter] key to select.
45.1.2 Number of Copies: This field defaults to either 0 (zero) or 1. Both print 1 copy. To print more than one copy, enter the number of copies.
45.2 Fax/Email:
In addition to printing reports, Intellect provides the capability to export reports to Email, Fax, Disk, or Archive. A secondary printer may also be selected, if one is set up, by clicking on the arrow to display the drop-down list.
45.3 Select the [Print] button to send the request to the printer (or as a Fax or email).
45.4 Select the [Cancel] button to clear the screen and return to the Create Collection File screen without saving or printing.
For selected procedures, the Right-click Menu options perform the same command tasks as those listed either in the Key's Help options described in the Multi-line Display section above, or the Action Buttons described in the following section.
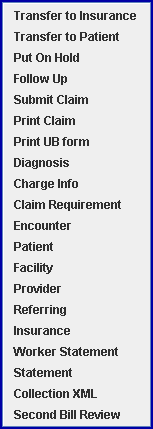
Except for the 'Second Bill Review' option (effective version 14.02.04), all of the Right-click Menu options correlate to the Key's Help options and/or Action Buttons as follows:
46. Transfer to Insurance: See Key's Help option 'E' for details.
47. Transfer to Patient: See Key's Help option 'P' for details.
48. Put on Hold: See Key's Help option 'H' for details.
49. Follow Up: See Key's Help option 'O' for details.
50. Submit Claim: See Key's Help option 'B' for details.
51. Print Claim: See Key's Help option 'C' for details.
52. Print UB Form: See Key's Help option 'U' for details.
53. Diagnosis: For details, see Highlight Options, [Diagnosis] action button.
54. Charge Info: For details, see Highlight Options, [Charge Info] button.
55. Claim Requirement: For details, see Highlight Options, [Claim Requirement] action button.
56. Encounter: For details, see Highlight Options, [Encounter] action button.
57. Patient: For details, see Highlight Options, [Patient] action button.
58. Facility: For details, see Highlight Options, [Facility] action button.
59. Provider: For details, see Highlight Options, [Provider] action button.
60. Referring: For details, see Highlight Options, [Referring] action button.
61. Insurance: For details, see Highlight Options, [Insurance] action button.
62. Worker Statement: See Key's Help option 'W' for details.
63. Statement: See Key's Help option 'S' for details.
64. Collection XML: See Key's Help option 'R' for details.
65. Second Bill Review (Effective version 14.02.04): To use this option, tag charges on the multi-line display, right click to display the right-click menu, and then select 'Second Bill Review'. A window pops up with a text field for a specific Message code:
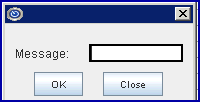
65.1 Enter the appropriate Message code beginning with 'SBR', as set up in Utility --►Messages --►Remark <Remark Code>, and click on [OK]. Intellect updates all the tagged charges by the entered message code and then, for the qualified tagged charges, prints a DWC Second Bill Review report (identical to the one requested through the ‘☐ Second Bill Review’ option at the bottom of the Payment --►Open Item screen).
65.2 Note: For more information on Message codes, see Utility --►Messages --►Message.
Effective version 13.07.08, the Action Buttons, located at the bottom of the screen, were divided into 'Tag Options' and 'Highlight Options':

For selected charges, Tag Options buttons perform the same command tasks as those listed in the Key's Help screen accessed in the Multi-line Display section above. Each Tag Options button has an underlined letter in its' title which correlates to the options in the Key's Help screen. For example, 'e' is underlined in [Transfer to Insurance] and performs the same action as pressing the 'E' key after a line, or multiple lines, are selected.
The 'Tag Options' buttons correlate to the Key's Help options as follows:
66. [Print Claim]: See Key's Help option 'C' for details.
67. [UB Form]: See Key's Help option 'U' for details.
68. [WC Statement]: See Key's Help option 'W' for details.
69. [Statement]: See Key's Help option 'S' for details.
70. [Create XML]: See Key's Help option 'R' for details.
71. [Follow Up]: See Key's Help option 'O' for details.
72. [Submit Claim]: See Key's Help option 'B' for details.
73. [Transfer to Patient]: See Key's Help option 'P' for details.
74. [Transfer to Insurance] (Effective version 13.07.08): See Key's Help option 'E' for details.
75. [Put on Hold] (Effective version 13.07.08): See Key's Help option 'H' for details.
Highlight Options (Effective version 13.07.08)
Highlight Options serve as quick links to corresponding tables for tagged charges/patients. See details for each button: Diagnosis, Charge Info, Claim Requirement, Encounter, Patient, Facility, Provider, Referring, and Insurance.
76. [Diagnosis] displays the following window where Diagnosis codes may be added, modified, or deleted.

76.1 To add a diagnosis to the list, click on the [Add] button and then enter the Diagnosis code.
76.2 To modify an existing code; i.e., change it to a different code, click on the diagnosis code to be changed, click on [Modify], type in the correct code, and press Enter.
76.3 To delete a diagnosis code from the list, click on the Diagnosis, and then click on [Delete]. After clicking on [Delete], the following window displays. Click [Yes] to delete the diagnosis code OR click [No] to return to the Charge Review screen.

76.4 Click [Exit] to return to the Charge Review screen. Changes made are automatically saved.
Effective version 15.08.06, if the date in the <ICD10 Effective Date> field on the Utility --►Set Up --►Parameter screen is equal to or greater than October 1, 2015, these two selection boxes are available for the <Diagnosis> field:
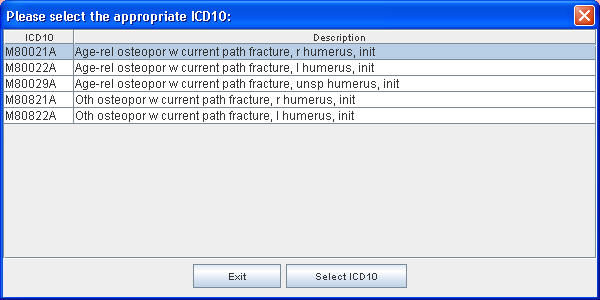
a. If an ICD-9 code is entered in the <Diagnosis> field, Intellect displays a selection list from which to choose an appropriate ICD-10 code. Highlight the appropriate ICD-10 code and click the [Select ICD-10] button to add the diagnosis to the multi-row table display, OR click [Exit] to close the selection screen.
b. When either a keyword or partial ICD-10 diagnosis description is entered in the <Diagnosis> field, Intellect displays an ICD-10 Lookup screen which includes ICD-10 code options for the keyword/description displayed in the <Search Phrase> field. For example, entering hand fracture in the <Diagnosis> field and pressing [Enter] displays:

Codes displayed in blue, as shown above, may be expanded to the next level. Double-click on the code OR select the code and click the [Expand] button at the bottom of the pop up window. The next level of codes is then displayed:

c. Click [Back] to return to the original list, click [Select] to choose the highlighted code for the charge, OR click [Exit] to close the ICD10 Lookup screen.
77. [Charge Info] displays the fields most commonly modified when correcting charge information on rejected claims. After making changes, click [Modify] to save the changes, OR click [Exit] to return to the Charge Review screen without saving changes.

Note: If the Apply To All box is selected, the changes are applied to all the charges currently selected. This option works only with the fields with asterisks: <Category>, <Referring Dr>, <Who>, <Assignment>, <Lab>, <Billing Date>, <Sec. Bill Date>, <Insurance Code>, and <Sec. Insurance>.
Note: Twelve diagnosis pointers may be entered in the <RDX> field.
Updates:
The <Billing Provider>, <Facility>, <Referring Dr>, <Category>, <Insurance Code>, and <Sec. Insurance> fields require validation of entered values. In the past, pressing [Enter] was the only method to check the validity of the field input. Effective version 13.08.20, field input can be validated regardless of whether a mouse or the [Enter] key is used.
Effective version 19.03.26: Three new fields, the <Copay Due>, <Deduct Due>, and <Co-Ins Due> fields, were added to the Charge Information screen to allow the modification of the unpaid copay, deductible, and co-insurance for a charge.
Effective version 18.07.18 - New field. Prior to this release, it was found that when posting charges with an encounter that also had a lab in the encounter and the encounter was no longer attached to the charge, the lab was still attached to the charges and printing in Box 32 and was also being included in the electronic 837 submission in NM1-77. As of version 18.07.18, a <Lab> field was added to the Charge Information window to allow the LAB to be removed from the charge history.
Effective version 15.09.02 - New Field. The <EN#> field was added to this screen, allowing an encounter that already exists to be entered.
78. [Claim Requirement] goes to the Modify CLAIM REQUIREMENT screen. The fields on this screen vary per claim (see Utility --►Procedure --►Procedure <Encounter Screen> for set up instructions). Information may only be added in the available fields. Information may not be modified on this screen.
78.1 After completing the claim information, click [Modify] to save the changes, [Clear] to clear all the fields on the screen, OR click [Exit] to return to the Charge Review screen without saving changes.
79. [Encounter] goes to the Modify Encounter screen linked to the tagged charge(s). If the charge was not linked to an Encounter, the program opens an 'Add Encounter' screen.
79.1 After making changes, click [Modify] to save the changes, [Clear] to clear all fields on the screen, OR click [Exit] to return to the Charge Review screen without saving changes. After selecting [Clear] or [Exit], this pops up:

79.1.1 Select one:
• Yes - to save the changes.
• No - to NOT save the changes. Intellect returns to the Charge Review screen.
• Cancel - to return the focus to the Modify Encounter screen. Any changes made are still reflected on the screen.
80. [Patient] goes to either the Registration --►Regular --►Patient --►Modify or Registration --►Worker --►Worker --►Modify screen, as applicable, where information may be modified or added as needed. Note: The program determines whether or not to open the Regular or Worker screen based on the patient's Utility --►Category code <Type>. If the <Type> is W or F, the Worker screen is opened; all other Types open the Regular screen. Changes to insurance may also be made at this time.
80.1 After making changes, click [Modify] to save the changes, [Clear] to clear all fields on the screen, OR click [Exit] to return to the Charge Review screen without saving changes. After selecting [Clear] or [Exit], this pops up:

80.1.1 Select one:
• Yes - to save the changes.
• No - to NOT save the changes. Intellect returns to the Charge Review screen.
• Cancel - to return the focus to the Modify Patient screen. Any changes made are still reflected on the screen.
81. [Facility] goes to the Utility --►Facility --►Modify screen where information may be modified or added as needed.
81.1 After making changes, click [Modify] to save the changes, [Clear] to undo changes which were modified on the screen, OR click [Exit] to return to the Charge Review screen without saving changes. After selecting [Clear] or [Exit], this pops up:

81.1.1 Select one:
• Yes - to save the changes.
• No - to NOT save the changes. Intellect returns to the Charge Review screen.
• Cancel - to return the focus to the Modify Facility screen. Any changes made are still reflected on the screen.
82. [Provider] goes to the Utility --►Provider --►Provider --►Modify screen where information may be modified or added as needed.
82.1 After making changes, click [Modify] to save the changes, [Clear] to clear all fields on the screen, OR click [Exit] to return to the Charge Review screen without saving changes.

82.1.1 Select one:
• Yes - to save the changes.
• No - to NOT save the changes. Intellect returns to the Charge Review screen.
• Cancel - to return the focus to the Modify Doctor screen. Any changes made are still reflected on the screen.
83. [Referring] goes to the Utility --►Referring --►Modify screen where information may be modified or added as needed.
83.1 After making changes, click [Modify] to save the changes, [Clear] to clear all fields on the screen, OR click [Exit] to return to the Charge Review screen without saving changes. After selecting [Clear] or [Exit], this pops up:

83.1.1 Select one:
• Yes - to save the changes.
• No - to NOT save the changes. Intellect returns to the Charge Review screen.
• Cancel - to return the focus to the Modify Referring screen. Any changes made are still reflected on the screen.
84. [Insurance] goes to the Utility --►Insurance --►Insurance --►Modify screen where information may be modified or added as needed.
84.1 After making changes, click [Modify] to save the changes, [Clear] to clear all fields on the screen, OR click [Exit] to return to the Charge Review screen without saving changes. After selecting [Clear] or [Exit], this pops up:

84.1.1 Select one:
• Yes - to save the changes.
• No - to NOT save the changes. Intellect returns to the Charge Review screen.
• Cancel - to return the focus to the Modify Insur_Co screen. Any changes made are still reflected on the screen.