
Intellect™
MANAGEMENT MENU OPTIONS

Balance
Balance
Before running the Balance report, Management --►Aging --►Report Aging should be run. If this is not set for Automation, it should be done manually (see Age Account at the bottom of this document).
Balance reports allow your accounts receivable to be printed based on several aging criteria. This report is affected by the set up under Utility --►Category <Aging Method> and <Aging Group 1 (2, 3, and 4)>. Balance reports are run by Provider only.
With this Management Report, Intellect provides the capability to print, Email, or Fax. This report is NOT programmed for Excel import.
Please note that with all management reports, the patient's Category and Insurance at the time of posting from the Charge screen are associated with that item forever.
1. To display the Print Balance Screen in Intellect, go to Management --► Balance --►Balance

The Print BALANCE screen opens:

2. Selection Criteria 
2.1 This field allows accounts to be defined to print based on alphabetical criteria.
2.2 Leave blank to select all patients that meet any other criteria entered in the following fields OR define the parameter using a hyphenated alphabetical range (such as A-L, as shown below) to return patient accounts where the last name begins with any letters in that range.

3.1 This field allows accounts to be defined to print based on account balance or aging group. The selection in this field determines the report.
3.2 Accept the 'Balance' default, OR use the drop-down list for an alternate selection. To view the list of options with descriptions, press the [F2] key OR click directly on the field.
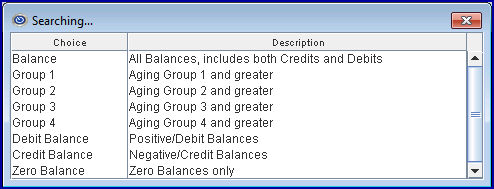
To view the list of only the options, click on the arrow. To select, double-click on the correct code, OR use the ↑ (up) and ↓ (down) arrows to highlight the correct code, and then press the [Enter] key to select.
*Note: Effective version 9.12.08: The single-character code choices on the drop-down lists for the <Aging> field were replaced with complete word choices, making the code selection easier. For reference, in 3.3 below, the former single-character code choices are shown in parenthesis behind the new code choice.
3.3 For each selection, the report includes:
Balance (A*): ALL balances including credits, NOT including zero.
Group1 (1): Any account that has a current balances in Utility --► Category <Aging Group 1>.
Group 2 (2): Any account that has a balance over thirty days old in Utility --►Category <Aging Group 2>.
Group 3 (3): Any account that has a balance over 60 days old in Utility --►Category <Aging Group 3>. See examples for Group 1 and/or Group 2.
Group 4 (4): Any account that has a balance over 90 days old in Utility --►Category <Aging Group 4>. See examples for Group 1 and/or Group 2.
Zero Balance (Z): Patients with zero balance ONLY.
Debit Balance (P): All positive balances, NOT including credits or zero balances.
Credit Balance (N): All negative balances NOT including credits or zero balances.
4. Category 
4.1 Limits the results by specific patient category.
4.2 Press [Enter] to bypass this field to request ALL categories OR use a specific category by typing its' Utility --►Category <Category Code>.
4.3 This accepts multiple values:
• separated by commas with no spaces:

• an asterisk * to return all Categories starting with the portion of the code entered prior to the *. For example, I* prints all Categories whose code begins with I:

5. Insurance 
5.1 Limits the results by specific patient insurance.
5.2 Press [Enter] to bypass this field to request ALL insurance companies OR select a specific insurance by typing its' Utility --►Insurance --►Insurance <Insurance Co. Code>.
5.3 This accepts multiple values:
• separated by commas with no spaces:

• an asterisk * to return all Insurers starting with the portion of the code entered prior to the *. For example, B* prints all Insurers whose code begins with B:

6. Amount 
6.1 Limits the results by setting a specific minimum dollar balance.
6.2 Press [Enter] to bypass this field to accept the default of 0.00, requesting all dollar amounts, OR enter a dollar amount, requesting all A/R to meet and/or exceed the amount entered for this report.
7. Provider Code 
7.1 The default is all providers (leave blank).
7.2 To filter the results based on a specific provider, type the Utility --►Provider --►Provider <Provider Code>
7.3 This field does NOT accept multiple values but accepts the asterisk * to return all Providers starting with the portion of the code entered prior to the *. For example, J* prints all Providers whose code begins with J.

8. Department Code 
8.1 The default is all departments (leave blank).
8.2 To request the report for a specific department, type the Utility --►Provider --►Provider <Department> name or number.
9. All/Patient/Insurance 
9.1 This field allows the records in the report to be further filtered, or limited.
9.2 Accept the 'All' default, OR use the drop-down list for an alternate selection.
9.3 To view the list of options with descriptions, press the [F2] key OR click directly on the field. To view the list of only the codes, click on the arrow. To select, double-click on the correct option, OR use the ↑ (up) and ↓ (down) arrows to highlight the correct option, and then press the [Enter] key to select.
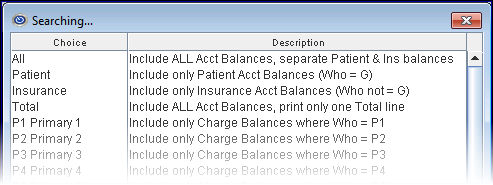
Note: Effective version 9.12.08: The single-character code choices on the drop-down list for the <All/Patient/Insurance> field were replaced with complete word choices, clarifying the code selection.
When making a selection, please note:
9.3.1 If options All, Patient, Insurance, or Total are selected, the insurance code printed on the report, and used in sorting by Insurance (see the <Sorted By> field), is always the current P1 insurance.
9.3.2 If the 'All' option is selected, the printed report shows one line with the totals and two sub lines (Patient Balance, Insurance Balance) within each patient account line:
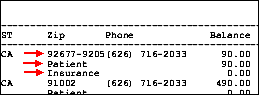
And the Report shows three lines for totals:
• Click here for a sample report using the 'All' option.
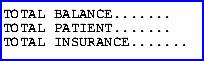
9.3.3 If options Patient, Insurance, or Total are selected, the report returns a single line TOTAL BALANCE at the bottom of the report.
• If Patient is selected, TOTAL BALANCE indicates the patient amount paid, or due. This is the same total that displays as TOTAL PATIENT when option 'All' is selected. Click here for a sample report with a patient balance.
• If Insurance is selected, TOTAL BALANCE indicates the insurance amount paid, or due. This is the same total that displays as TOTAL INSURANCE when option 'All' is selected. Click here for a sample report with an insurance balance.
• If Total is selected, TOTAL BALANCE indicates the sum of the patient and insurance balances. This is the same total that displays as TOTAL BALANCE when option 'All' is selected. Click here for a sample report with a Total Balance.
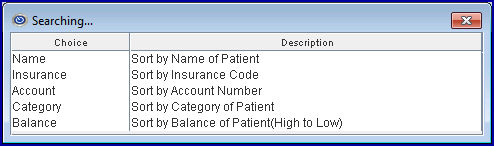
10.1 This field affects how the report is displayed. The drop-down options for this field are column names by which the report may be sorted.
10.2 Accept the default 'Name' column, OR use the drop-down list for an alternate selection.
• Select a column with alphabetical information (such as the patient name) to sort the records by that column from A-Z. See a sample report sorted by the Name column.
• Select a column with non-monetary numeric information (such as the account number) to sort the records by that column from least to greatest. See a sample report sorted by the ACN column.
• Select a column containing both alphabetical and non-monetary numeric information (possibly the Insurance or Category Code) to sort the records by that column with the numeric information first (in order from least to greatest), followed by the alphabetical information from A-Z. See a sample report sorted by the INS1 or Cat column.
Note: In the INS1 column, the insurance code printed on the report is always the current P1 insurance.
• Select a column with monetary information (i.e., the 'Balance' column added in version 9.12.08) to sort the records by that column from lowest monetary amount to highest. See a sample report sorted by the Balance column.
Effective version 9.12.08: The single-character code choices on the drop-down lists for the <Sorted By> field were replaced with complete word choices, making the code selection easier. For reference, the new codes correspond to the old codes as follows: Name - N, Insurance - I, Account - A, Category - C, and Balance - B.
10.3 To view the list of codes with descriptions, press the [F2] key OR click directly on the field. To view the list of only the codes, click on the arrow. To select, double-click on the correct code, OR use the ↑ (up) and ↓ (down) arrows to highlight the correct code, and then press the [Enter] key to select.
11. When the information is completely entered, select an option:

11.1 Click [Print] OR press [Enter] to display the Print Balance Report dialog box:
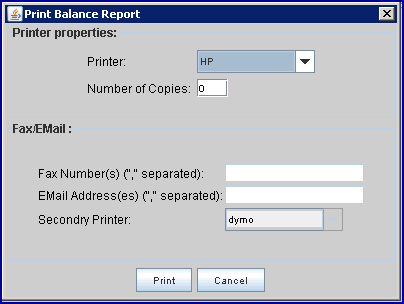
11.1.1 Printer Properties:
11.1.1.1 Printer: The default printer for the logged-in clinic and password is selected. To select a different printer, either click on the arrow, OR press the → (right arrow) on the keyboard to view the list of printer codes. In our example, the defaulted Printer is HP. This is just an example of a printer name and may or may not be set up on the system.
To select the printer type, click on the code, OR use the ↑ (up) and ↓ (down) arrows to highlight the correct code; then press the [Enter] key to select.
11.1.1.2 Number of Copies: This field defaults to either 0 (zero) or 1. Both print 1 copy. To print more than one copy, enter the number of copies.
11.1.2 Fax/Email:
In addition to printing reports, Intellect provides the capability to export reports to Email, Fax, Disk, or Archive. A secondary printer may also be selected, if one is set up, by clicking on the arrow to display the drop-down list. This report is NOT programmed for Excel import.
11.1.3 Select the [Print] button to send the request to the printer (or as a Fax or email).
11.1.4 Select the [Cancel] button to clear the screen and return to the <Report Code> field without saving or printing.
11.2 Click [Clear] to clear all information and return the focus to the <Report Code> field without saving.
11.3 Click [Exit] to clear the screen and return the focus to the main Intellect screen.
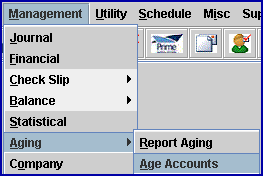
This option is used to physically age the patients' accounts according to their set up under Utility --►Category <Aging Method> and <Aging Group 1 (2, 3, and 4)>. Your system comes with this feature automated, so your accounts are aged each night.
To age accounts manually, select the Age Account menu option (see below), to begin aging the accounts.
The length of time this process takes depends on the number of patient accounts. The screen first displays this prompt:

Then the Process displays:

Sample Balance Reports based on the <Aging> field

