Intellect™
REGISTRATION MENU OPTIONS

Introduction
Use the Registration sub-menus to set up and maintain patient demographics and related patient insurances. Demographic and insurance menu options are available for regular patients and worker's compensation patients:


Information for each option is covered in detail in subsequent documentation.
Videos Available: Click Regular Patient Registration, Worker Registration, and/or Pediatric Registration to access the links. Depending on the system set up, the media player may need to be activated. Speakers need to be attached to the workstation to hear the instructions.
Note: To view the videos, log-in through the www.primeclinical.com website. Current support is required.
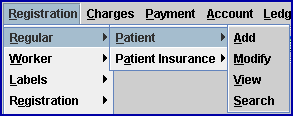
Each menu option and sub-menu may also have Add, Modify, View, Search, or Delete sub-options. For example:

The screens for the Modify, View, Search, or Delete sub-options look like the screen for the Add option, with the exception of the buttons at the bottom of the screen, as noted below:
1. Modify option 
1.1 Use this option to make changes/additions to already created records. See detailed documentation for modifying the Patient, Additional Demographics, if any, Patient Insurance, Worker, and Worker Insurance.
2. Delete option 
2.1 When permitted, this option allows the deletion of individual records. Note: Regular Patients and Workers Compensation Patients may NOT be deleted.
2.2 Insurance records, Doctors First Report, and all PR records may be deleted.
3. View option 
3.1 Use this option to display individual records. All information displayed on the screen is for viewing only and may not be modified. Add and Modify options are available for staff with the necessary security level to add or modify records.
3.2 These menus have View Options: Patient, Worker, First Report, all PRs, and Authorization. Patient and Worker registration screens have buttons to view respective insurance. See example above.
3.3 When viewing the Insurance screen for patients with more than one insurance record, the [Next] button is enabled to allow the screen to display the next record.

4. Search option

4.1 Use this option to search for a record, or a group of records, by field selections on a specific screen. When the Search option is selected, Intellect displays the associated screen. For example, when selecting the Search option from the Patient menu, Intellect displays the Patient screen; when selecting the Search option from the Patient Insurance menu, the Insurance screen displays, etc. To search, complete the field(s) for the desired information and select [Search] to start the search.
4.2 For example, if CASH is set up for a Category and a user wants to find all patients who pay in cash:
4.2.1 Go to Registration --►Regular --►Patient --►Search.
4.2.2 In the <Description> field, enter the description for the CASH category, as set up in Utility --► Category <Description> field.
Note: The search is made on the Utility --►Category <Description> field, not the Utility --►Category <Category Code> field. As a result, if the <Category Code> is CASH and the <Description> is PATIENT RESPONSIBILITY, if CASH is entered in this <Category> field to perform a search, nothing displays.
4.2.3 Select [Search] to start the search.
4.2.4 When search results are found, the blue Title Bar at the top of the search results displays the total number of records found.

4.2.5 Highlight a desired record and press [Enter].
4.3 Once a search is complete and a record is selected:
4.3.1 If more than one record is returned and a record is selected, the [Next] button is enabled to change the screen display to the next record sequenced by Account Number.
4.3.2 If more than one record is returned and any record other than the first record is selected, both the [Next] and the [Back] buttons are enabled.
4.3.3 Select [Clear] to clear all the search results and return the focus to the first field.
4.3.4 Select [Print All] to print a list of all the records returned in the search.
4.3.5 Select [Print] to print only the record that is currently active (shown on the screen).