Intellect™
REGISTRATION MENU OPTIONS

Credit Card
Effective version 14.02.04
This menu option is used to set up a credit card for a patient. Once the credit card information is entered, Intellect pulls the data when posting payments using the ‘☐ Credit Card Payment’ option at the bottom of the Payment --►Open Item screen. ‘☐ Credit Card Payment’ may be selected while posting a payment from the payer, but ONLY when the <Who> column = ‘G.’ Intellect applies the payment to the ‘entire’ balance of the displayed charges where <Who> = ‘G.’
When a credit card has been added and used, please note the following:
When in Ledger --►Accounting, and there were payments made from the payer at the same time as the Payment --►Open Item ‘☐ Credit Card Payment’ option was also chosen, and the balance on the charges were to multiple providers, Intellect displays the payments as a separate entry for each provider.
Note: For a family using the same credit card, each family member/patient must be set up using this option.
Before this option may be used, the clinic and/or providers must be registered with authorize.net. For set up information, go to Credit Card Authorization.
Note 1: If only some of the providers in a clinic are registered with Authorize.net, credit card payments are only made for the providers who are registered.
Note 2: For clinics that allow patients to make payments through the Online Payment Portal or Patient Portal, Authorize.net must be used as the third-party vendor for processing the credit card payments. For additional information, see New Features --► Online Payment Portal for the portal option available for clinics using Intellect only and New Features --► Patient Portal --►Patient Access for the portal option available to PCM users only.
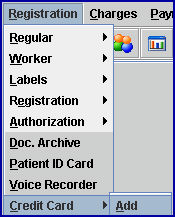
1. To set up a credit card in Intellect, go to Registration --► Credit Card--► Add:

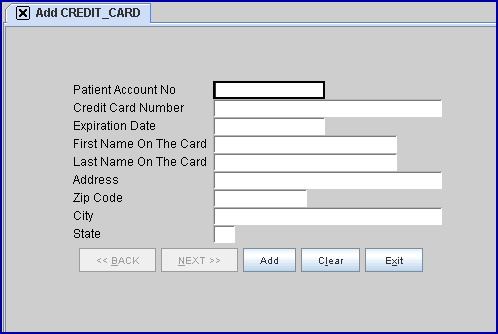
The Add CREDIT_CARD screen displays:

2. Patient Account No 
2.1 Enter the account number for the patient for whom to add credit card information, and press [Enter]. After pressing [Enter], Intellect fills-in the <Zip Code> field with information from the Registration --►Regular --►Patient --►Add patient screen.
3. Credit Card Number 
3.1 Enter the credit card number.
3.2 For security, after entering the credit card number, Intellect changes all but the last four digits on the screen to asterisks (*).
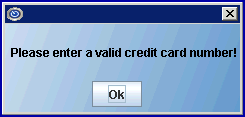
3.3 If a credit card number is entered with less than 10 digits, an alert message displays:

Press [OK] to return to the <Credit Card Number> field where the correct credit card number may be entered.
4. Expiration Date 
4.1 Enter the expiration date of the credit card in MM/DD/YY order.
5. First Name On The Card 
5.1 Enter the first name of the credit card holder as it appears on the credit card.
6. Last Name On The Card 
6.1 Enter the last name of the credit card holder as it appears on the credit card.
7. Address 
7.1 Enter the street number and name, as shown on the Registration --►Regular --►Patient screen.
8. Zip Code 
8.1 If this information is available on the Registration --►Regular --►Patient patient screen, this field is automatically filled-in when the <Patient Account No> field is completed.
8.2 This is a read-only field and may not be modified.
9. City 
9.1 If this information is available on the Registration --►Regular --►Patient patient screen, this field is automatically filled-in when [Enter] is pressed in the <Zip Code> field.
9.2 This is a read-only field and may not be modified.
10. State 
10.1 If this information is available on the Registration --►Regular --►Patient patient screen, this field is automatically filled-in when [Enter] is pressed in the <Zip Code> field.
10.2 This is a read-only field and may not be modified.
11. When the information is completely entered, select one of these options:

11.1 Click [Add] to clear the screen, return the focus to the <Patient Account No> field, and save the new credit card.
11.2 Click [Clear] to display:

11.2.1 Click [Yes] to clear the screen, return the focus to the <Patient Account No> field, and save the new credit card.
11.2.2 Click [No] to clear the screen, and return the focus to the <Patient Account No > field without saving the credit card.
11.2.3 Click [Cancel] to return to the Add CREDIT_CARD screen.
11.3 Click [Exit] to display:

11.3.1 Click [Yes] to clear the screen, return the focus to the <Patient Account No> field, and save the new credit card.
11.3.2 Click [No] to close the Add CREDIT_CARD screen and return the focus to the main Intellect screen without saving the credit card.
11.3.3 Click [Cancel] to return to the Add CREDIT_CARD screen.