
Intellect™
REGISTRATION MENU OPTIONS

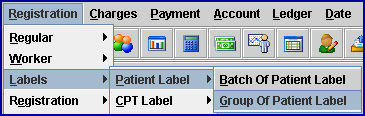
Labels
Patient Label GOP
This option allows the printing of mailing labels for groups of patients. Labels may be requested for patients with a specific Category, Insurance Company, Gender, Month of Birth, or any combination thereof.
NOTE: All label printing in Intellect returns only those patients that have the fields complete in their registration. For example, if a specific insurance is requested, patients that do not have any insurance do not print.
Contact support to have these parameters removed from the label-printing screen.
1. To print a group of patient labels in Intellect, go to Registration --►Labels --► Patient Label --►Group Of Patient Label
The printer dialog box displays:
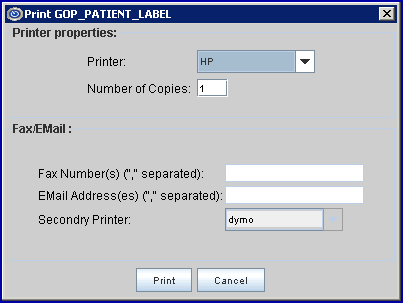
1. Printer Properties:
1.1.1 Printer: The default printer for the logged-in clinic and password is selected. To select a different printer, either click on the arrow, OR press the → (right arrow) on the keyboard to view the list of printer codes. In our example, the defaulted Printer is HP. This is just an example of a printer name and may or may not be set up on the system.
To select the printer type, click on the code, OR use the ↑ (up) and ↓ (down) arrows to highlight the correct code, and then press the [Enter] key to select.
Note: The Dymo Label Printer may be used with this option.
1.1.2 Number of Copies: Labels always print 1 copy. To have the system set to always print more than one copy of labels, contact support.
1.2 Fax/Email: These options are not available when printing labels.
1.3 Select the [Cancel] button to clear the screen and return the focus to the main Intellect screen without saving or printing.
1.4 Select the [Print] button to open this parameter screen:
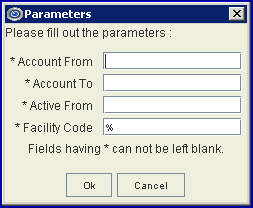
2. Account From 
2.1 Type the first Registration --►Patient <Patient Account No.> to print.
2.2 This field works in conjunction with the <Account To> field to create a range of patient accounts.
2.3 This field may not be left blank/empty.
3. Account To 
3.1 Type the last Registration --►Patient <Patient Account No.> to print.
3.2 This field works in conjunction with the <Account From> field to create a range of patient accounts.
3.3 This field may not be left blank/empty.
4. Active From 
4.1 Type the desired date.
4.2 This field may not be left blank/empty.
5. Facility Code 
5.1 Type a Utility --►Facility <Facility Code> to request Intellect to select only those patient’s treated at this facility.
5.2 This field may not be left blank/empty.
6. When the information is completely entered, select one of these options:
![]()
6.1 Select [Ok] to complete the printing.
6.2 Select [Cancel] to clear the screen and return the focus to the main Intellect screen.