
Intellect™
SCHEDULE MENU OPTIONS

Appointment
Receipt
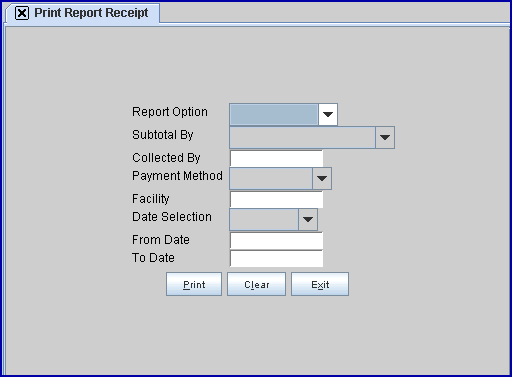
Print Report Receipt
This option is used to print a report of patient payment receipts. The receipts are created and saved via Schedule --► Appointment --► Receipt --►Add.
PCM users only: For payments made by patients via Patient Portal, the information posted in the portal creates a receipt with operator number 50000. This Print Report Receipt option allows users to run a receipt report to identify payments made through Patient Portal. Set up requirements to run the receipt report are given in the applicable fields below.
1. To print a patient payment receipts report in Intellect, go to Schedule --►Appointment --► Print Report Receipt

The Print Report Receipt screen opens:
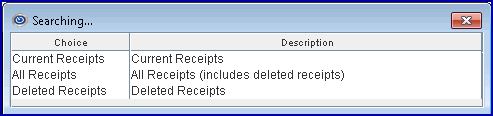
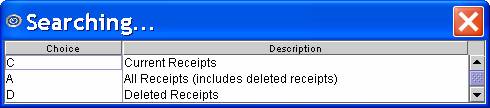
Effective Version 9.12.10 Field Modification. The one- and two-character code choices on the drop down lists have been replaced with explanatory choices, making the code selection more user-friendly and comprehensive. Note: The drop-down list descriptions for the code choices have remained the same, allowing correlation between the old and new code choices.
2. Report Option 
2.1 Select a report option from the drop-down list. If no selection is made, it defaults to Current Receipts (the recommended option).
2.2 Click on the field, OR press the [F2] key to display the valid choices. To view the list of only the codes, click on the arrow.
Select by clicking on the correct code, OR use the ↑ (up) and ↓ (down) arrows to highlight the correct code and then press the [Enter] key to select.
Effective version 9.12.10
All versions prior to 9.12.10
2.3 PCM users only. To run a receipt report to identify payments made through Patient Portal, it is suggested this field is set to 'C.'
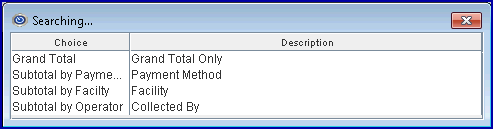
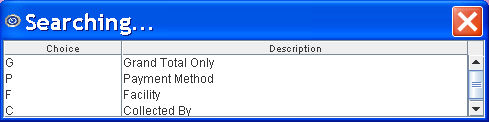
3. Subtotal By 
3.1 The default subtotal is Grand Total, which is the recommended option.
3.2 Accept this default OR use the drop-down list to make an alternate selection.
Effective version 9.12.10
All versions prior to 9.12.10
4. Collected By 
4.1 This field allows the user to order the requested selection for a specific operator(s) by entering their code(s).
4.2 Leave this field blank to review all receipts collected by the staff.
4.3 To accommodate multiple operator numbers, this field accepts multiple values separated by a comma.
4.4 PCM users only. To run a receipt report to identify payments made through Patient Portal, enter 50000 in this field.
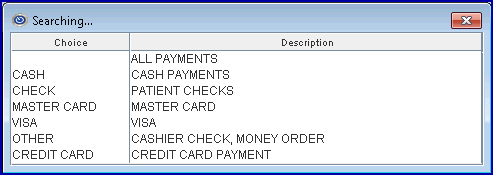
5. Payment Method 
5.1 This field allows the user to order the requested selection for a specific payment method by selecting a specific type.
5.2 Leave this field blank (the default) to request all payment methods.
5.3 If running a receipt report to identify payments made through Patient Portal, leave this field blank; otherwise, use the drop-down list to make a selection:
6. Facility 
6.1 This field allows the user to order the requested selection for a specific POS by entering a Utility --►Facility <Facility Code>.
6.2 Leave this field blank to request all locations.
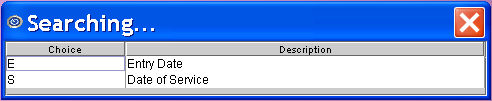
7. Date Selection 
7.1 Version 9.12.01 - New field added
7.2 This field allows the user to choose whether or not to use the date the receipt was entered or the actual date of service. Select an option from the drop-down list.
7.3 PCM users only. If running a receipt report to identify payments made through Patient Portal, it is suggested to select 'Entry Date.'
7.4 Click on the field, OR press the [F2] key to display the valid choices. To view the list of only the codes, click on the arrow.
Select by clicking on the correct code, OR use the ↑ (up) and ↓ (down) arrows to highlight the correct code and then press the [Enter] key to select.
Effective version 9.12.10
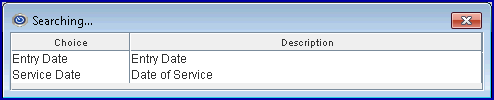
Note: 'Service Date' is the recommended option.
All versions prior to 9.12.10
8. From Date 
8.1 Type the beginning date to include in this report. If left blank, this field defaults to the current calendar date.
9. To Date 
9.1 Type the latest date to include in this report. Default is always the current calendar date.
10. When the information is completely entered, select one of these options:

10.1 Select [Print] to display a printer dialog box:
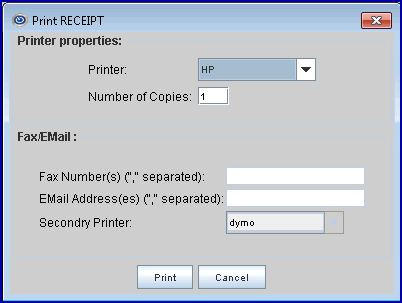
10.1.1 Printer Properties:
10.1.1.1 Printer: The default printer for the logged-in clinic and password is selected. To select a different printer, either click on the arrow, OR press the → (right arrow) on the keyboard to view the list of printer codes. In our example, the defaulted Printer is HP. This is just an example of a printer name and may or may not be set up on the system.
To select the printer type, click on the code, OR use the ↑ (up) and ↓ (down) arrows to highlight the correct code; then press the [Enter] key to select.
10.1.1.2 Number of Copies: This field defaults to either 0 (zero) or 1. Both print 1 copy. To print more than one copy, enter the number of copies.
10.1.2 Fax/Email:
In addition to printing reports, Intellect provides the capability to export reports to Email, Fax, Disk, or Archive. A secondary printer may also be selected, if you have one set up, by clicking on the arrow to display the drop-down list. This report is NOT programmed for Excel import.
10.1.3 Select the [Print] button to send the request to the printer (or as a Fax or email).
10.1.4 Select the [Cancel] button to clear the screen and return to the Print Report Receipt screen without saving or printing.
10.2 Click [Clear] to clear all information and return the focus to the <Report Option> field without saving.
10.3 Click [Exit] to clear the screen and return the focus to the main Intellect screen without saving.