Intellect™
SCHEDULE MENU OPTIONS

Appointment
Full Day
Tab Options
Month Tab
Video Available: Click Navigating the Appointment Schedule to access the link. Depending on the system set up, the media player may need to be activated. Speakers need to be attached to the workstation to hear the instructions.
Note: To view the videos, log-in through the www.primeclinical.com website. Current support is required.
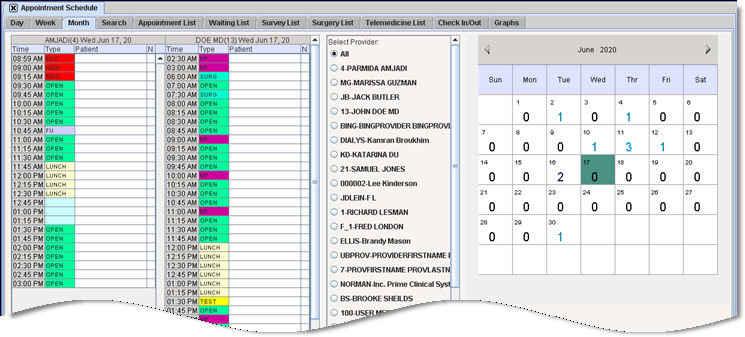
Selecting the Month tab displays three frames featuring a full calendar, a displayed provider selection list, and a scrollable display of single day appointment columns.
The default is the current calendar day with all providers selected ( ![]() All).
All).
Version 9.12.20 and greater:

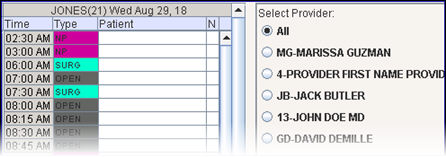
Versions prior to 9.12.20:

Calendar Frame
1. Month Selection Tool 
1.1 The default is the current month.
1.2 Use the arrows to advance one month at a time forward or one month at a time back.
2. Days of the Month 
2.1 The small number in the upper left hand corner indicates the calendar date.
2.2 The large number in the center indicates the number of appointments scheduled for that date based on the Select Provider parameter in the next frame; i.e., either all or individually selected provider’s appointments.
2.3 Click on the day to display the single day appointments for that date in the far right frame based on the Select Provider parameter in the next frame; i.e., either all or individually selected provider’s appointments.
2.4 The active day is always distinguished by the background color  .
.
Select Provider Frame
1. All 
1.1 The radio button for ![]() All is the default view.
All is the default view.
1.2 When ![]() All is selected, the appointment totals in the calendar view reflect all providers.
All is selected, the appointment totals in the calendar view reflect all providers.
1.3 When ![]() All is selected, the schedule for single day appointments in the frame on the right becomes a scrollable display listing all providers available for that day.
All is selected, the schedule for single day appointments in the frame on the right becomes a scrollable display listing all providers available for that day.
2. Individual Provider 
2.1 When an individual provider is selected (for example, ![]() Anderson, as shown above) the appointment totals in the calendar view reflect only that provider’s scheduled daily appointments.
Anderson, as shown above) the appointment totals in the calendar view reflect only that provider’s scheduled daily appointments.
2.2 Also when an individual provider is selected, the schedule for single day appointments in the frame on the right becomes a single column display listing only that provider’s schedule column for that day, if set.
Single Day Provider Frame

1. Screen properties:
This has the same properties as the Day tab view, except that schedules can be displayed on an ![]() All or individual basis and are displayed vertically with a scroll bar when
All or individual basis and are displayed vertically with a scroll bar when ![]() All is selected.
All is selected.
2. Change view:
The option to change the view by pressing [1], [2], or [3] on the top portion of the key board is also available. See Day tab view for detailed information.
3.1 The primary way to make additions or modification to the appointment schedule in the Month view is from the right-click (context) menu pop-up.
3.2 To display the menu, click on the appropriate time slot within the patient column and then right click. For example:
3.2.1 Click on an empty time slot and select Add to display the Add Appointment screen.
3.2.2 Click on an existing patient appointment for other modification options.
3.3 See right-click (context) menu for detailed information.
- OR -
3.4 Instead of using the right-click menu, type 'A' in an empty time slot to add a patient, OR type 'M' in an existing patient appointment to make modifications.