Intellect™
SCHEDULE MENU OPTIONS

Appointment
Full Day
Appointment Booking and Management
Search Appointment Dialog Box
(Appointment History Dialog Box)
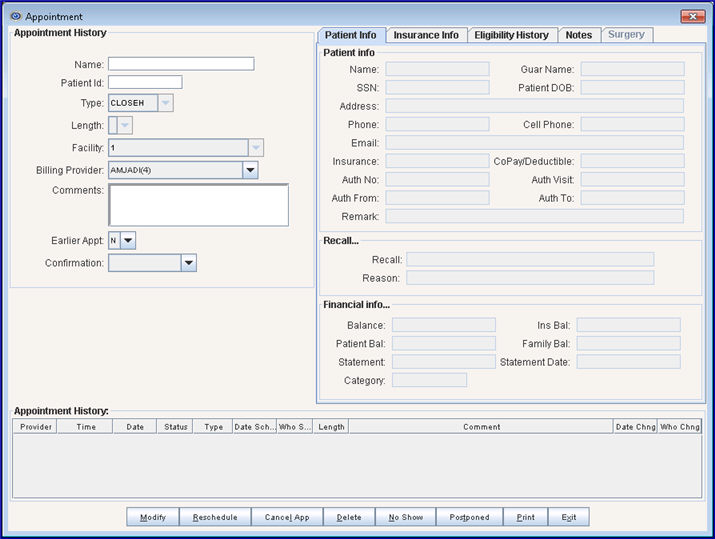
This dialog box has the exact same fields as the Modify Appointment dialog box, with the exception of the function buttons at the bottom of the screen; however, the usage and behavior of the <Name> and <Patient Id> fields are completely different. The Search Appointment dialog box is designed to accept patient Id or name input to search for certain appointment history and/or perform an assortment of actions on a patient's appointment schedule, with the exception of modifying the appointment data.
To open the Appointment History dialog box:
1. Select any day/date and time slot -- the time slot can be either filled or empty.
2. Either type the letter 'S', OR right-click to open the context menu and click Search (as shown below)

An Appointment History dialog box displays:

Instructions for this screen are divided into 4 sections:
Top right portion (tabs)
Appointment history area (at the bottom)
Action buttons (at the bottom)
1. Name: ![]()
1.1 This field is used to search for a patient either by last name or account number.
1.1.1 To search by last name, type the patients' last name and press [Enter].
OR, type up to 6 characters of the last name, and press the [F2] key. Intellect searches for the registered patient(s) with appointments. To select the name from the list, either highlight the name and press the [Enter] key, OR double-click on the name.
1.1.2 To search by account number, enter the account number, and press [Enter].
OR, press the [F2] key and, in the <Account> field, enter the beginning numbers of the account number followed by an asterisk (*). Press [Enter] all the way through the <DOB> field to display the list of choices. To select the account number from the list, either highlight the record and press the [Enter] key, OR double-click on the record.
1.2 Once a patient is selected (see above), this field displays the name of the patient for whom the search was made and, if an appointment has been scheduled at some point for the selected patient, a list of appointments display in the Appointment History area at the bottom of the screen.
2. Patient Id: ![]()
2.1 This field holds the Patient <Patient Account No> of the patient whose appointment history is to be displayed.
2.2 If a name is selected in the <Name> field, then this field displays the corresponding account number.
2.3 If the account number is known and entered, Intellect completes the screen with any appointment history.
All remaining fields are read-only and may not be accessed for modification of data.
3. Type: ![]()
3.1 This field displays the Appointment Type for this patient’s appointment, with the most current appointment on top.
4. Length: ![]()
4.1 This field displays the scheduled length for this patient’s appointment, with the most current appointment on top.
5. Facility: ![]()
5.1 This field displays the place of service, as set up in Utility --►Facility <Name> followed by the Utility --►Facility <Facility Code> for this patient’s appointment, with the most current appointment on top.
6.1 This field is for clients using the Cost Center/Billing Provider feature, set up in Utility --►Provider --►Provider <Cost Center/Dr>. If <Billing Provider> does not apply, press the [Enter] key to accept the default.
6.2 When an appointment is scheduled for a provider whose Utility --►Provider --►Provider <Cost Center/Dr. (C/D)> = 'C' and Utility --►Provider --►Provider <Billing Provider> is completed, the program defaults the Utility --►Provider --►Provider <Billing Provider>.
6.3 When the Utility --►Provider --►Provider <Cost Center/Dr. (C/D)> = 'D', the Scheduled Provider is always defaulted, even if Utility --►Provider --►Provider <Billing Provider> is completed.
7. Comments: 
7.1 For the appointment with the most current schedule date, this field displays any comment associated with the Appointment Type, or any manually entered comment.
8. Earlier Appointment ![]()
8.1 This field only shows the patient’s current Yes/No status. It cannot be modified here.
9.1 This drop-down is used to update and color code the current appointment status.
9.2 Use of this tool is optional. Select the appropriate status.

* An automatic Dialer/Updater is available for purchase. Contact PCS for details.
(i.e., Patient Info, Insurance Info, Eligibility History, Notes, and Surgery tabs)
These fields are read-only on this screen. For field definitions, see:
Add Appointment Dialog Box
Modify Appointment Dialog Box
Upon completion of a patient search, either by last name or account number, if an appointment has been scheduled at some point for the selected patient, a list of appointments displays in Appointment History. The Appointment History display for the search dialog box is unique in that the focus may be scrolled to select the desired appointment using [Enter], the up arrow [↑], the down arrow [↓], or by using the mouse.

1.  : Displays the Utility --►Provider --►Provider <Provider Code> for previously booked appointments.
2.  : Displays the time of a booked appointment.
3.  : Displays the date of a booked appointment.
4.  : Displays the most recent action taken in respect to a booked appointment; i.e., Add, Modify, Reschedule, No Show, etc.
5.  : Displays the Utility --►Set Up --►Appointment --►Appointment Type <Appointment Type> of a booked appointment.
6.  : Displays the calendar date when an appointment is booked.
7.  : Displays the operator number of the person that made the patient’s appointment.
8.  : Displays the amount of time allocated for an appointment.
9.  : Displays a comment associated with the Utility --►Set Up --►Appointment --►Appointment Type <Appointment Type> for a booked appointment.
10.  : Displays the calendar date that any change was made to the patient’s appointment.
11.  : Displays the operator number of the person that made changes to the patient’s appointment.
After an appointment has been selected, these buttons are available:

1. Modify 
1.1 Effective version 15.08.06
1.2 With an appointment selected, click [Modify] to open the Modify Appointment screen where changes may be made.
Note: To make modifications in versions prior to 15.08.06, users still need to leave this screen to go to the Appointment List and click the Modify option on the context menu to open the Modify Appointment screen.
2.1 Click [Re Schedule] to close the dialog box, copying the selected appointment information to a clip board to be pasted into a desired schedule Time/Date slot, and updating the Appointment History to show the original as recsh and a new appointment as Added.
2.2 Deleted, Cancelled, Re Scheduled, Postponed (Re scheduled) cannot receive further actions because what is listed is only the record of the original appointment. Attempting to Re Schedule appointments with these statuses causes this error message to display:

This button allows one or more appointments to be canceled. Refer to the applicable documentation:
3.1 Canceling indicates the appointment will eventually be rescheduled.
3.2 In Versions less than 9.12.35: With an appointment selected, click [Cancel App] to close the dialog box, removes that appointment from the schedule, and updates the Status to Cancelled in the Appointment History.
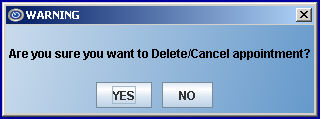
In Version 9.12.35 and greater: Click [Cancel App] to display this warning:

• Click [Yes] to cancel the selected appointment.
• Click [No] to close the warning message and the selected appointment remains as scheduled.
3.3 Appointments whose Status display as Deleted, Cancelled, Re Scheduled, Postponed (Re scheduled) cannot receive further actions because what is listed is only the record of the original appointment.
Attempting to Cancel appointments with these statuses causes this error message to display:

Effective Version 14.02.04, selected groups of appointments may be canceled all at once:
3.4 On the Appointment Schedule, right-click on the patient for whom to delete/cancel appointments.
3.5 Select ‘Search’ from the right-click menu.
3.6 Enter the search criteria for the patient and press [Enter].
3.7 Click on the first appointment to delete/cancel. Hold down the [Shift] key on the keyboard and use the up/down arrows to select the remaining appointments that need to be deleted/canceled.
3.8 Once the appointments are selected, click on the [Cancel App] button, as appropriate. Intellect displays:

• Click [Yes] to delete/cancel the selected appointments.
Note: The status does not change when the [Exit] button at the bottom of the screen is pressed and then re-enter the Appointment History screen.
• Click [No] to return to the Appointment History screen. The selected appointments remain highlighted. To un-highlight the appointments, click anywhere on the list of appointments.
Note: This modification does not apply to the ReSchedule option.
This button allows one or more appointments to be deleted. Refer to the applicable documentation:
4.1 Deleted appointments indicate scheduling errors.
4.2 In Versions less than 9.12.35: With an appointment selected, click [Delete] to close the dialog box, remove that appointment from the schedule, and update the Status to Deleted in the Appointment History.
In Version 9.12.35 and greater: Click [Delete] to display this warning:

• Click [Yes] to delete the selected appointment.
• Click [No] to close the warning message and the selected appointment remains as scheduled.
4.3 Appointments whose Status display as Deleted, Cancelled, Re Scheduled, Postponed (Re scheduled) cannot receive further actions because what is listed is only the record of the original appointment.
Attempting to Delete appointments with these statuses causes this error message to display:

Effective Version 14.02.04, selected groups of appointments may be deleted all at once:
4.4 On the Appointment Schedule, right-click on the patient for whom the appointments should be deleted/canceled.
4.5 Select ‘Search’ from the right-click menu.
4.6 Enter the search criteria for the patient and press [Enter].
4.7 Click on the first appointment to delete/cancel. Hold down the [Shift] key on the keyboard and use the up/down arrows to select the remaining appointments that need to be deleted/canceled.
4.8 Once the appointments are selected, click on the [Delete] button, as appropriate. Intellect displays:

• Click [Yes] to delete/cancel the selected appointments.
Note: The status does not change until the [Exit] button at the bottom of the screen is pressed and then re-enter the Appointment History screen.
• Click [No] to return to the Appointment History screen. The selected appointments remain highlighted. To un-highlight the appointments, click anywhere on the list of appointments.
Note: This modification does not apply to the ReSchedule option.
5.1 With an appointment selected, click [No Show] to close the dialog box, and update the Status to No Show in the Appointment History, include the patient on a Missing Appointment report, and generate a letter to the patient, if configured to do so.
5.2 Additional scheduling actions on No Show appointments may be performed.
6.1 With an appointment selected, click [Postponed] to close the dialog box copying the selected appointment information to a clip board to be pasted into a desired schedule Time/Date slot updating the Appointment History to show the original as Postponed and a new appointment as Added. This has the same effect as Re Schedule, but implies the action originated from the clinic.
7. Print ![]()
7.1 Click [Print] to close the dialog box and prints a record of this patient’s entire appointment history.
8. Exit ![]()
8.1 Click [Exit] to close the Search box.