
Intellect™
UTILITY MENU OPTIONS

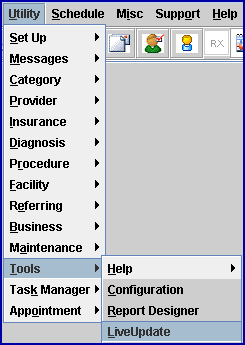
Tools
Live Update
Use this utility to update your software to the current version of Intellect. Updates contain new and improved features, and modifications of existing ones. Before updating your system, PCS recommends that you ALWAYS review the Release Notes available through Intellect by selecting Help --►Release Notes from Intellect's main menu. You may either view the update documents or print them to your local printer. When reviewing update documents, notice items marked ATTENTION as these features may immediately affect your billing. You should review all Release Notes whose version is more current than the version loaded on your server. In Intellect, the version number is located on the blue bar in the upper, left corner of your screen.
• When updating your system, Intellect verifies that your software maintenance contract is current. If not, a message displays indicating that your contract is not current.
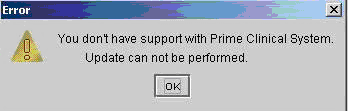
• You need to have a current maintenance contract before either you or PCS Support are able to update your system.
• To view the date your software maintenance ends, log onto the PCS website. You can do this from Intellect by selecting Support --► Prime Clinical web site. Enter your Login and Password. The date your support ends is displayed on your Client Site Welcome page.
• The first time you update your system Intellect may display the following window. If so, enter your Intellect Client ID and select [OK]. Capitalize the letter A, and include the dash between the letter A and the number. For example: A-9999

Note: Your server should be updated before updating any workstations.
1. To update to the most current version of Intellect, go to Utility --► Tools --► LiveUpdate
The Intellect LiveUpdate Applet displays:

2. Cancel ![]()
2.1 To stop the update, select [Cancel].
3. Next ![]()
3.1 Select [Next] to continue with the update. The display changes to:
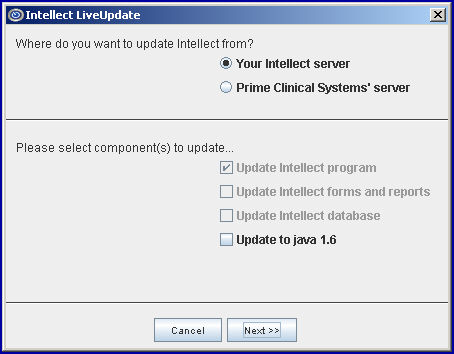
4. Your Intellect server ![]()
Note: If 'Your Intellect Server' is selected, you will be unable to select component(s) to update (see above). We recommend you always use this option when updating local workstations, unless instructed otherwise, to ensure all workstations have the same version as the server.
- OR -
5. Prime Clinical Systems' server ![]()
If Prime Clinical Systems' server is selected, update components are available for selection:
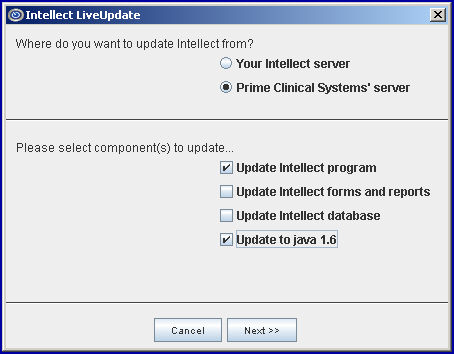
If selecting Prime Clinical Systems' server, you must have internet connections to connect to our website via DSL connection. Updating from Prime Clinical Systems' server works the same as it always has; i.e., connecting via the web to get the program, which allows components to be selected for update. This option should be used when updating your server.
5.1 Update Intellect program ![]()
5.1.1 Select this option to update your system to the next software release.
Note: Print, complete, sign, and return the Update Authorization Form to PCS prior to your update. Even if updating your system yourself, PCS requests you send us this completed form so we can update your Client Record with the version number to which you are updating. Knowing your version number is necessary if we find a critical error in the program and need to update clients with specific versions.
• If your version is less than 9.12.01, click here.
• If your version is 9.12.01 or greater, click here.
5.2 Update Intellect forms and reports ![]()
5.2.1 Select, as necessary.
5.3 Update Intellect database ![]()
5.3.1 Select, as necessary.
5.4 Update to Java 1.6 ![]()
5.4.1 Effective version 9.12.35 - New Option
5.4.2 Select the Update to Java 1.6 option to enable the program to run faster and visually enhance the display.
• When updating workstations, select Your Intellect server (see above), and check the boxes for Update Intellect program and Update to java 1.6. Then, click [Next].
• When updating your server, select Prime Clinical Systems’ server, and check the boxes for all four components, including Update to java 1.6. Then click [Next].
6. Cancel ![]()
6.1 Select [Cancel] to close the applet, stopping the update.
7. Next ![]()
7.1 Select [Next] to begin the update.
7.2 Progress bars display:
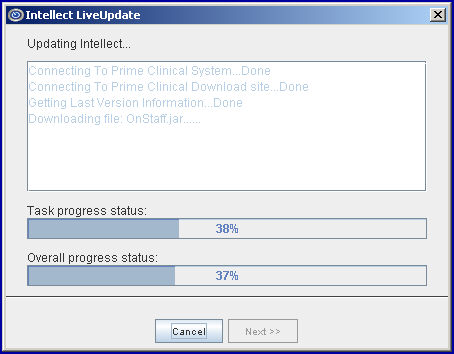
When overall progress reaches 100%, the [Cancel] button is replaced by the [Finish] button.

7.3 Select [Finish].
7.4 Restart Intellect to complete the update (see below).
You MUST restart the Service after loading the current Live Update onto the Main Server. Until this step is completed, the new version is not active.
Do NOT restart the Service on local workstations, only the Main Server!
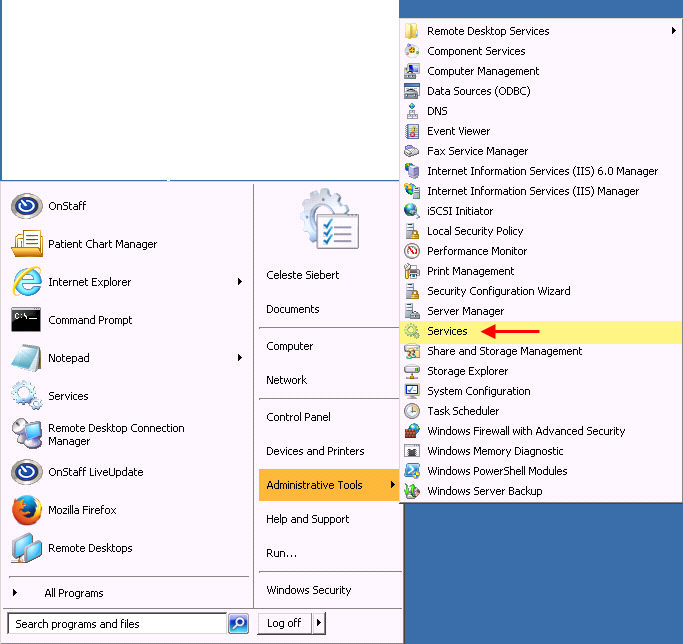
Service is restarted using Administrative Tools/Services on your computer.
Menus vary on different computers, so Services might be accessed in a variety of ways. See the following examples for locating Services: Example 1, Example 2, Example 3.
Once you have located the Services option, click on it to open it, and go to step 4.
1. From the Main Server desktop, click on the Windows icon in the bottom left corner of the screen to display program options:

2. Click on the Services option to open it and go to step 4.
1. From the Main Server desktop, select Start (i.e., click on the Windows icon in the bottom left corner of the screen), then select Administrative Tools.
2. Click on the Services option to open it and go to step 4.
1. From the Main Server desktop, select Start/Settings/Control Panel.
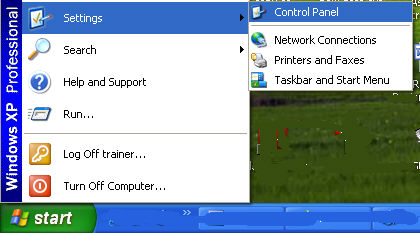
2. Select Administrative Tools

3. Select Services to open it

4. Example of an open Services screen:

5. From the Services directory, right click on OnSTAFF Server (see red arrow above) to display menu options.
5.1 If your server was paused; i.e., services are still running, the menu options show as ‘Stop’ and ‘Restart’:

5.1.1 Click on Restart and go to step 6.
5.2 If your services are not running, only the 'Start' menu option shows:

5.2.1 Click on Start and go to step 6.
6. When the program has completed the ‘Restart’ process, you are returned to the Administrative Tools/Services screen (see example in step 4). Review the ‘Status’ column:
• If ‘Status’ = ‘Error,’ please call PCS support.
• If ‘Status’ = Started,’ as shown in step 4, close each of the directories to return to the desktop.