
OnSTAFF 2000
UTILITY/SET UP/
APPOINTMENT MENU
The first step in using the appointment scheduling program is setting up your files. We suggest this area be maintained by the System Administrator. Whenever set up of appointment types is necessary, add additional templates, create, delete or make changes to schedules, or add blocks to existing schedules, you will be working from this area of the program. The following is a brief explanation of tasks which may be performed from each menu option:
![]()
Menu Options:
Appointment Type Allows creation, deletion or modification of Appointment Types.
Template Allows creation, deletion or modification of pre-defined Templates.
Schedule Allows creation, deletion or modification of rotating or non-rotating Schedules for the provider.
Block Allows Blocking of patient scheduling for a specified period of time when the provider will be unavailable.
Exit Returns to the Set Up Menu.
NOTE: Once you have scheduled patients based on the information in these files, please call your vendor before making any modifications or it may result in the masking of scheduled patients and/or loss of appointment history.
*Clinic 99, the practice clinic, is an excellent place to set up and test a provider's schedule.
/Set Up/Appointment/APPOINTMENT TYPE
The Appointment Type option allows you to define the reason for booking an appointment, the appointment types needed for your template(s) and the ability to color code template appointment types. Within this option you will be able to set the default length of the appointment, the maximum number of times (per time slot) this appointment type may be scheduled, whether this appointment type is limited to mornings or afternoons and tell On-Staff whether or not patients may be scheduled for a particular appointment type. For example, you would not schedule a patient with an appointment type of 'LUNCH' although you may choose to have this type on your template. This option also allows you to define what super bill to print, if any, for each type of appointment.

Menu Options:
Add Add new Appointment Types.
Modify Modify existing Appointment Types.
View View existing Appointment Types.
Delete Delete existing Appointment Types.
Print Prints a list of the Appointment Types.
Exit Returns to the Appointment Set Up Menu.
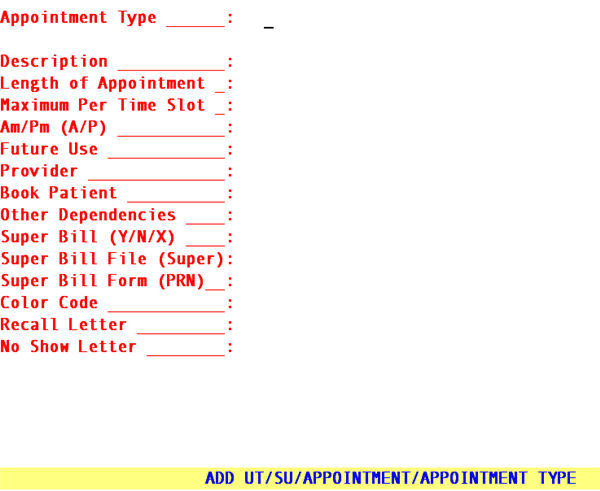
To add an appointment type, move the cursor to highlight the Add option and press [Enter]. On-Staff will display the following fields:
Appointment
Type: Enter a user defined code for the appointment using up to 6 characters. This entry may be the codes you now enter on your appointment book to denote the reason for the patient's visit. For example, NP-New Patient, LABS-coming in for lab work, PAP-coming in for a pap, WLCK-coming in for a well check, MTG-to schedule a staff or other type of meeting, etc. The types assigned when booking an appointment will print on the schedule. (See FIGURE 3 page I-8-22)
Description: Enter the description of this type.
Length of
Appointment: Indicate the minimum number of minutes this appointment type will require in five minute increments only.
NOTE: If the appointment is for one hour & five minutes, the length would be 65, etc.
Maximum Per
Time Slot: When setting up Template Appointment Types:
1) Enter the maximum number of appointments for this type. For example, 9:00 A.M. you want to book up to 3 patients, you could set up Appointment Type O3 (Open Time Slot with the maximum of 3 bookings) with Maximum Per Time Slot 3. At 9:15 A.M. you want to book only 2 patients, Appointment Type O2 with Maximum Per Time Slot 2. At 9:30 A.M. you want to limit the bookings to only 1 patient to allow for catch-up time, Appointment Type O1 with Maximum Per Time Slot 1. You would then add the appropriate Appointment Type to the appropriate /Template <Time> when setting up your templates. When the maximum has been met and the scheduler is attempting to book another patient they will receive the following prompt ‘Exceeding Maximum Appointment Type Would you like to Continue->__’.
Answering Y would allow them to override the maximum. Answering N would not allow them to override the maximum. /Template <Double Book> Y would allow more than one patient booking while N would allow only one NO MATTER WHAT Maximum Per Time Slot is set at. Upon trying to schedule more than one patient the scheduler will receive the following prompt ‘Double booking is not allowed. Press enter to continue’.
NOTE: Maximum Per Time Slot is ALWAYS calculated from the Template’s assigned Appointment Type NOT the scheduled appointment’s Appointment Type Maximum Per Time Slot.
2) Entering a Maximum Per Time Slot of 0, denotes there is NO maximum, thus the above noted prompt would NEVER display. Using the /Template <Double Book> N along with Maximum Per Time Slot 0 would stop booking at one patient per time slot where Y would allow unlimited booking of patients.
This would be an informational field only when setting up booking/scheduling Appointment Types. In this way, you might enter the maximum number of times, per time slot, your office is capable of handling this booking/scheduling Appointment Type. For example, if this is the set up for a new patient appointment type, how many new patients can be seen at 8:00am, 8:15am...etc. (per time slot). Or, if desired, you may enter 0 for these appointment types.
Am/Pm (A/P): Determines whether this type of appointment may be scheduled only in the morning, only in the afternoon or at anytime. Pressing the [F2] search key will display the following choices:
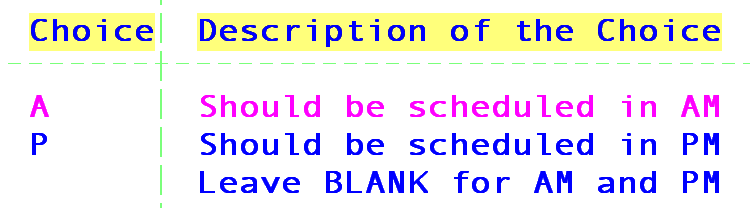
For example, if this is the set up for a new patient appointment type and the physician chooses to only see new patients in the morning, entering A would not allow the scheduler to book this appointment type in the afternoon.
Facility: Not used at this time.
Provider: Not used at this time.
Book Patient: Determines whether or not to use this appointment type when making a patient’s appointment. Press the [F2] search key to display the following valid choices:
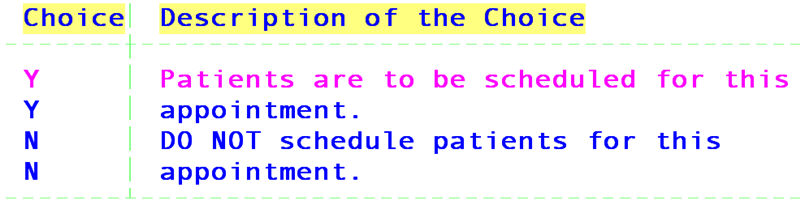
For example, if your are setting up an appointment type of LUNCH to be used on the template, entering N would not allow the scheduler to book a patient with this type of appointment and will display the description of that type when in the schedule module.
Other
Dependencies: Not used at this time.
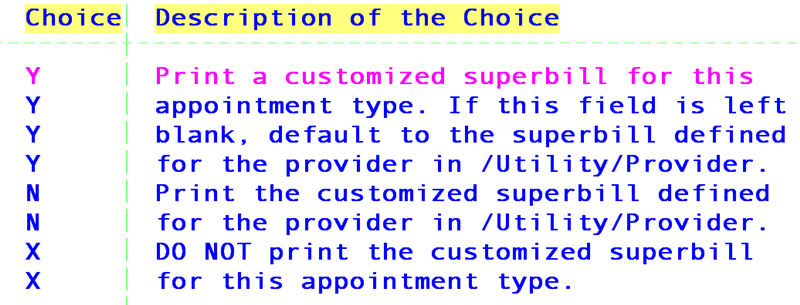
Super Bill (Y/N/X): Determines whether a super bill will be printed for this appointment type and if so, from what file. Pressing the [F2] search key on this field will display the following choices:
Super Bill
File (Super): When your super bill has been programmed and loaded to your system, your vendor will complete this field when appropriate.
Super Bill
Form (PRN): When your super bill has been programmed and loaded to your system, your vendor will complete this field when appropriate.
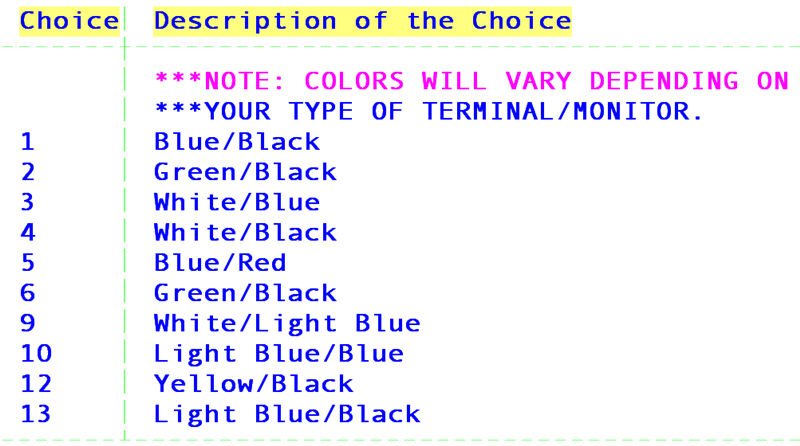
Color Code: Allows the color coding of Template Types ONLY. Pressing the [F2] search key will display the following valid choices:
Recall Letter: Used for Welcome To Our Practice letters for new patient appointment types, Instructions for procedures where a patient is scheduled for surgery, etc.
How Does It Work?
When an appointment is scheduled using this <Appointment Type>, On-Staff will check for a <Recall Letter> code. If found, On-Staff will add a recall for that patient in /Schedule/Recall with /Schedule/Recall <Message> set to this <Recall Letter> code and the date for the letter to print (/Schedule/Recall <Date>) set to the current calendar date. If <Recall Letter> is blank, On-Staff will not add a recall.
No Show Letter: Used for No Show Letters to patients informing them of the importance of their follow up, etc.
How Does It Work?
When an appointment with this <Appointment Type> is flagged as a ‘NoShow’, On-Staff will check for a <No Show Letter> code. If found, On-Staff will add a recall for that patient in /Schedule/Recall with /Schedule/Recall <Message> set to this <No Show Letter> code and the date for the letter to print (/Schedule/Recall <Date>) set to the current calendar date. If <No Show Letter> is blank, On-Staff will not add a recall.
NOTES: ONLY when an appointment is added to the schedule will a recall record be added. On-Staff will not remove a recall record if the appointment type is changed or the appointment is cancelled, rescheduled, copied, or deleted. In most all cases, by the time one of these actions is performed, the recall letter has already been printed and mailed
After pressing [Enter] at the Super Bill Form (PRN) field, the cursor will return to the Description field to allow you to verify the accuracy of your entry. When you are satisfied with the entry, press [] to save and accept this information. The screen will clear the fields of the last entry, and the cursor will return to the Appointment Type field, allowing the entry of additional appointment types. When you have finished entering appointment types, press [] again and the system will return to the Appointment Type Menu.