Intellect™
LEDGER MENU OPTIONS

Accounting
Group of Patients
This menu option is used to print groups of patient ledgers containing charges, payments adjustments, diagnosis, and remarks to a patient's account based on date, Patient Category, and account balance options using any or all of these parameters.
Effective version 20.07.27, reports printed via the Ledger Print options now only include the last 4 digits of the patient's social security number, complying with HIPAA mandates:

Effective version 14.07.01, the ledger reports display the category based on the <Category> field on the Registration --►Regular --►Patient screen instead of the <Category> field on the Ledger --►Accounting and Ledger --►Open Item screens.
1. To print a group of patient Accounting Ledgers in Intellect, go to Ledger --► Accounting --►Print --►Group Of Patient

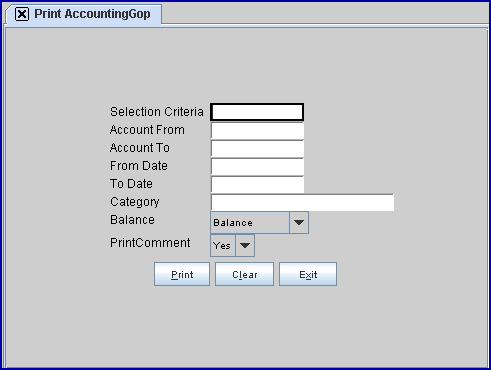
The Print AccountingGOP screen displays:

2. Selection Criteria 
2.1 Allows accounts to be selected to include in the printing, based on alphabetical criteria.
2.2 Leave blank to select all patients that meet any other criteria entered below, OR define the parameter using an alphabetical range to return patient accounts where the last name begins with any letters in the range.
3. Account From 
3.1 This is the beginning account number for printing by a specific range of patient account numbers.
3.2 Press [Enter] to bypass this field, which requests ALL accounts. OR, use a field as the beginning account number to be included.
4. Account To 
4.1 This is the ending number for printing by a specific range of patient account numbers.
4.2 Press [Enter] to bypass this field, which requests ALL accounts (also open ended). OR, use this field as the ending account number to be included.
5. From Date 
5.1 Enter the beginning date of service for transactions to print.
5.2 Leave blank to view all selected patient transactions.
6. To Date 
6.1 Enter the ending date of service for transactions to print.
6.2 Leave blank to view all selected patient transactions from the <From Date> forward.
7. Category 
7.1 This field limits the printing by specific patient category.
7.2 Press [Enter] to bypass this field, which requests ALL categories. Or, use a specific category by typing its Utility --►Category <Category Code>.
7.3 This field accepts multiple values separated by commas with no spaces. For example:
 .
.
8. Balance 
8.1 Version 9.12.10 - field activated
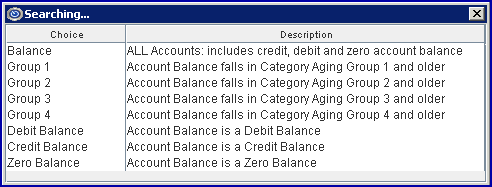
8.2 Accept the ' Balance' default, OR use the drop-down list to make another selection.
Click on the field, OR press the [F2] key to display the valid choices.
To view the list of only the codes, click on the arrow. To select, click on the correct code, OR use the ↑ (up) and ↓ (down) arrows to highlight the correct code and then press the [Enter] key to select.

9. Print Comment 
9.1 Used to add the Ledger Remarks to the bottom of the report.
9.2 Accept the 'Yes' default to add, OR use the drop-down to make an alternate selection.
Click on the field, OR press the [F2] key to display the valid choices.
To view the list of only the codes, click on the arrow. To select, click on the correct code, OR use the ↑ (up) and ↓ (down) arrows to highlight the correct code and then press the [Enter] key to select.

10. When the information is completely entered, select one of these options:

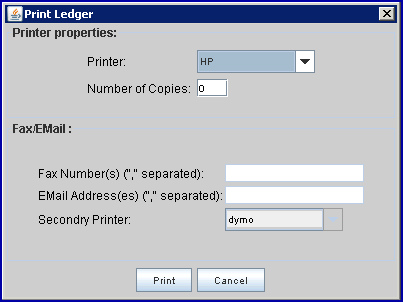
10.1 Click [Print] to display the Print Ledger dialog box:

10.1.1 Printer Properties:
10.1.1.1 Printer: The default printer for the logged-in clinic and password is selected. To select a different printer, either click on the arrow, OR press the → (right arrow) on the keyboard to view the list of printer codes. In our example, the defaulted Printer is HP. This is just an example of a printer name and may or may not be set up on the system.
To select the printer type, click on the code, OR use the ↑ (up) and ↓ (down) arrows to highlight the correct code, and then press the [Enter] key to select.
10.1.1.2 Number of Copies: This field defaults to either 0 (zero) or 1. Both prints 1 copy. To print more than one copy, enter the number of copies.
10.1.2 Fax/Email:
In addition to printing reports, Intellect provides the capability to export reports to an Excel spreadsheet, Email, Fax, Disk, or Archive. A secondary printer may also be selected, if one is set up, by clicking on the arrow to display the drop-down list.
10.1.3 Select the [Print] button to send the request to the printer (or as a Fax or email).
10.1.4 Select the [Cancel] button to clear the screen and return to the Print_AccountingGOP screen without saving or printing.
10.2 Click [Clear] to clear all information and return the focus to the <Account> field.
10.3 Click [Exit] to clear the screen and return the focus to the main Intellect screen without saving.