
Intellect™
CHARGES MENU OPTIONS

DME Oxygen Encounter
This menu option is used to post additional claim information needed to process a patient’s claim for Oxygen Therapy. Use this form for electronic billing when Utility --►Procedure <Status> = 'O' or 'D.'
DME is covered under Part B as a medical or other health service (§1861(s)(6) of the Social Security Act [the Act]) and is equipment that:
a. Can withstand repeated use;
b. Is primarily and customarily used to serve a medical purpose;
c. Generally is not useful to a person in the absence of an illness or injury; and
d. Is appropriate for use in the home.
All requirements of the definition must be met before an item can be considered to be durable medical equipment.
See instructions to add encounter information to a patient’s account.
Updates:
Effective version 16.05.20
In prior versions, for the Internal Control Number (ICN) to be included in the Electronic Claims, the ICN had to be entered in the <Internal Control> field. Effective this version, Intellect now pulls the ICN number from the charge. This is handled by Intellect when auto-posting is used to post payments from the payers. This modification is NOT retroactive. Additionally, this ICN now also prints on the printer EOB from Intellect.
Effective version 14.07.01
When Intellect looks for a Referring Provider (a.k.a. ordering physician), Intellect first looks at the encounter screen for either <Ordering Provider> or <Supervising Provider> and, when either is blank, Intellect looks at the Utility --►Set Up --►Parameter <Referring> setting and pulls the referring provider based on the setting.
Effective Version 9.12.27
For clients who complete most of the Encounter screen fields with the same values for each patient, version 9.12.27 allows a 'default' record to be set up with the value to be carried over to all new Encounters.
To set up a default screen, go to Charges --►Encounter. Select the type of Encounter screen the office uses (the sample below is for Generic Encounter), then select Modify. At the <Patient Account No> field, enter 0 (zero). At the <Encounter #> field, enter 0 (zero).

Complete any field to default to all new Encounters entered.
Setting up the default encounter screen does NOT affect any encounters already entered.
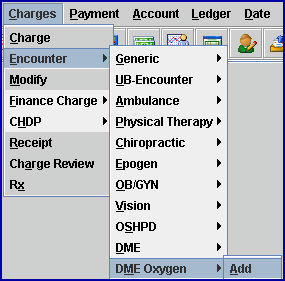
1. To add encounter information to a patient’s account in Intellect, go to Charges --► Encounter --►DME Oxygen --►Add
The Add DME Oxygen screen displays:
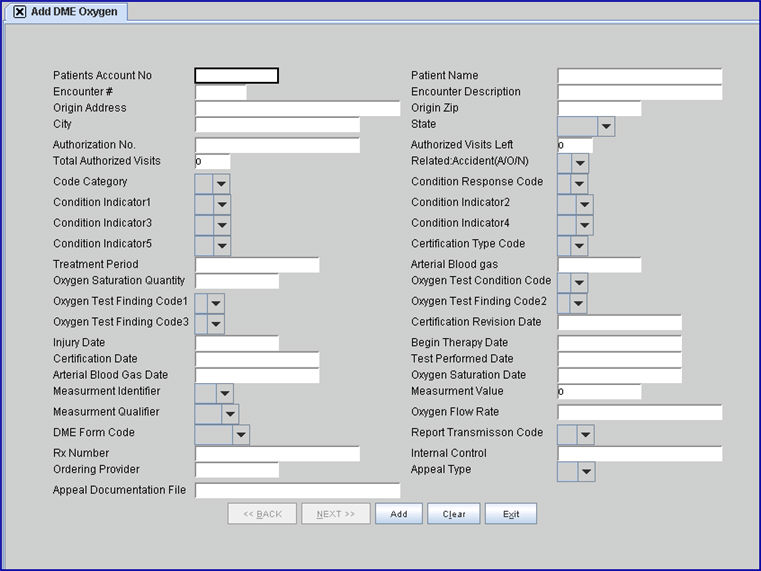
2. Patient’s Account No 
2.1 When not already displayed, type the patient’s account number OR type up to 6 characters of the last name and press the [F2] key. To select the code from the list, either highlight the record and press the [Enter] key, OR double-click on the record.
3. Patients Name 
3.1 The patient’s name is displayed. This is a read-only field and may not be modified.
3.2 This field is formatted Last, First.
4. Encounter # 
4.1 This number is assigned automatically when adding a new record.
4.2 This number is used to individually display this encounter.
5. Encounter Description 
5.1 Type a meaningful description for this encounter.
6. Origin Address 
6.1 Not used for DME Oxygen Encounter. Leave blank
7. Origin Zip 
7.1 Not used for DME Oxygen Encounter. Leave blank.
8. City 
8.1 Not used for DME Oxygen Encounter. Leave blank.
9. State 
9.1 Not used for DME Oxygen Encounter. Leave blank.
10.1 Type the authorization number given by insurer for this treatment.
10.2 Intellect completes Box 23 on the CMS 1500 form with this number.

Or, when used for electronic claims submission, Loop 2300 REF*G1.
11. Authorized Visits Left 
11.1 This is an informational field.
11.2 Enter the <Total Authorized Visits> minus the number of visits that have taken place.
11.3 This value is displayed in the Charges --►Charge <Visit No> field.
12. Total Authorized Visits 
12.1 This is informational only. Enter the total visits as authorized by the insurer.
13. Related: Accident (A/O/N) 
13.1 Indicate whether or not this treatment is related to an accident.
13.2 Select the default 'N' if it is not related to an accident.
13.3 Select 'A' for an automobile accident. Selecting 'A' places an 'X' in Box 10b Yes on the CMS 1500 form, and also places the resident state code in <Place> (see screen save below)
13.4 Select 'O' for another type of accident. Selecting 'O' places an 'X' in Box 10c Yes on the CMS 1500 form:

Electronic claims submission Loop 2300 CLM11 - 1 through CLM11 - 3:
AA Auto Accident
AB Abuse
AP Another Party Responsible
EM Employment
OA Other Accident
Note: When rebilling claims to indicate corrected claims or replacement claims with internal control numbers, this field may not be left blank -- a selection must be made. In addition, make sure to enter the proper <Internal Control> number on this screen.
14.1 This field specifies the situation or category to which the code applies. This is Loop 2400 CRC01 which qualifies CRC03 through CRC07 (<Condition Indicators>).
14.2 To view the list of codes with descriptions, click on the field, OR press the → (right arrow) on the keyboard. To select, double-click on the correct code, OR use the ↑ (up) and ↓ (down) arrows to highlight the correct code, and then press the [Enter] key to select.

14.3 To view the list of only the codes, click on the arrow. Use the ↑ (up) and ↓ (down) arrows to highlight the correct code, and then press the [Enter] key to select.
15.1 This indicates whether the subsequent condition indicators apply to this encounter.
15.2 For electronic claims submission Loop 2400 CRC02. Certification Condition Code applies indicator. A 'Y' value indicates the condition codes in CRC03 through CRC07 apply; an 'N' value indicates the condition codes in CRC03 through CRC07 do not apply.
16.1 This fills electronic claim submission first indicator: Loop 2400 CRC03 'Conditions Indicator.'
16.2 To view the list of codes with descriptions, click on the field, OR press the → (right arrow) on the keyboard. To select, double-click on the correct code, OR use the ↑ (up) and ↓ (down) arrows to highlight the correct code, and then press the [Enter] key to select.
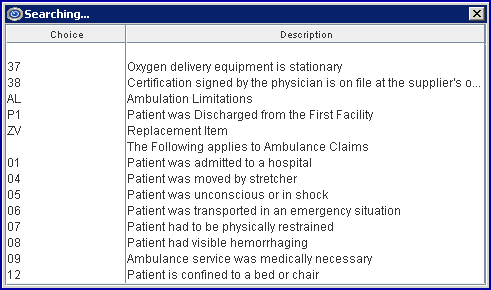
16.3 To view the list of only the codes, click on the arrow. Use the ↑ (up) and ↓ (down) arrows to highlight the correct code, and then press the [Enter] key to select.
17. Condition Indicator2 
17.1 Enter an electronic claim submission second indicator if necessary: Loop 2400 CRC04 'Conditions Indicator'.
17.2 To view the list of codes with descriptions, click on the field OR press the → (right arrow) on the keyboard.
17.3 To view the list of only the codes, click on the arrow. To select, double-click on the correct code, OR use the ↑ (up) and ↓ (down) arrows to highlight the correct code, and then press the [Enter] key to select.
17.4 See <Condition Indicator 1> above for a list of valid choices.
18. Condition Indicator3 
18.1 Enter an electronic claim submission third indicator if necessary: Loop 2400 CRC05 'Conditions Indicator'.
18.2 To view the list of codes with descriptions, click on the field OR press the → (right arrow) on the keyboard.
18.3 To view the list of only the codes, click on the arrow. To select, double-click on the correct code, OR use the ↑ (up) and ↓ (down) arrows to highlight the correct code, and then press the [Enter] key to select.
18.4 See <Condition Indicator 1> above for a list of valid choices.
19. Condition Indicator4 
19.1 Enter an electronic claim submission fourth indicator if necessary: Loop 2400 CRC06 'Conditions Indicator'.
19.2 To view the list of codes with descriptions, click on the field OR press the → (right arrow) on the keyboard.
19.3 To view the list of only the codes, click on the arrow. To select, double-click on the correct code, OR use the ↑ (up) and ↓ (down) arrows to highlight the correct code, and then press the [Enter] key to select.
19.4 See <Condition Indicator 1> above for a list of valid choices.
20. Condition Indicator5 
20.1 Enter an electronic claim submission fifth indicator if necessary: Loop 2400 CRC07 'Conditions Indicator'.
20.2 To view the list of codes with descriptions, click on the field OR press the → (right arrow) on the keyboard.
20.3 To view the list of only the codes, click on the arrow. To select, double-click on the correct code, OR use the ↑ (up) and ↓ (down) arrows to highlight the correct code, and then press the [Enter] key to select.
20.4 See <Condition Indicator 1> above for a list of valid choices.
21.1 This is required if it is necessary to include supporting documentation in an electronic form for Medicare DMERC claims for which the provider is required to obtain a certificate of medical necessity (CMN) from the physician. Loop 2400 CRE.
21.2 To view the list of codes with descriptions, click on the field, OR press the → (right arrow) on the keyboard. To select, double-click on the correct code, OR use the ↑ (up) and ↓ (down) arrows to highlight the correct code, and then press the [Enter] key to select.

21.3 To view the list of only the codes, click on the arrow. Use the ↑ (up) and ↓ (down) arrows to highlight the correct code, and then press the [Enter] key to select.
22.1 Enter the number of months covered by this certification.
22.2 This uses electronic claims submission Loop 2400 CR502.
23.1 Enter the PO2 mmHg in whole numbers.
23.2 This uses electronic claims submission Loop 2400 CR510.
24.1 Enter the percent in whole numbers.
24.2 This uses electronic claims submission Loop 2400 CR511.
25. Oxygen Test Condition Code 
25.1 This indicates the condition of the patient during the Oxygen Test
25.2 This uses electronic claims submission Loop 2400 CR512.
25.3 To view the list of codes with descriptions, click on the field, OR press the → (right arrow) on the keyboard. To select, double-click on the correct code, OR use the ↑ (up) and ↓ (down) arrows to highlight the correct code, and then press the [Enter] key to select.

25.4 To view the list of only the codes, click on the arrow. Use the ↑ (up) and ↓ (down) arrows to highlight the correct code, and then press the [Enter] key to select.
26.1 This is required as appropriate if patient’s arterial PO2 is greater than 55 mmHg and less than 60 mmHg, or oxygen saturation is greater than 88%.
26.2 This uses electronic claims submission Loop 2400 CR513.
27. Oxygen Test Finding Code2 
27.1 This is required as appropriate if patient’s arterial PO2 is greater than 55 mmHg and less than 60 mmHg, or oxygen saturation is greater than 88%.
27.2 This uses electronic claims submission Loop 2400 CR514.
28. Oxygen Test Finding Code3 
28.1 This is required as appropriate if patient’s arterial PO2 is greater than 55 mmHg and less than 60 mmHg, or oxygen saturation is greater than 88%.
28.2 This uses electronic claims submission Loop 2400 CR515.
29. Certification Revision Date 
29.1 This is required if <Certification Type Code>= 'R' or 'S'.
29.2 This uses electronic claims submission Loop: 2400 DTP03.
30. Injury Date 
30.1 Type the date of injury for a Workers’ Comp case.
30.2 Effective version 14.09.29: This field is no longer required if the <DOI> field on the Registration --►Worker --► Worker Insurance screen is completed, since Intellect pulls the date from that field to complete the CMS 1500 or electronic equivalent.
30.3 Effective version 13.12.12: For Workers’ Comp patients only (Utility --►Category <Type> = ‘W’ or ‘F’), Intellect completes Box 14 on the CMS form with the date and qualifier 439.

Or, when used for electronic claims submission, it is added to Loop 2400 DTP*439*
31.1 This is required if it is necessary to include supporting documentation in an electronic form for Medicare DMERC claims for which the provider is required to obtain a certificate of medical necessity (CMN) from the physician.
31.2 This uses electronic claims submission Loop: 2400 DTP01 463.
32.1 Enter the last certification Date required on oxygen therapy certificates of medical necessity (CMN). This is the date the ordering physician signed the CMN.
32.2 This uses electronic claims submission Loop: 2400 DTP01 461.
33.1 Enter the date of the Oxygen Saturation/Arterial Blood Gas Test. Use for any 4 liter/minute test date.
33.2 Required on initial oxygen therapy service line(s) involving certificate of medical necessity (CMN).
33.3 This uses electronic claims submission Loop: 2400 DTP01 119.
34.1 Enter the date of the Oxygen Saturation/Arterial Blood Gas Test. DO NOT use for any 4 liter/minute test date.
34.2 This uses electronic claims submission Loop: 2400 DTP01 480.
35.1 Enter the date of the Oxygen Saturation/Arterial Blood Gas Test. DO NOT use for any 4 liter/minute test date.
35.2 This uses electronic claims submission Loop: 2400 DTP01 481.
36.1 This is used in electronic claims submission Loop: 2400 MEA01.
36.2 Use for any 4 liter/minute test.
36.3 Indicate the type of measurement that applies to <Measurement Value>.

37.1 This is used in electronic claims submission Loop: 2400 MEA03.
37.2 Use for any 4 liter/minute test.
37.3 Indicate the type of measurement that’s applies to <Measurement Identifier>.
38.1 This is used in electronic claims submission Loop: 2400 MEA02.
38.2 Select the code identifying a specific product or process characteristic to which a measurement applies.
38.3 To view the list of codes with descriptions, click on the field, OR press the → (right arrow) on the keyboard. To select, double-click on the correct code, OR use the ↑ (up) and ↓ (down) arrows to highlight the correct code, and then press the [Enter] key to select.
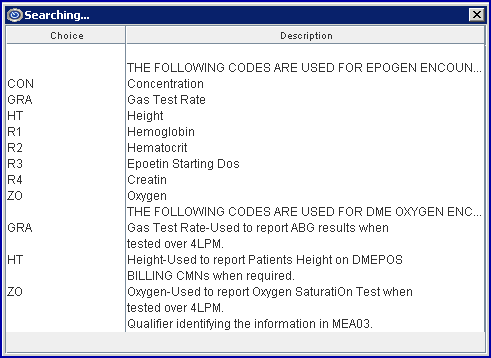
38.4 To view the list of only the codes, click on the arrow. Use the ↑ (up) and ↓ (down) arrows to highlight the correct code, and then press the [Enter] key to select.
39.1 Enter the oxygen flow rate.
39.2 Valid values are 1 - 999 liters per minute and X for less than 1 liter per minute.
39.3 This is used in electronic claims submission Loop: 2400 REF*TP*
40. DME Form Code 
40.1 This is used to select the appropriate form for the equipment.
40.2 To view the list of codes with descriptions, click on the field, OR press the → (right arrow) on the keyboard. To select, double-click on the correct code, OR use the ↑ (up) and ↓ (down) arrows to highlight the correct code, and then press the [Enter] key to select.
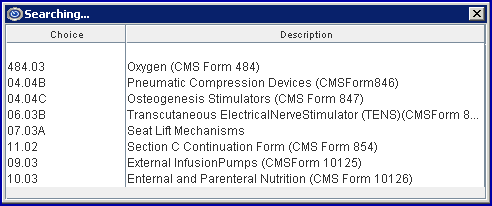
40.3 To view the list of only the codes, click on the arrow. Use the ↑ (up) and ↓ (down) arrows to highlight the correct code, and then press the [Enter] key to select.
41.1 This is used to designate the Certification of Medical Necessity Attachment Transmission Code
41.2 It is used in electronic claims submission Loop 2400 LQ.
41.3 To view the list of codes with descriptions, click on the field, OR press the → (right arrow) on the keyboard. To select, double-click on the correct code, OR use the ↑ (up) and ↓ (down) arrows to highlight the correct code, and then press the [Enter] key to select.

41.4 To view the list of only the codes, click on the arrow. Use the ↑ (up) and ↓ (down) arrows to highlight the correct code, and then press the [Enter] key to select.
42.1 Enter the unique identification number assigned by the pharmacy or supplier to the prescription. This fills Loop 2410 REF02 with the Qualifier XZ.
43.1 EDS assigns each claim an Internal Control Number (ICN) systematically when it is received electronically or by mail. Processing or returning the claim constitutes EDS’ final action on that claim. A resubmission of the same service is considered a new claim. Each claim sent to EDS is assigned an ICN automatically, which is used to track the claim. The ICN is made up of 13 digits in a specific format. The format of the ICN enables the determination of when the EDS actually received the claim.
43.2 This is used when rebilling a corrected claim to provide the insurance the original claim control number on a denied claim.
43.3 This number is included in the electronic transmission for all claims. It is a number assigned by the payer to identify a claim. The number is usually referred to as an Internal Control Number (ICN), Claim Control Number (CCN), or a Document Control Number (DCN). CLM, 2300 REF02 is the Loop and segment:
CLM*1.608.1.491.G*250***11:B:7*Y*A*Y*Y*P
REF*F8*20024E011000 ß
44. Ordering Provider 
44.1 Version 9.12.18 - New field added.
44.2 Type the code for the Ordering Provider, if required for a service or supply is ordered by a provider that is different from the rendering provider for this claim.
44.3 This code pulls information from Utility --►Referring <Referring Code>.
44.4 Effective version 13.10.29: For the CMS 1500 form, Intellect completes the Ordering Provider’s name in Box 17 with qualifier DK (for Ordering Provider) and the provider’s NPI in Box 17b.

Or, when used for electronic claim submission, Loop 2310E NM1*DK.
45. Appeal Type 
45.1 This field is used to identify the level of the appeal, if needed.
45.2 Use the drop-down list and select the appropriate option:

46. Appeal Documentation File 
46.1 If there is documentation that needs to be sent to the insurance company, enter the file name of the documentation.
46.2 Files with valid file names are sent directly to the insurance company.
46.3 Effective version 14.07.01:
Clients with Intellect only:
46.3.1 Create and save Appeal Document(s) files in the /home/staff/EB_ATTACHMENT folder. SBRs may also be saved as a .pdf to the /home/staff/EB_ATTACHMENT folder and attached as appeal documents.
46.3.2 Type the exact file name in this field. Note: This field is case-sensitive.
Clients with both Intellect and Patient Chart Manager (PCM) only:
46.3.3 With the focus in this field, press the [F2] key twice to display a list of document files pulled from the Progress Notes in PCM (the list does NOT include files generated in Intellect or manually saved to the /home/staff/EB_ATTACHMENT folder).
46.3.4 To display only a certain type of file, enter the beginning letters of the file and then press [F2].
46.3.5 Click on the appropriate file to select it. Multiple files may be selected by holding down the [Ctrl] and [Shift] keys while clicking on the desired files. The file's Document Id displays.
47. When the information is completely entered, select one of these options:

47.1 Click [Add] to clear the screen and return the focus to the <Patient Account No> field, saving the new encounter.
47.2 Click [Clear] to display this message:

47.2.1 Click [Yes] to clear the screen and return the focus to the <Patient Account No> field, saving the new encounter.
47.2.2 Click [No] to clear the screen and return the focus to the <Patient Account No> field without saving.
47.3 Click [Exit] to display this message:

47.3.1 Click [Yes] to clear the screen and return the focus to the main Intellect screen, saving the new encounter.
47.3.2 Click [No] to clear the screen and return the focus to the main Intellect screen without saving.