
Intellect™
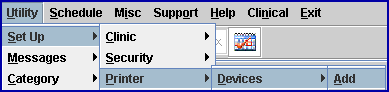
UTILITY MENU OPTIONS

Set Up
Printer
Devices
This option tells the printer how to print, if there are graphics, the printer destination, and more. This area is maintained by your vendor. There are two primary types of physical print devices supported by Intellect: laser (PCL Language) indicated by device code 'HP', and dot matrix indicated by device code 'printer'. Also use this option to add printing options such as Email, Archive, and FAX.
1. To set up a printer device in Intellect, go to Utility --►Set Up --►Printer --►Device --►Add:
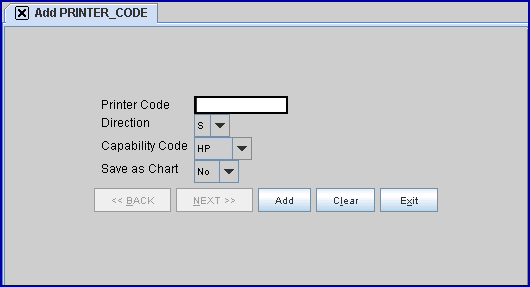
The Add PRINTER_CODE screen displays:
2.1 The field is mandatory and must be completed. If left blank, an error message displays:
. 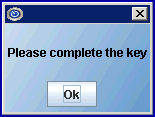
Press the [OK] button to return the focus to the <Printer Code> field.
2.2 Before setting up a new printer, it is a good idea to check and see if one is already set up.
2.2.1 Type the <Capability Code> entered on this screen, and press the [F2] key.
2.2.1.1 If no printers are set up for that Capability Code, this displays:
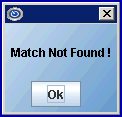
Go to step 2.3.
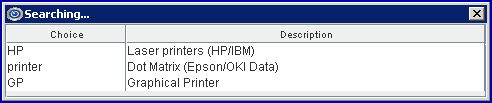
2.2.1.2 If printers are set up for that <Capability Code>, a list displays:

To select the printer code from the list, highlight the record either by clicking on it OR scrolling down, and then press the [Enter] key. For more information on the Searching screen, see Introduction to Intellect --► Intellect Characteristics and Features -- Searching.
2.3 Enter a <Printer Code> that matches the actual device name in the operating system. The printer code being entered must match the device name EXACTLY or printing will fail. For example, if the device name, as shown in 2.3.2 below, is HP6 and hp6 is entered in the <Printer Code> field, the printer does not work.
The device name may be found through the Windows operating system. For example:
2.3.1 Click on the Windows' ![]() button.
button.
2.3.2 Click on Settings, and then Printers and Faxes, as shown below:
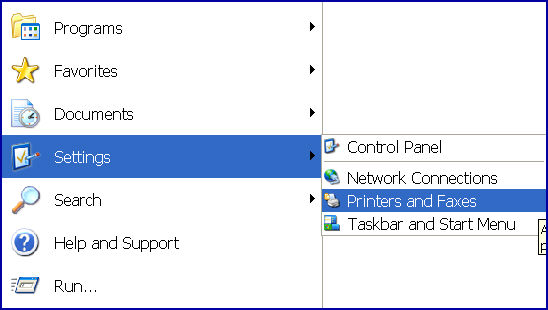
The available printers are displayed:
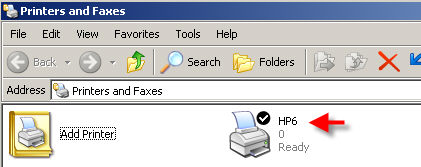
2.3.3 Make note of the exact device name of the printer where it should print and enter the device name EXACTLY how it appears into the <Printer Code> field.
3.1 Select the appropriate output.
3.2 It is critical that the selected Direction code matches the actual destination and type of action. For example, 'E' always tells the system (not the physical device) this is an email. 'F' should be used to send faxes. 'G' should be used for the Dymo printer, etc.
3.3 Press the [F2] search key to display the valid choices:

4.1 The types of physical print devices supported by Intellect include laser printers (PCL Language) indicated by device code 'HP', dot matrix printers indicated by device code 'printer', and Dymo printers (graphical printers) indicated by device code 'GP'.
4.2 Accept the default HP OR use the drop-down to make an alternate selection.
4.2.1 'HP' should be selected when sending faxes.
4.3 Press the [F2] search key to display the valid choices:
5.1 For PCM users only. Effective version 16.02.22 - New field
5.2 If this field is set to ‘Yes’ for any printer, any PDF report that is printed to that specific printer also saves the file as a document in PCM. Set up is required for this feature to function:
5.2.1 Intellect Set Up
Add a patient to Registration --►Regular --►Patient with the name ‘INTELLECT_REPORTS’ as the last name and ‘INTELLECT’ as the first name, with ONLY a generic DOB and category.
5.2.2 PCM Set Up
The patient must be set up in PCM, and the Chart Tab must be named INT_REPORTS. Each record that is saved can then be moved to the appropriate Patient Chart. The first time this feature is used to pull the file in PCM, users receive the prompt ‘Chart does not exist’ do you want to create it. Please answer YES and create the Chart just as if for a Patient Chart.
5.3 See also Export Intellect Reports to PCM.
6. When the information is completely entered, select one of these options:

6.1 Click [Add] to clear the screen and return the focus to the <Printer Code> field, saving the new device.
6.2 Click [Clear] to clear the screen and return the focus to the <Printer Code> field, saving the new device.
6.3 Click [Exit] to clear the screen and return the focus to the main screen without saving.
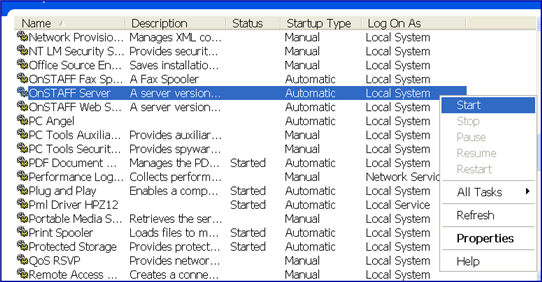
* You MUST 'Restart the Service' on the Main Server after adding new printers to Intellect. Until this step is completed, you will not be able to print to the new printer. Do NOT 'Restart the Service' on local workstations -- only the Main Server!
For example, 'Restart the Service' by doing the following:
1. From the Main Server desktop, select Start/Settings/Control Panel
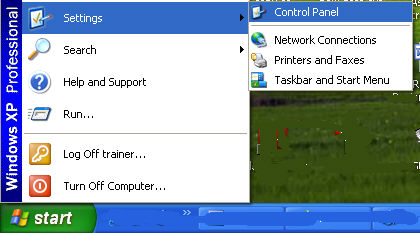
2. Select Administrative Tools:

3. Select Services:

4. From the Services directory, right click on OnSTAFF Server and click on Start:
5. When the program has completed the 'Restart' process, it returns to the Administrative Tools/Services screen. Review the 'Status' column:
• If 'Status' = Error, please call PCS support.
• If 'Status' = 'Started', close each of the directories until once again at the desktop.


