
Intellect™
PAYMENT MENU OPTIONS

Apply Receipt
This menu option is used to post or review payments made by patients when the information is entered in Schedule --► Appointment --► Receipt <Bal Payment Amount> and/or <Copay Amount>. You may automatically post for an individual patient or for multiple patients based on the date of service or entry date of the receipt. Please be advised: Apply Receipt only works if the patient has a debit balance for charges within the entered date range.
Note: The Utility --► Category <Pt Copay Remark> and <Pt Adjustment Remark> fields for the patient's <Category> are the defaults when using the Apply Receipt option.
This feature always runs as a Local task, and cannot be changed to run as a Server task. This means the printer selected when running the task MUST be a local printer. The program cannot print the report to a server printer.
Video Available: Click Apply Receipt to access the link. Depending on the system set up, the media player may need to be activated. Speakers need to be attached to the workstation to hear the instructions.
Note: To view the videos, log-in through the www.primeclinical.com website. Current support is required.
Effective version 9.12.14 - Modification. Prior to version 9.12.14, when using Apply Receipt and the payment was more than the total balance, the system did NOT apply the overpayment. Effective version 9.12.14 and higher, the overpayment is applied to the most current charge.
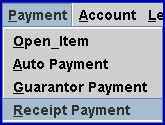
1. To manually post patient payments to a patient's account in Intellect, go to Payment --► Apply Receipt.
Note: In some versions, the drop-down list displays Receipt Payment instead of Apply Receipt.
The POST RECEIPT_PAYMENT screen displays:
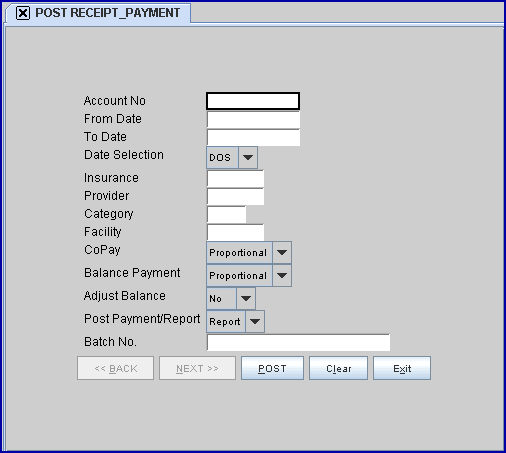
2. Account No 
2.1 This is an optional field. It is used to post only one patient.
2.2 Type the patient account number for whom to post.
3. From Date 
3.1 Enter the oldest date to include on the posting. This is used only for co-payments.
3.2 Leave blank to apply payments to all charges.
4. To Date 
4.1 Enter the most current date of the date range to include on the posting. This is used only for co-payments.
4.2 Leave blank to apply payments to all charges.
5. Date Selection 
5.1 Determines the date used for the Co-payment date range as entered in the <From Date> <To Date> fields above.
5.2 The default is to use the date of service (DOS) entered in Schedule --► Appointment --► Receipt <Date Of Service>. The alternate selection uses the Calendar date when the receipt was created.
5.3 Press the [F2] search key to display the valid choices:

6. Insurance 
6.1 The default is to post for all insurers (leave blank).
6.2 To filter the posting based on a specific insurer, type the insurer's Utility --►Insurance --►Insurance <Insurance Co Code>.
7. Provider 
7.1 The default is to post for all providers (leave blank).
7.2 To filter the posting based on a specific provider, type the provider's Utility --►Provider --►Provider <Provider Code>.
8. Category 
8.1 To limit posting to a specific patient <Category>, enter its' Utility --►Category <Category Code>.
8.2 To request ALL categories, press [Enter] to bypass this field.
9. Facility 
9.1 This limits posting by a specific Facility if entered when posting charges and Schedule --► Appointment --► Receipt <Facility Code> has the same code.
9.2 To limit posting to the specific Utility --► Facility <Facility Code>, enter it in this field.
9.3 To request ALL facilities, press [Enter] to bypass this field.
10.1 Pays or creates a report (where Utility --►Procedure --►Procedure <Co-Payment> = 'Y') using the Schedule --► Appointment --► Receipt <Copay Amount> for any procedure billed to this account limited by any date or parameters entered above (Provider, Facility, Category, and/ or Insurance).
10.2 Accept the default 'Proportional' OR use the drop-down list to make an alternate selection.
10.3 Press the [F2] search key to display the valid choices:

Note: Effective version 9.12.14 - Modification. A separate remark is now applied to the Co-Payment. To accommodate this change, a <Pt Copay Remark> field was added to the Utility --► Category screen. This field is used as a remark code when using Apply Receipt to post the Co-Payment amount. [F2] searches the Remark table.
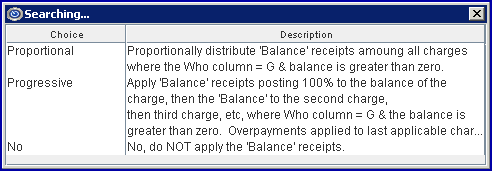
11. Balance Payment 
11.1 This pays or creates a report for any patient balance (where the 'Who' is a 'G') using the amount entered in Schedule --► Appointment --► Receipt <Bal Payment Amount> limited by any non-date parameters entered above (Provider, Facility, Category, and/ or Insurance)
11.2 Accept the default 'Proportional' OR use the drop-down list to make an alternate selection.
11.3 Press the [F2] search key to display the valid choices:
12. Adjust Balance 
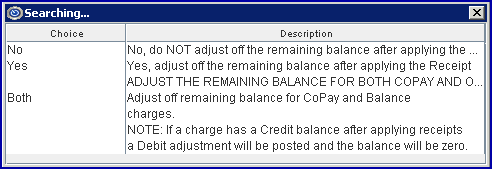
12.1 When posting the payments, use this option to adjust to zero any remaining balance on the paid items, if desired.
12.2 Accept the default of 'No' to not adjust. Or use the drop-down list to make an alternate selection.
12.3 Press the [F2] search key to display the valid choices:
13. Post Payment/Report 
13.1 This is used to determine whether to review a report or to post the payments to the selected account.
13.2 Accept the default of 'Report' to not adjust. Or use the drop-down list to select 'Post' to post the charges.
13.3 Press the [F2] search key to display the valid choices:

14. Batch No. 
14.1 Prime Clinical Systems recommends the assignment of a Batch No when using the bulk payment methods. If a posting error occurs (e.g., posting the wrong amount, the same check twice, etc.) if a Batch No was entered when applying the payments or the payment and adjustment transactions, then they may be reversed/removed using Utility --► Maintenance --► Reverse Entry provided the clinic date has not been changed.
15. When the information is completely entered, select one of these options:

15.1 The [Post] option is affected by the setting of the <Post Payment/Report> field:
• When the field is set to 'Post,' the payment is applied accordingly.
• When the field is set to 'Report,' a printer dialog box displays:
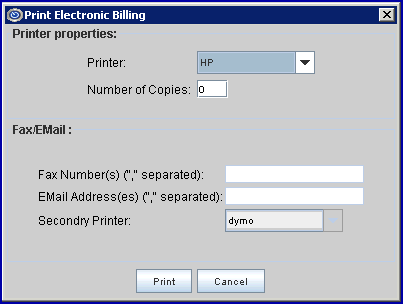
15.1.1 Printer Properties:
15.1.1.1 Printer: The default printer for the logged-in clinic and password is selected. To select a different printer, either click on the arrow, OR press the → (right arrow) on the keyboard to view the list of printer codes. In our example, the defaulted Printer is HP. This is just an example of a printer name and may or may not be set up on the system.
To select the printer type, click on the code, OR use the ↑ (up) and ↓ (down) arrows to highlight the correct code, and then press the [Enter] key to select.
Note: When printing the Apply Receipt report, you must always send it to a local printer. The program always creates this job as a local job, even if the report setup has been set to a server job. You can either choose to send it to a local printer/send to disk/ or view (if PDF is set up) then print from view option. This is the only report in the system that must be sent to a local printer.
15.1.1.2 Number of Copies: This field defaults to either 0 (zero) or 1. Both prints 1 copy. To print more than one copy, enter the number of copies.
15.1.2 Fax/Email:
In addition to printing reports, Intellect provides the capability to export reports to Email, Fax, Disk, or Archive. A secondary printer may also be selected, if one is set up, by clicking on the arrow to display the drop-down list.
15.1.3 Select the [Print] button to send the request to the printer (or as a Fax or email).
15.1.4 Select the [Cancel] button to clear the screen and return to the <Account No> field without saving or printing.
15.2 Click [Clear] to clear all information and return the focus to the <Account No> field without saving.
15.3 Click [Exit] to clear the screen and return the focus to the main Intellect screen without saving.