
Intellect™
SCHEDULE MENU OPTIONS

Appointment
Full Day
Appointment Booking and Management
Inquire Appointment Dialog Box
This screen may be accessed as follows:
Select the day/date and time slot of the scheduled patient for whom to inquire. With the patient selected, there are two ways to inquire a patient's appointment:
1. Right click to open the context menu and click Inquire

- OR -
2. Simply type the letter 'I'
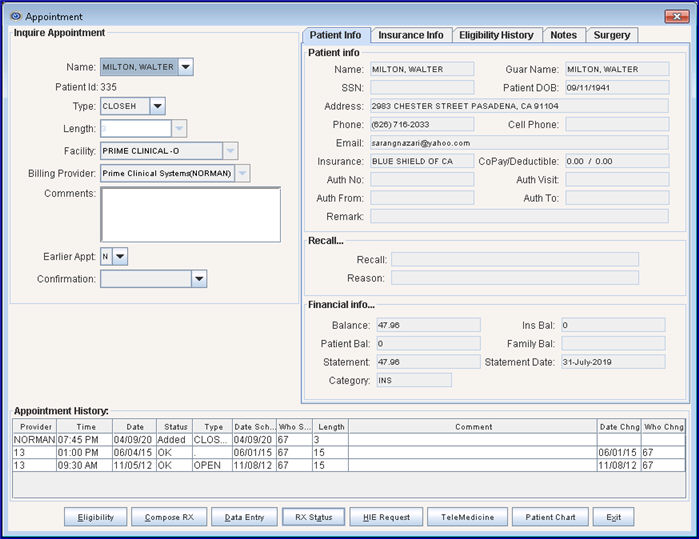
Example of the Inquire Appointment screen:
For field definitions, please refer to the Add Appointment and Modify Appointment documentation.
Functionality on this dialog box is limited:
1. View Patient Information
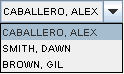
From this screen, information can be viewed for the patient(s) scheduled for the selected time slot. The fields identical to the Modify Appointment dialog box are read-only, with the exception of the Name drop-down list shown below, which allows patient selection if there is more than one patient scheduled for the selected time slot.
2. Eligibility ![]()
Version 9.12.01 New Feature - Access insurance eligibility via clicking on the [Eligibility] button at the bottom of the screen. Additional information on the Eligibility feature is available under Schedule --► Eligibility Verification Feature Overview and under Schedule --►Appointment --►Full Day --►Appointment Booking and Management --►Add Appointment Dialog Box or Modify Appointment Dialog Box in this documentation.
3. E-Prescribing ![]()
Version 9.12.01 New Feature - Access NewCrop's E-Prescribing program using the [Compose RX], [Data Entry], and [RX Status] buttons at the bottom of the Inquire Appointment screen, as defined below.
3.1 [Compose RX]: This button allows a Doctor, or someone at the correct password level, to access E-Prescribing to generate a prescription for a patient. For valid users, E-Prescribing may also be accessed from Intellect's main menu by selecting Clinical and then Compose RX.
3.2 [Data Entry]: This button allows access to NewCrop’s E-Prescribing to all four different types of users; i.e., Doctor, Nurse, Staff, and Mid-level. For valid users, E-Prescribing may also be accessed from Intellect's main menu by selecting Clinical and then RX Data Entry.
3.3 [RX Status]: This button allows a Doctor, or someone at the correct password level, to access E-Prescribing to check on the status of a prescription for a patient. For valid users, E-Prescribing may also be accessed from Intellect's main menu by selecting Clinical and then Check RX Status.
When one of the buttons described above is selected for a user who is set up on the system, a pop-up window asks for that user’s password. This password is set up on the Add SECURITY screen. Successfully entering the user password takes the user to the NewCrop program. Once a user enters the NewCrop program from Intellect, an [OnStaff Intellect] button displays at the bottom of the screen to facilitate re-entry into Intellect from the NewCrop program. For additional information on E-Prescribing, see Clinical --► E-Prescribing --► Overview, Prerequisites, and Enrollment Form.
4. Patient Info Tab ![]()
This information is view only. See Patient Info Tab in Add Appointment Dialog Box for details.
5. Insurance Info Tab ![]()
This information is view only. See Insurance Info Tab in Add Appointment Dialog Box for details.
6. Eligibility History Tab ![]()
This information is view only. See Eligibility History Tab in Add Appointment Dialog Box for details.
Note: To NOT see descriptions for certain eligibility remark codes, as sent by the vendor, this information may be suppressed. See the <Status> field information in Utility --►Messages --►Eligibility Remark.
7. Notes Tab ![]()
After selecting the Notes tab, notes may be entered. Click the [Save Notes] button to save additions/corrections.
8. Surgery Tab ![]()
This information is view only. See Surgery Tab in Modify Appointment Dialog Box for details.