Intellect™
SCHEDULE MENU OPTIONS

Appointment
Full Day
Tab Options
Week Tab
Video Available: Click Navigating the Appointment Schedule to access the link. Depending on the system set up, the media player may need to be activated. Speakers need to be attached to the workstation to hear the instructions.
Note: To view the videos, log-in through the www.primeclinical.com website. Current support is required.
Selecting the Week tab displays a seven-day column listing for a single provider. Providers are selected from a drop-down list sorted by providers’ last name (see step 2 below). The default is alphabetical. If a provider does not have a schedule set for a given day (see Utility --► Set Up --► Appointment --►Schedule), then that day’s column is left blank (see Sunday and Saturday below).

1.1 The selection tool displays the current calendar week from Sunday though Saturday, listed by month, numerical day, and full numerical year.
1.2 Use the arrows on the selection tool to advance one week at a time forward or one week at a time back.
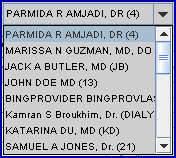
2. Provider Drop-Down Selection 
2.1 Displays an alphabetical list of available providers for this schedule.
2.2 It is listed First, Last, Title, (Provider Code) and sorted by Last Name.
2.3 Click the down arrow to reveal choices, then click the desired provider to display his/hers weekly schedule.
3. Column Properties 
3.1 Column properties are the same as in the Day tab view.
4.1 The primary way to make additions or modification to the appointment schedule in the Week view is from the right-click (context) menu pop-up.
4.2 To display the menu, click on the appropriate time slot within the patient column and then right click. For example:
4.2.1 Click on an empty time slot and select Add to display the Add Appointment screen.
4.2.2 Click on an existing patient appointment for other modification options.
4.3 See right-click (context) menu for detailed information.
- OR -
4.4 Instead of using the right-click menu, type 'A' in an empty time slot to add a patient, OR type 'M' in an existing patient appointment to make modifications.
5. Options to Change Week View
5.1 Press the number [2] on the top portion of the key board when in the Week View changes the default display. Only booked appointments for that day display and each appointment, regardless of time slot, appears on a separate line. Un-booked time slots are not visible.

5.2 Press the number [3] on the top portion of the key board when in the Day view changes the default display. All appointments slots for that day display and each appointment, regardless of time slot, appears on a separate line. All time slots display.

5.3 Press the number [1] on the top portion of the key board to return to the standard view.

5.4 Type 'C' on the keyboard changes the display, adding a wider column to display any entry in the Add/Modify Appointment Dialog Box. To return to the normal, view type 'C' again.

The Comment field holds 47 characters.