
Intellect™
SCHEDULE MENU OPTIONS

Appointment
Full Day
Tab Options
Survey List Tab
Effective version 14.03.20, surveys may be automatically emailed to patients regarding the services they received at their last appointment. Surveys are emailed to all patients the day after their appointment (see sample email). The Survey List only displays information for patients who respond to the survey. The questions in the survey are standard, with options of Excellent, Good, Fair, and Poor (see sample survey).
Effective version 19.12.04, the Survey can be sent to an electronic phone device as an SMS text message and the patient may take the survey from their device. Set up for this option is the same as set up for Twilio. See Twilio - User Set Up in the online documentation.
• Offices using Twillio for appointment reminders may also sign up online at Twilio for SMS messages. Offices are required to purchase a phone number online for this service.
• Offices NOT using Twillio for appointment reminders, and who are using their email server, may still send messages to a patients' device; however, there are limitations to this method by other phone carriers which may affect the messaging.
Set up is required before this feature may be used.
1. Go to Utility --►Tools --►Configuration
1.1 These fields should already have been set up based on information from the clinics DSL carrier: <SMTPSERVER>, <USERNAME>, and <PASSWORD>.
1.2 Set up the following fields.
Set up should be completed by the clinics IT person. Offices who do not have an IT person should contact Prime Clinical to complete the set up of these fields.
• <External IP>: Enter the clinics public (external) IP address. If the IP address is unknown, open up a web browser (i.e., Internet Explorer), type http://www.whatismyip.com and hit [Enter]. A web page pops up displaying the clinics IP address.
• <Webserver Port>: Enter the port to be used by the web server. The default port is 8080. The recommended port is 8080 but if that port is already being used for another purpose, another port may be used as long as it is an open port through the firewall.
1.3 After entering the information, press [MODIFY], and exit from Intellect to save.
2. Go to Utility --►Set Up --►Security --►Login Users --►Modify
2.1 Verify that the <Operator Email> field has been set up. Use the email address registered by the DSL provider.
NOTE: The security records of all users who intend to email must include the same <SMTPSERVER> address that was entered in the <SMTPSERVER> field of Utility --►Tools --►Configuration.
3. Go to Utility --►Task Manager --►Modify
When an appointment is added to the system, the program pulls all the patients from that days’ appointments and includes them with the Automated Survey Task. To access this information, SURVEY REQUEST needs to be set up in a task. See sample below:
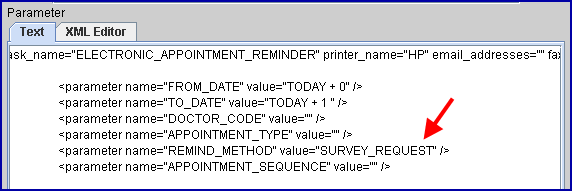
Please contact Support for help setting up this task.
4. Go to Utility --►Set Up --►Appointment --►Appointment Type
Each appointment type for which surveys should be sent must have the <Send Survey> field set to 'Y'.
_________________________________
Once the patient takes the survey, the results may be viewed for each question through Schedule --►Appointment --►Full Day via the Graphs tab and Survey List tab.

The Graphs tab allows users to view a graph for each survey question which shows the percentage of patients answering excellent, good, fair, and poor.
On the Graphs tab, select the ![]() button to view the percentage for each type of response for each question. Response percentages are displayed based on the type of graph selected; i.e., pie, bar, or line. The display may also be filtered by type of appointment, doctor, facility, from/to date, etc.
button to view the percentage for each type of response for each question. Response percentages are displayed based on the type of graph selected; i.e., pie, bar, or line. The display may also be filtered by type of appointment, doctor, facility, from/to date, etc.
See the Graphs tab documentation for complete information on defining and viewing graphs. Once in the Graphs tab documentation, see Survey for information specific to patient surveys.

The Survey List tab allows users to view the survey responses. When patients have completed the survey, results are shown on this screen with identifying information for the selected day(s). To select the date(s) of data to display, see 3. Information Selection.
1. Survey Results
Versions prior to 15.06.10 only include the comments entered for question 8 of the survey:

Versions 15.06.10 and greater have additional columns displaying the answers for each of the survey questions. If a column is empty, no selection was made for that question on the survey. See also 2. Column Definitions.

Right-click on any answer to display an [Inquire] button:

Click on the [Inquire] button to display the patient's Inquire Appointment screen to view the appointment for which the survey was taken.
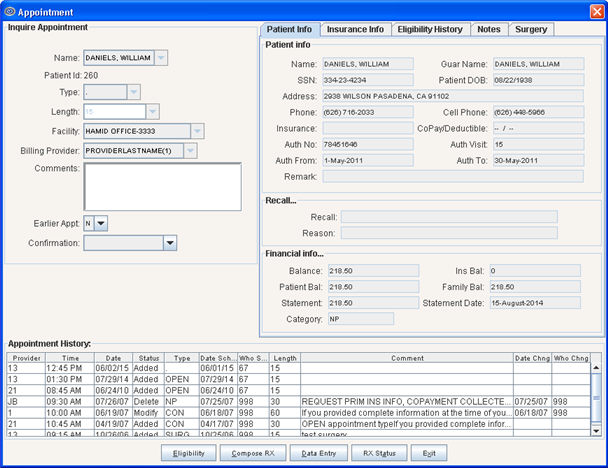
Note: Since the surveys are emailed to patients the day after their appointment, survey results are not available until after the appointment date.
Columns on the Survey List tab are defined as follows:
2.1 Patient Name 
Displays the name of the patient associated with the email where the survey was sent.
2.2 Provider 
Displays the Provider Code (as set up in Utility --►Provider --►Provider) of the doctor with whom the patient had the appointment.
2.3 Time 
Displays the time of the patient’s appointment.
2.4 Facility 
Displays the facility where the appointment took place.
2.5 Waiting 
Displays the patients’ response to survey question 2: How long did you have to wait before you were seen?
2.6 Understanding 
Displays the patients’ response to survey question 6: When your appointment was over, how was your understanding about your condition?
2.7 Courtesy 
Displays the patients’ response to survey question 3: How would you rate the courtesy you were shown by our staff?
2.8 Ques. Ans 
Displays the patients’ response to survey question 4: How would you rate the way your questions were answered?
2.9 Staff Knowledge 
Displays the patients’ response to survey question 5: How would you rate the knowledge of our staff?
2.10 Overall 
Displays the patients’ response to survey question 7: How would you rate your visit?
2.11 Comments 
Displays the patients’ comments, as entered into the comment field of question 8 on the survey.
• Facility, Provider, Type Selection
Note: When selecting a date, keep in mind that surveys are emailed to patients the day after their appointment.
3.1.1 Effective version 18.07.18, the date(s) of the displayed survey results are based on the <Appointment lookup days> field on the Utility --►Set Up --►Parameter screen.
Click on the [Refresh] button to update the display.

3.1.2 Prior to version 18.07.18, the dates of the displayed survey results were selected using the areas indicated below:

Select the date using either method:
• ![]()
Click on the double arrows to skip to a new month, OR click on the single arrows to skip to a new day.
- OR -
• 
Click on the single arrows to skip to a new month. Click on a day to select that date.
Click on the [Refresh] button to update the display.

3.2 Facility, Provider, Type Selection
The POS (Facility), Dr., and Type tabs allow the selection of all facilities, doctors, and appointment types for the graph, OR select a particular facility, doctor, or type.
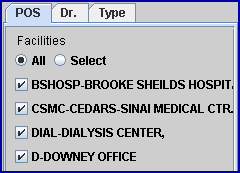
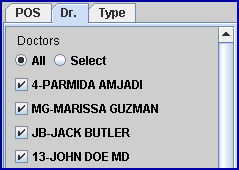
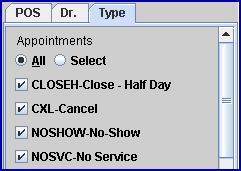
For more information on using these options, see the Day tab for details.