Intellect™
UTILITY MENU OPTIONS

Procedure
Supply - Effective version 16.05.20
The supply option allows offices to enter all the supplies used in each procedure for each provider. Once the supplies have been entered, offices can run a Management --►Detail -- Benchmarking Report which shows the cost effectiveness of procedures performed by individual providers. This report is generally run on a monthly, quarterly, or yearly basis.
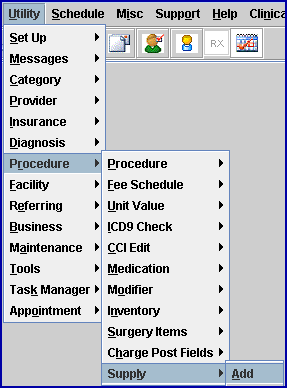
1. To set up procedures performed by a specific provider, go to Utility --►Procedure --►Supply --►Add
The Add Supply screen opens:
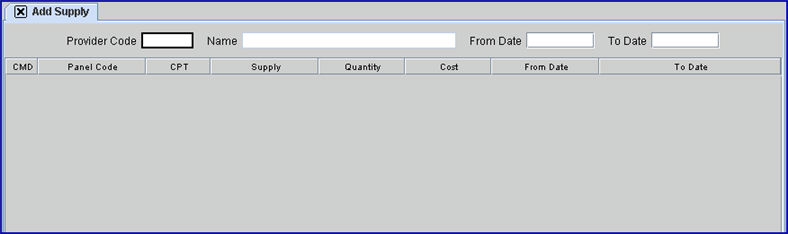
2.1 Enter the Utility --►Provider <Provider Code> for the designated provider.
2.2 This is a required field. If [Enter] is pressed before populating this field, an error message displays:
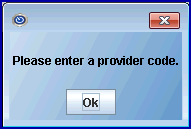
Press [Enter] OR click on [Ok] to return to the <Provider Code> field.
3. Provider Name 
3.1 The provider’s name is displayed. This is a read-only field.
4.1 Enter the beginning date of the date range.
4.2 The date entered here automatically fills the <From Date> field on the multi-line display.
4.3 To display all entries for the provider shown in <Provider Code>, leave this field and the <To Date> field blank. Once the entries have displayed, offices may add supplies and/or modify the <Quantity> and <Cost> fields as needed.
5.1 This is the ending date of the date range.
5.2 This field may be left blank (see 4.3 above for additional information).
6. CMD 
6.1 With the cursor in this field, the user may:
• Enter 'A' to add a procedure code, 'M' to modify, 'D' to delete, OR press [ESC] to return to the top of the screen. The system is not case sensitive; either upper- or lowercase letters may be entered.
- OR -
• Right-click to display this right-click menu:

Note: This right-click menu may be accessed by clicking anywhere on the multi-line display. The options perform as indicated below, regardless of where the menu is retrieved.
6.1.1 Select 'Add' OR enter an 'A' to add a blank line to the bottom of the list with the focus in the <Panel Code> field, allowing users to add more procedure codes.
6.1.2 Select 'Modify' OR enter an 'M' moves the focus to the <Quantity> column allowing changes to be made to the information in the <Quantity> or <Cost> columns.
Note: When changes are made, there is no need to log out and log back in; the changes are made immediately.
6.1.3 Select 'Delete' OR enter a 'D' displays:
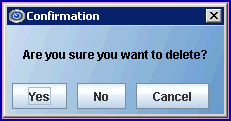
[Yes]: Click to delete the highlighted line.
[No]: Click to return the focus to the command column for the highlighted line.
[Cancel]: Click to return the focus to the command column for the highlighted line.
6.1.4 Press 'ESC' to return the user to Intellect's main menu.
6.1.5 Note: Old entries should not be deleted as past information should be available if needed for a Benchmarking Report covering a broad time period.
7.1 Enter the Utility --►Procedure --►Procedure <Panel Code> for which cost is being determined.
7.2 Procedure codes with multiple procedures (exploding) within one code may be used.
7.3 This field is required. If a procedure code is not entered, a warning message displays:
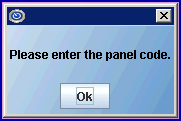
Press [Enter] OR click on [Ok] to return to the <Provider Code> field.
7.4 To modify the Panel Code, delete the existing record and enter the correct code.
8. CPT 
8.1 The CPT code displays, based on what is entered in the <Panel Code> column, and pulls the information from the corresponding Procedure Code.
8.2 This is a read-only field.
9.1 For each <Panel Code>, all supplies associated with that procedure need to be entered on a separate line for the purpose of tracking cost.
9.1.1 For example, if the procedure code is for cataract surgery, each item used in the surgery needs to be entered on a separate line.
9.1.2 Listing each supply used during a procedure allows the purchase price of each supply to be accounted for when determining the actual cost of the procedure.
9.2 This field is required. If a supply name is not entered, the system displays:
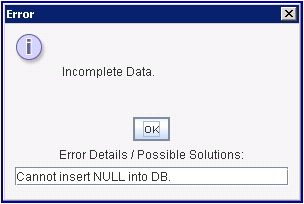
Click [OK] to return the user to the <Panel Code> field to fill-in the missing information.
9.4 This is a free-type field allowing users to simply type in a logical name for an individual supply; i.e., tray.
Note: A supply labeled 'tray,' a supply labeled 'Tray,' and a supply labeled 'tray-' would display as three separate items.
9.5 To modify the supply name, delete the existing record and add a new entry with the correct name.
10.1 Enter the quantity of the supply being purchased for this procedure.
10.2 For example, if trays are sold in packs of three and two trays are used in a procedure, the user would enter 1 since one pack of trays had to be purchased to perform the procedure.
10.3 This field may be modified.
11.1 Enter the cost of the <Supply>.
11.2 For example, if trays are used in the procedure and are purchased in packs of three which cost $3.00 per pack, $3.00 needs to be indicated in this field, regardless of how many trays in the pack are used during the procedure (see example in 10.2).
11.3 To enter $3.00, it is only necessary to type 3 and press [Enter]. For costs with cents, a decimal needs to be included; i.e., to enter fifty cents, enter .5.
11.4 This field may be modified.
12.1 To conserve key strokes, this field displays the <From Date> entered at the top of the screen.
12.2 Enter the beginning date of the date range for the desired time period.
12.3 Generally, this field should not be modified as it records the date when the <Supply> actually cost the amount recorded in the <Cost> field. If, however, the <From Date> needs to be changed, delete the existing record and add a new entry with the correct date.
12.4 This field may not be blank.
13.1 To conserve key strokes, this field displays the <To Date> entered at the top of the screen.
13.2 Enter the beginning date of the date range for the desired time period.
13.3 Generally, this field should not be modified as it records the date when the <Supply> actually cost the amount recorded in the <Cost> field. If, however, the <To Date> needs to be changed, delete the existing record and add a new entry with the correct date.
13.4 This field may not be blank.
Closing the screen automatically saves the entered information. To access the information again, enter the values for the <Provider Code> and <From/To Dates> initially entered at the top of the screen.