
OnSTAFF 2000
UTILITY/SET UP/
SECURITY MENU

Menu Options:
Login Users Step one for adding New Users.
Macros Macro Groups
Exit Returns you to the Set Up Menu.
/Set Up/Security/LOGIN USERS
Login Users is the first step in adding users to On-Staff (Set Up --►Printer --►Report is the second step, log on with the users password to verify access is the third). This option is used to assign new users’ passwords, security levels, macro groups, printer groups, and user number (unique to each user). The security level should at least meet the minimum security level required for the jobs assigned to the employee. The security levels are associated to each menu function seen throughout On-Staff. These levels are maintained under Main Menu --►Utility --►Set Up Menus --►Programs. When Login User is selected, On-Staff will display the following:

Menu Options:
Add Add a New User to On-Staff.
Modify Modify a User’s security level, name, macro group, etc.
Delete Delete a User from On-Staff.
View View a User’s login screen.
Exit Returns you to the Security Menu.
When the Add option is selected, On-Staff will display the following:
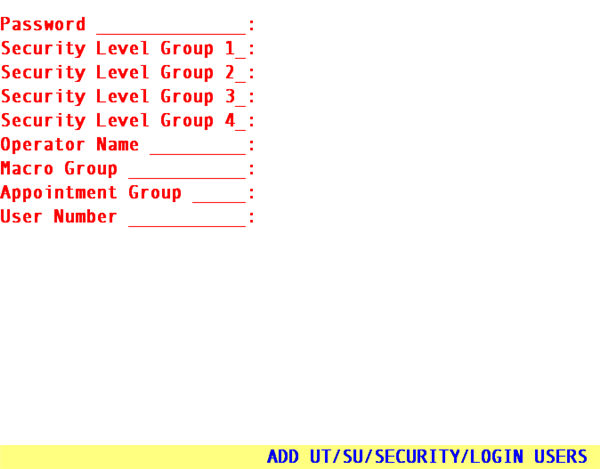
Password: A minimum of three and a maximum of 10 characters (letters, numbers or a combination).
Security
Level Group 1: Enter the security level to be assigned to this user (a number from 0-99). We suggest billers to be set between 60-70, front desk between 40-50, and administrators 99. This security level controls the users access to menus.
Security
Level Group 2 The second of four possible security groups used to limit menu access determined by daily tasks. Use this field to type in a security level value form 0-99 for this operator for this Security Group.
Security
Level Group 3 The third of four possible security groups used to limit menu access determined by daily tasks. Use this field to type in a security level value form 0-99 for this operator for this Security Group.
Security
Level Group 4 The last of four possible security groups used to limit menu access determined by daily tasks.Use this field to type in a security level value form 0-99 for this operator for this Security Group.
Operator Name: Enter the name of the user, keep in mind that collection letters generated by On-Staff identify the sender by the name entered in this field, followed by Billing Department on the next line.
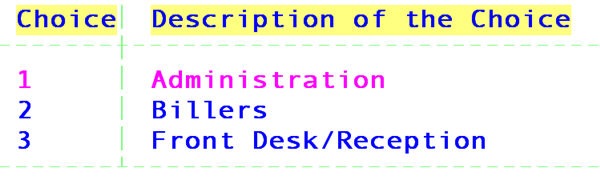
Macro Group: Enter the Macro Group Code appropriate for the user (see the following pages for standard templates)You may define your own macro groups for each operator to meet their requirements. For more information regarding this see pages I-3-4 through I-3-8. Pressing the [F2] search key will display the provided Standard Macro Groups:
Group: This field is used in conjunction with Utility --►Provider <Appointment Group> to assign this user a pre-determined group of providers for appointment scheduling purposes. Enter a number which matches the /Utility/Provider <Appointment Group> entry of that/those provider(s) this user will be scheduling for. Accepting the field default, zero, will allow the user full display of ALL providers within the Main Menu --►Schedule --►Appointment Full Day schedule, regardless of each provider’s assigned group.
Assignment of an appointment group here will:
• Display for this user ONLY those providers contained within that group when this user enters the /Full Day schedule or views a patient’s appointment history.
• Allow this user to schedule, reschedule, cancel, postpone, flag as a no show, delete, modify appointments, etc. for ONLY those patients with appointments with providers whose Utility --►Provider <Appointment Group> entry matches this <Appointment Group> assigned this user (i.e., this user will NOT be able to see, reschedule, cancel, postpone appointments, etc. for providers that are not in their appointment group).
NOTE: At the time an appointment is scheduled with a particular provider, the Utility --►Provider <Appointment Group> for this provider is kept as part of the appointment record. Therefore, if you choose to use this feature or are re-assigning a provider’s appointment group you must contact the Software Support Department so that they may update the patient’s appointment history to appropriately reflect the change.
User Number: Enter a unique number for each user added to On-Staff. This allows reports to be printed that track the user's productivity. Do not assign number 998 or 999, these are reserved for your vendor.
After the last field has been entered, the cursor will return to the Security Level field allowing the user to review the information entered. If the data entered is accurate, press [“] and On-Staff will return to the Password field allowing addition of more passwords if desired. Pressing [“] again will return the cursor to the Login Users Menu.
NOTE: To complete the addition of a new user, you must also add them under Utility --►Set Up --►Printer --►Report.