
Intellect™
BILLING MENU OPTIONS

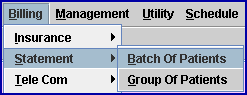
Statement
Batch of Patients
This menu option is used to print a statement for an individual (i.e., if a patient requests another statement), or it can be used to print small batches of patient accounts which either have Utility --►Category <Statement> = O and charges where <Who> = G, OR Utility --►Category <Statement> = R and have charges with a balance. In addition to the Utility --►Category <Statement>, accounts must also meet the conditions set up in the Utility --►Set Up --►Parameter screen in these fields: <Minimum Statement>, <Stop Statement Age>, and <Include Zero Charges>. See Statement Printing Parameters for additional information.
Very often a client’s billing is set for automation; hence, this Print Batch of Patients screen would be most useful for printing specific groups of statements.
Note: When a patient changes insurance, the old insurance information should be left in the patient's demographic screens until all charges/payments have been completed for the old carrier. If the old insurance is removed prior to completion of charges/payments, Intellect does not generate the information for the old insurance on the statements.
See instructions for printing a batch of statements.
Updates:
Effective Version 21.03.04
In previous versions of Intellect when an Automated Task was set to send patients statements via email, patients without an email address were only printed to the secondary printer when the patients' email address was blank and when the statement was PCL-designed.
As of the current version, the same functionality is also available for PDF-designed statements.
Effective Version 15.09.02
For patients with secondary insurance, it is now possible to bill the patient for the unpaid copay and deductible before billing their secondary insurance. To use this option, the <Bill Unpaid CoPay/Deductible> field on the Utility --►Category screen must be set to ‘Yes’.
Effective Version 13.10.29
As of this update, clients can have the insurance name on the patient statements by adding IC_NAME to the Report Designer query and adding the field to the statement. In prior software versions, it was only possible to have the insurance code on statements. Now the statement can include either the insurance name only, just the insurance code, or both the insurance code and name.
Effective Version 9.12.34
The 'B' option added in version 9.12.30 to the drop-down menu of the <Billing Sorting> field on the Utility --►Set Up --►Parameter screen was removed. The function of the 'B' option is now performed by the 'Batch' option on the new <Batch Sorting> field added to the Utility --►Set Up --►Parameter screen; i.e., the 'Batch' option sorts the batch in the order the accounts were entered into the Batch Entry screen.
The system uses the <Batch Sorting> field to sort the results when printing a report or form from the Batch of Patient screens in Billing --►Insurance, Billing --►Statement, Billing --►Worker --►Statement, Billing --►Worker --►HCFA forms, and Billing --►Worker --►Attorney.
The sort options are:

Effective Version 9.12.18
For PCM users only. The patients of offices using Patient Chart Manager (PCM) who also have Intellect Version 9.12.18 or greater, may make credit card payments online using Patient Portal. To implement this feature, the office must have Patient Portal set up.
To get Patient Portal, contact Marty at Prime Clinical by either opening a reference for Patient Portal or by sending an email directly to marty@primeclinical.com.
For offices already set up for Patient Portal, open a reference and support will contact you to complete the credit card set up. The following information is needed:
• Your Patient Portal address. For the entire sequence number/password to print on the statement, the portal address should be no more than 25 characters. If needed, the www at the beginning of the address may be left off. The address is entered in the Utility --►Set Up --►Clinic in the <Web Site> field.
• The Login and Password for the Authorize.net account, or other vendor, and the URL for the authorization company. They are entered in Utility --►Set Up --►Clinic in the <Credit Card Authorization Login>, <Credit Card Authorization Password>, and the <Credit Card Authorization URL> fields.
• Your Web Service information; i.e., Webserver port (usually port 8080) and External IP address. They are entered in the Utility --►Tools --►Configuration screen in fields <Webserver Port> and <External IP> respectively.
• A PDF Printer Device, set up under Utility --►Set Up --►Printer --►Devices. If this has not already been set up, the PCS Support staff will set it up.
See also Third-Party Vendor Options --► Credit Card Authorization.
NOTE: The patient’s current category determines if a statement is printed (see Utility --►Category <Statement>).
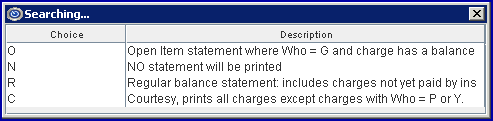
Effective Version 9.12.14, a new 'C' (Courtesy) option has been added to the Utility --►Category screen <Statement> field so charges are included on the patient statement with a balance where Who = S or T. The options in the <Statement> field are shown below. No changes were made to the functionality of choices O, N, and R.
Also effective Version 9.12.14: Prior to version 9.12.14, if the Insurance did NOT make a payment, Intellect did not print the zero payment information on the patient statement. Clients were able to enter a Comment on the Payment --►Open Item screen which prints on the statements if the <Payment Comment on Stmt> field on the Modify Parameter screen is set to Yes (see Utility --►Setup --►Parameter). Effective version 9.12.14, the zero payment, along with the remark description, prints on the statement if the office uses a statement which prints payment and adjustment detail. The zero payment prints whether or not an adjustment was posted.
Note: The program modification does not affect the Payment --►Open Item <Comment>. It continues to work as it did before.
Version 9.12.1 - New Feature When printing the patient name and address on the patient statement, Intellect now has the ability to print the first name and last name separately.
Note: The change is NOT automatically applied to office statements. To have the formatting of the patient name modified, please contact Prime Clinical Systems.
Video Available: Click Billing Patient Statement to access the link. Depending on the system set up, the media player may need to be activated. Speakers need to be attached to the workstation to hear the instructions.
Note: To view the videos, log-in through the www.primeclinical.com website. Current support is required.
1. To print a batch of statements in Intellect, go to Billing --►Statement --►Batch of Patients
The Print Batch of Patients screen displays:
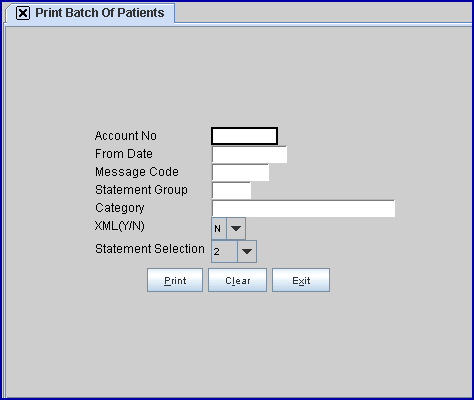
2. Account No 
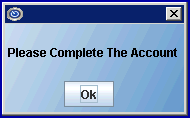
2.1 Type the patient account number of the statement to print. This field is required. If it is left blank, this message displays:
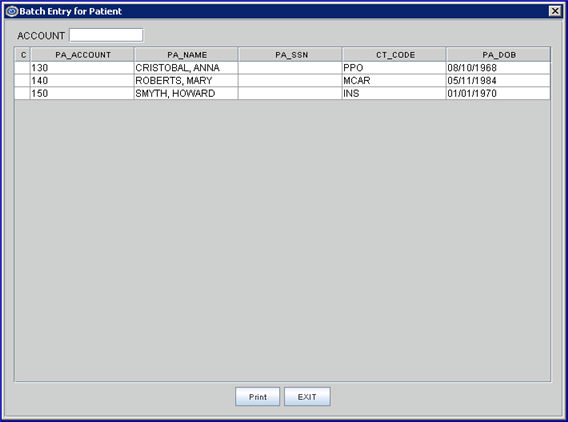
2.2 To add more accounts to process a single batch, press [Enter] to display the Batch Entry dialog screen (see below).
2.2.1 Type any additional account numbers (one at a time) and press [Enter] to add.
2.2.2 Up to 99 account numbers may be entered.
3. From Date 
3.1 Enter the oldest date of itemized activity to include on the statements.
3.2 Leave blank to itemize all statements.
3.3 There is no default.
4.1 To add a statement message, type the Utility --►Message --►Message <Message Code>.
4.2 This message appends any Utility --►Category <Billing Message> or Group Message for the particular patient category.
Caution: If a code is entered here and the code is pre-configured in the patient’s assigned utility category, it prints twice.
4.3 Intellect completes the Remark section of the Statement.

4.4 To view the list of valid message codes with descriptions, press the [F2] key to display the Searching screen. To select a code, double-click on it, OR use the ↑ (up) and ↓ (down) arrows to highlight the correct code, and then press the [Enter] key to select. For more information on the Searching screen, see Introduction To Intellect --►Intellect Characteristics and Features -- Searching.
5. Statement Group 
5.1 Used to select a particular Utility --► Provider --► Provider <Statement Group> to print. To select all groups, leave blank.
5.2 When printing statements, the program uses the statement group as it was set up at the time of posting charges. Meaning if, when charges are posted, the Provider <Statement Group> was set to 1 and afterward it is changed to <Statement Group> 2, additional charges are posted and the patient receives two statements: one for Statement Group 1, and a second for Statement Group 2. If all charges should be printed on one statement, please contact Prime Clinical Systems for more information.
6. Category 
6.1 Limits the billing results by specific patient category.
6.2 Press [Enter] to bypass this field to request ALL categories, OR use a specific category by typing its Utility --►Category <Category Code>.
6.3 This field accepts multiple values:
• category codes separated by commas with no spaces:

• a range of codes entered with a hyphen and no spaces:

• an asterisk * to return all Categories starting with the portion of the code entered prior to the *. For example, M* prints all Categories whose code begins with M.

7.1 This field controls whether or not an XML file is created and sent to an outsourced vendor. For example, if an office outsources their statements, the information in the XML file allows patients to make online credit card payments via Patient Portal.
7.2 Offices who do NOT plan to use the Patient Portal feature should select 'N,' the default, and ask their statement vendor to ignore the new information in the XML file (see 7.3).
7.3 Select 'Y' (Yes) to create a feed for third-party billing services.
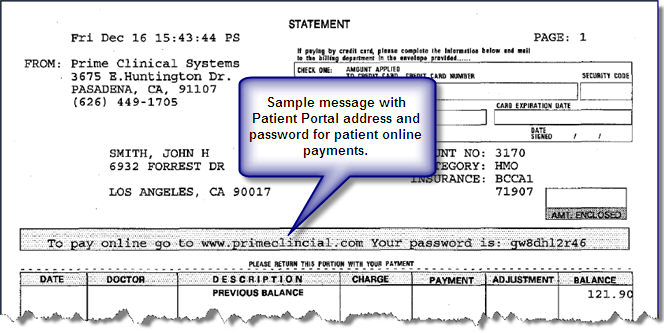
Effective version 9.12.15, the XML file includes a message and sequence number/password. The following example may be provided to the vendor: <onlinePayment remark="To pay online go to www.primeclinical.com. The password is: gmz16buo71032" />. The password is automatically generated for each statement. See sample below:
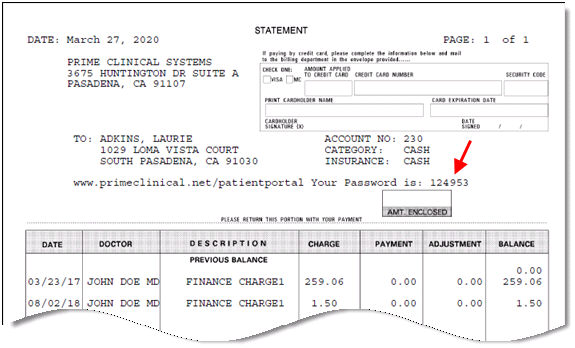
Effective version 20.04.20, the password for the online patient portal was changed from Alpha/Numeric with a total of 13 characters to Numeric with a total of only 6 characters. The password is automatically generated for each statement. See sample below:
Note: Payments made through Patient Portal may be viewed by running a receipt report through Schedule --►Appointment --►Receipt --►Print Report Receipt.
8.1 Displays the default statement selection from Utility --►Set Up --►Parameter <Statement Selection>.
8.2 There are many types and styles of statements to choose from and available to be loaded. Clinics who are outsourcing their statements may have their own statements customized.
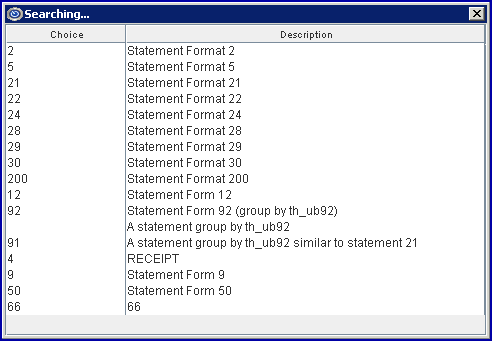
8.3 Although the drop-down displays a long list, clients are restricted to one type of statement.
8.4 Effective version 9.12.16, Statement Forms which print without payment and adjustment detail can now print the Payment Comment and Check Number if the associated parameters are set up. Statement Forms which do not normally print payment and adjustment detail have a single digit code, such as 2 or 5.
For set up, go to Utility --►Set Up --►Parameter, fields <Payment Comment on Stmt?> and <Print Statement Check#>.
8.5 Effective version 9.12.18 - New Statement Form 50. Statement Form 50 is similar to Statement Form 2 which includes a column for charges, credits, and balances. Statement Form 50 displays any payments posted on the statement form regardless of when the charge was posted. The statement also displays the balance for each charge line. Click on SAMPLE STATEMENTS for a sample of Statement Form 50.
9. When the information is completely entered, select one of these options:

9.1 Select the [Print] button OR press [Enter] to display a printer dialog box:
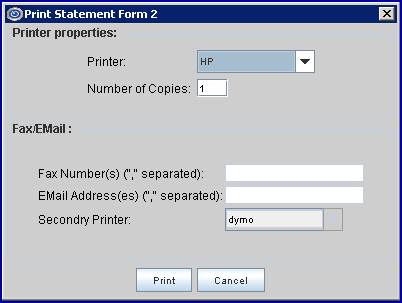
9.1.1 Printer Properties
9.1.1.1 Printer: The default printer for the logged-in clinic and password is selected. To select a different printer, either click on the arrow, OR press the → (right arrow) on the keyboard to view the list of printer codes. In our example, the defaulted Printer is HP. This is just an example of a printer name and may or may not be set up on the system.
To select the printer type, click on the code, OR use the ↑ (up) and ↓ (down) arrows to highlight the correct code; then press the [Enter] key to select.
Note: To review reports before printing them, select the printer type VIEW and then press the [Enter] key to select. The reports are sent to the workstation screen and the icons shown below display in the top left corner of the screen. Hovering the mouse over an icon displays its function.

9.1.1.2 Number of Copies defaults to either 0 (zero) or 1; both print 1 copy. To print more than one copy, enter the number of copies.
Select the [Print] button to send the request to the printer.
9.1.2 Fax/Email
In addition to printing reports, Intellect provides the capability to export reports to an Excel spreadsheet, Email, Fax, Disk, or Archive.
NOTE: Non-commercial email carriers have a cap on the number of emails that may be sent per day. If an offices' current email carrier does not support the number of emails they need to send on a daily basis, they need to contract with a commercial email vendor.
A secondary printer may also be select, if one is set up, by clicking on the arrow to display the drop-down list.
9.1.3 Select the [Print] button to send the request to the printer (or as a Fax or email).
9.1.4 Select the [Cancel] button to clear the screen and return to the <Account No> field without saving.
9.2 Click [Clear] to clear all information and return the focus to the <Account No> field without saving.
9.3 Click [Exit] to clear the screen and return the focus to the main Intellect screen without saving.
Note: As of Version 9.12.12, statements which print the Payment and Adjustment detail as a separate line now print the Balance on a separate line too. Prior to version 9.12.12, the balance printed on the same line as the Charge. Clients reported this was confusing for many of their patients, therefore, Prime made this change. The format of each clinics' current statement did not change, only the balance line was added as shown in the sample of Statement 21 -- click on Sample Statements above.


