
Intellect™
PAYMENT MENU OPTIONS

Auto Payment
ERA Pickup & Print Report
The ‘Report’ option is used to manually pickup Electronic Remittance Advice (ERA)/835 files from a clearinghouse or direct carriers (such as Medicare and Medi-Cal) OR print the report for previously downloaded files. This option generates the Automatic Payment Journal WITHOUT posting the payments and adjustments.
NOTE: ERA files may be set to automatically download without printing a hardcopy. Please contact PCS support to setup nightly automation for ERA pickup.
Prior to using this option:
• The provider’s office must establish the appropriate account with the direct payer or clearinghouse for electronic claims submission and ERAs.
• PCS support must setup the Utility --► Insurance --► Insurance and Utility --► Insurance --► Tele Com screens with the credentials for each clearinghouse and/or direct payer.
Please verify ERA availability and any additional enrollment requirements for specific insurances with your clearinghouse or direct carrier.
IMPORTANT NOTE: If an office uses the same submitter number for multiple Intellect clinics, the payments for all clinics may appear in the same ERA file. The automated ERA pickup task runs in only one of clinics using the same submitter number, however a match will not be found on the report for charges posted in another clinic. Therefore, it is important to remember to generate the Automatic Payment Journal in each clinic which shares the same Submitter Number.
For detailed instructions on automatically posting the payments and adjustments to patient accounts based on the downloaded file, see online documentation for Post ERA.
Video Available: Click Payment Auto Payment ERA to access the link.
Note: To view the videos, you need to have logged-in through the www.primeclinical.com website, and you must have current support. Depending on your system set up, you may need to activate your media player. You need to have speakers attached to your workstation to hear the instructions.
In this Topic Hide
1. To manually download new ERA files from a clearinghouse or direct payer, go to Payment --► Auto Payment
The Auto Payment screen displays:
2. Carrier Type ![]()
2.1 Accept the default OR select one of the following from the drop-down list:
2.1.1 ‘Medicare’ (formerly ‘M’) when downloading ERA files directly from Medicare.
2.1.2 ‘Insurance’ (replaced ‘I’ and any carrier type NOT ‘A,’ ‘B,’ ‘C,’ ‘M,’ ‘P,’ or ‘W’ effective version 16.10.11) when downloading ERA files from any clearinghouse or direct payer.
2.2 Press the [F2] search key to display the valid choices:
NOTE: Only ‘Medicare’ and ‘Insurance’ are valid choices for ERA pickup.
3. From ![]()
3.1 Leave blank for this option (not used for ERA pickup).
4. To ![]()
4.1 Leave blank for this option (not used for ERA pickup).
5. Payment ![]()
5.1 Leave blank for this option (not used for ERA pickup).
6. File Name ![]()
6.1 Leave blank for this option (not used for ERA pickup).
7. Insurance Code ![]()
7.1 Type the Utility --► Insurance --► Insurance <Insurance Co. Code> associated with the clearinghouse or direct payer.
7.2 This field is required to establish a connection with the correct clearinghouse or direct payer.
8. src pay ![]()
8.1 Leave blank for this option (not used for ERA pickup).
9. src adjustment ![]()
9.1 Leave blank for this option (not used for ERA pickup).
10. Post Payment/Report ![]()
10.1 Accept the default ‘Report.’
11. Check ![]()
11.1 Leave blank for this option (not used for ERA pickup).
12. Print Bill ![]()
12.1 Leave default ‘No’ for this option (not used for ERA pickup).
13. Provider Code ![]()
13.1 Leave blank for this option (not used for ERA pickup).
14. Category Code ![]()
14.1 Leave blank for this option (not used for ERA pickup).
15. Batch No ![]()
15.1 Leave blank for this option (not used for ERA pickup).
16. Adjust Cross Over ![]()
16.1 Leave default ‘No’ (not used for ERA pickup).
17. Credit Card Payment ![]()
17.1 Leave default ‘No’ (not used for ERA pickup).
18. Primary/Sec/All ![]()
18.1 Leave default ‘All’ (no used for ERA pickup).
19. When the required fields are populated, click [Commit/Exit] to download the ERA file and print the Automatic Payment Journal. NOTE: The payments and adjustments are NOT posted.
![]()
19.1 See III - Buttons on the Screen below for more details about the print options.
19.2 See online documentation Automatic Payment Journal for ERA for a detailed explanation and samples of the report.
1. To reprint the Automatic Payment Journal for a previously downloaded ERA file, go to Payment --► Auto Payment
The Auto Payment screen displays:
2. Carrier Type ![]()
2.1 Accept the default OR select one of the following from the drop-down list:
2.1.1 Select ‘Medicare’ (formerly ‘M’) for Medicare ERA files
2.1.2 Select ‘Insurance’ for ERA files from any clearinghouse or direct payer including Medicare.
2.2 Press the [F2] search key to display the valid choices:
NOTE: Only ‘Medicare’ and ‘Insurance’ are valid choices for ERA report.
3. From ![]()
3.1 Leave blank for this option (not used for ERA report).
4. To ![]()
4.1 Leave blank for this option (not used for ERA report).
5. Payment ![]()
5.1 Leave blank for this option (not used for ERA report).
6. File Name ![]()
6.1 Press [F2] to display previously downloaded ERA files.
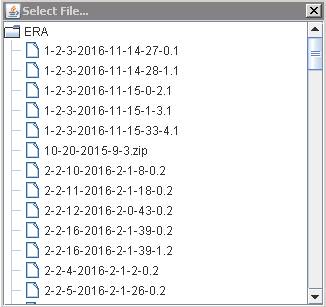
NOTE: If billing is submitted from more than one clinic, the files are listed in the clinic order based on the clinic from which the ERA pickup was requested. The file names are formatted as the ‘clinic number-MM-DD-YYYY-HH-MM-SS-sequence’ to indicate clinic, date and time of the download and a unique sequence number.
6.2 Scroll through the list to locate the desired file, and then double-click on the filename.
6.3 The selected filename automatically populates the field. For example:
![]()
7. Insurance Code ![]()
7.1 Leave blank for this option (not used for ERA report).
8. src pay ![]()
8.1 Leave blank for this option (not used for ERA report).
9. src adjustment ![]()
9.1 Leave blank for this option (not used for ERA report).
10. Post Payment/Report ![]()
10.1 Accept the default ‘Report’.
11. Check ![]()
11.1 Leave blank for this option (not used for ERA report).
12. Print Bill ![]()
12.1 Leave default ‘No’ for this option (not used for ERA report).
13. Provider Code ![]()
13.1 Leave blank for this option (not used for ERA report).
14. Category Code ![]()
14.1 Leave blank for this option (not used for ERA report).
15. Batch No ![]()
15.1 Leave blank for this option (not used for ERA report).
16. Adjust Cross Over ![]()
16.1 Leave default ‘No’ (not used for ERA report).
17. Credit Card Payment ![]()
17.1 Leave default ‘No’ (not used for ERA report).
18. Primary/Sec/All ![]()
18.1 Leave default ‘All’ (not used for ERA report).
19. When the information is completely entered, click [Commit/Exit] to print the Automatic Payment Journal for the selected ERA file. NOTE: The payments and adjustments are NOT posted.
![]()
19.1 See III - Buttons on the Screen below for more details about the print options.
19.2 See online documentation Automatic Payment Journal for ERA for a detailed explanation and samples of the report.
![]()
1. Click [Cancel/Exit] to displays this prompt:
1.1 Click [No] to commit and exit.
1.2 Click [Yes] to exit without committing.
2. Click [Commit/Exit] to display the Print Automatic Payment dialog box:
2.1 Printer Properties:
2.1.1 Printer: The default printer for the clinic and password for which you logged in will be defaulted. The above example of printer ‘HP’ and may or may not be set up on your system.
To select a different printer, view the list of printer codes by either clicking on the arrow, OR press the → (right arrow) on your keyboard. When the drop-down list is displayed, click on the code, OR use the ↑ (up) and ↓ (down) arrows to highlight the correct code, and then press the [Enter] key to select.
NOTE: If printer ‘PDF’ is selected, the ‘autopayment’ report is saved to the server folder \home\staff\reports.
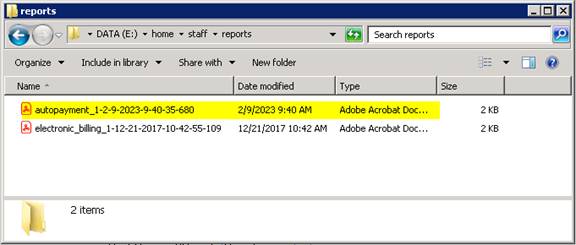
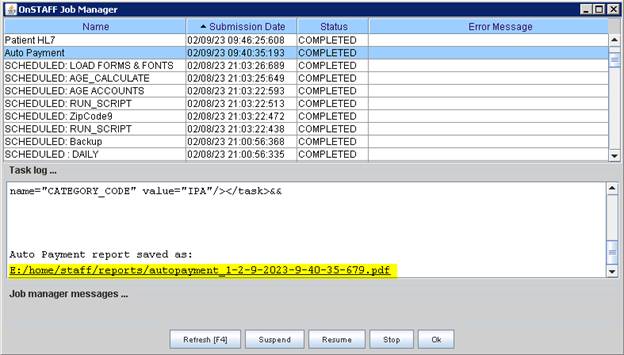
For the exact filename and folder location on your server, press [Ctrl]+[J] keys or Job Manager ![]() icon to open OnSTAFF Job Manager window and view the Task Log for ‘Auto Payment.’
icon to open OnSTAFF Job Manager window and view the Task Log for ‘Auto Payment.’
2.1.2 Number of Copies: This field defaults to either 0 (zero) or 1. Both print 1 copy. If you wish to print more than one copy, enter the number of copies.
2.2 Fax/Email:
In addition to printing reports, Intellect provides the capability to export reports to an Excel spreadsheet, Email, Fax, Disk, or Archive. A secondary printer may also be selected, if you have one set up, by clicking on the arrow to display the drop-down list.
2.3 Select the [Print] button to send your request to the printer (or as a Fax or email).
2.4 Select the [Cancel] button to clear the screen and return to the Auto Payment screen without saving or printing.
Automatic Payment Journal for ERA