
Intellect™
UTILITY MENU OPTIONS

Tools
Report Designer
Writing Custom Reports with Intellect
Report Designer may be used to write custom reports, letters, Superbills, and registration forms. This section of the documentation is designed to help create custom reports. If Report Designer is not an option on the menu, your security level must not be high enough to access the application. Contact a system administrator or Prime Clinical's Support.
• For instructions on creating forms, refer to Utility --►Tools --►Report Designer --►Scanning and Programming Forms.
• Instructions on creating custom letters/reports is discussed in this document.
To write custom reports, you need to have purchased a user license for the Report Designer application. If do not know if your office has done this, please review your Prime Clinical Systems, Inc. purchase agreement.
When writing custom reports, PCS recommends you follow the steps in the order they are listed. The documentation was written listing the steps in the easiest and most efficient sequence.
Step One - Designing Your Report
Step Two - Opening Report Designer
Step Three - Creating a New Report
Step Four - Opening the Query Designer (SQL)
Step Five - Selecting the Data Dictionary Tab
Step Six - Fields
Step Seven - Criteria
Step Eight - Order Tab
Step Nine - Group
Step Ten - Programming the Report
Adding the Calendar Date on the Form
Step Eleven - Placing the New Report or Letter on the Management/Custom Reports Menu
Effective version 18.12.07. To have the Organization Name and Physical Address to print on either itemized or non-itemized follow-up letters, request that Support to add ‘DR_PHYSICAL_ADDRESS and DR_PHYSICAL_CITY_STATE’ to Report Designer. See sample letter.
Effective version 16.02.22:
1. The physical address of the provider may be included on the CHDP form. To have the provider’s physical address to print, please contact PCS support.
2. For HCFA reports, Intellect pulls the value from the <Share of Cost Amount> field on the Charges --►Encounter --►Generic screen when it is greater than zero. When entering the dollar value, do not enter decimal points or dollar signs. Enter full dollar and cents amounts, even if the amount is even. For example, $4.00 is entered as 400. Use only one claim line for each service billed.
To facilitate this feature, the <Insurance Type> field must equal D on the Utility --►Insurance screen. Additionally, please contact PCS Support to add the ‘INS_STATUS’ field to Report Designer If it is not already there.
Share of cost amounts are entered in the Claim Codes (Box 10D) and Amount Paid (Box 29) fields of the CMS-1500 claim form.
Step One - Designing Your Report:
The first step in creating and writing a custom report is to plan what the report should look like. Some of the items to consider when planning a report are:
• What selection criteria should be applied? Make a list of all the items which apply. For example:
o Do you plan to limit the charges by the date of service?
o Should payments be limited by the date the payment was posted?
o Should the report include all payments within the date range, or only those which apply to the charges on the report?
o Will you need to request the report for a single provider, category, facility, etc?
o Do you want a report which prints for only specific procedure codes or panel codes?
• Which data columns are needed? Make a list of all the columns of data to include on the report. The columns need to be set up in Step Six.
• Which columns have totals?
• Which table should the data pull from?
For example:
o If you are requesting to print only charges where the patient's category is Medicare, do you want to use the category currently set up in the patient's demographic screen OR use the category which the patient had at the time the charge was posted.
• How will the data be grouped or summarized?
• The order in which the records should print.
o Do you want the report to list records in order by the patient name or account number, their category, etc?
• Whether the report should be printed as portrait or landscape.
• It is helpful to layout an example on paper showing what you want your report to look like.
Step Two - Opening Report Designer:
To create custom reports in Intellect, go to Utility --►Tools --►Report Designer.
While the program is loading, this dialog box may display:
Step Three - Creating a New Report:
To create a new form/report, select the New Report icon. ![]()

1. The Report Properties box displays. Some fields are defaulted; they are discussed later in this document.
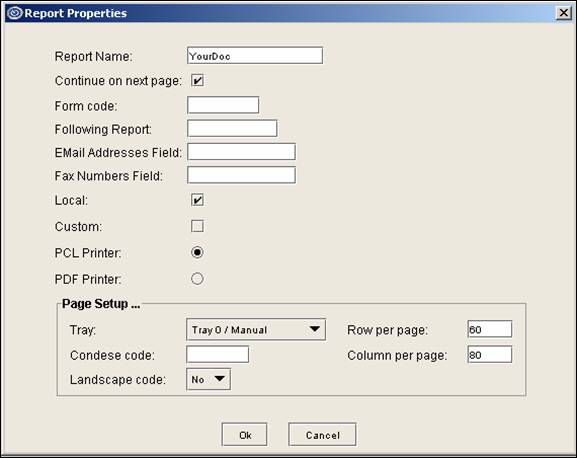
2. Report Name ![]()
2.1 Enter the name of the report. PCS recommends that you begin all of the report names with an identifier to indicate it is a custom report created by your office. For example, use either the clinic or provider's initials, or your Prime Clinical client ID. When using this naming convention, both your office and PCS are able to easily identify which reports were created by you. In addition, if you forget the name of the report it is easy to search for it using the identifier. In the example used in this document, the report name is: YourDoc.
3. Continue on next page ![]()
3.1 The box is checked as the default, indicating the report should continue to additional pages when needed. Custom reports should be left checked.
4. Form code ![]()
4.1 Complete with the Form Name. Do NOT enter the clinic number unless it is part of the Form Name. Combining the clinic number with the form name is needed only in step 2. In our example: YourDoc.
5. Following Report ![]()
5.1 This field applies only when the form should follow another form; i.e., a multi-page registration form. Enter the form name of the first page here WITHOUT the clinic designation.
6. Email Address Field ![]()
6.1 To ALWAYS have the output of this form emailed, enter the field name where the email address should be retrieved. To get the field name, go to the field on the screen and press [F1]. For example if the form should be emailed to the patient, go to Registration --►Regular --►Patient --►Modify, place the focus on the <Email Address> field, and press [F1]. The following dialog box displays with the field name. In this example the field name is PA_EMAIL

7. Fax Numbers Field ![]()
7.1 To ALWAYS have the output of this form faxed, enter the field name where the fax number should be retrieved. Use the above instructions to get the field name.
NOTE: When a report or letter is requested to print, Intellect has the option to enter an email address or fax number at that time. So, if you have created a report and wish to email or fax it to a provider, you may enter the appropriate email address or fax number at that time.
8. Local ![]()
8.1 The box is defaulted to blank. It designates whether the task should be run on your local workstation or, if left unchecked, to run on the server. Unless otherwise instructed by PCS, leave the default setting of blank so the report runs on the server. If checked ![]() the report runs on your local workstations.
the report runs on your local workstations.
NOTE: If you are viewing a report (rather than printing it), the task always runs on the local workstations. Because the temporary files created to view the report are not saved after the report is completed, running the task on the local workstation does not have an affect.
9. Custom ![]()
9.1 To NOT have updates overwrite your form, check ![]() this box. In the case of forms scanned and programmed by clients, PCS recommends the Custom box always be checked.
this box. In the case of forms scanned and programmed by clients, PCS recommends the Custom box always be checked.
10. PCL Printer ![]()
10.1 As a default, this radio button ![]() is checked. Although the forms you are programming will not use PCL, you will not be able to uncheck this box. When you select PDF Printer in the next step, this box becomes unchecked.
is checked. Although the forms you are programming will not use PCL, you will not be able to uncheck this box. When you select PDF Printer in the next step, this box becomes unchecked.
11. PDF Printer ![]()
11.1 Click on the radio button ![]() to select. In doing so, the PCL Printer radio button becomes unchecked. PDF Printer must be selected or your form will not print with the data.
to select. In doing so, the PCL Printer radio button becomes unchecked. PDF Printer must be selected or your form will not print with the data.
12. Tray ![]()
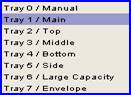
12.1 Intellect usually defaults Tray1/Main, though this may be different on each workstation as it is controlled by hardware set up/configuration. To change the tray destination, select one of the options from the drop-down list.
NOTE: The printer name is not part of the set up in Report Designer: Users are prompted for the printer name when printing the report.
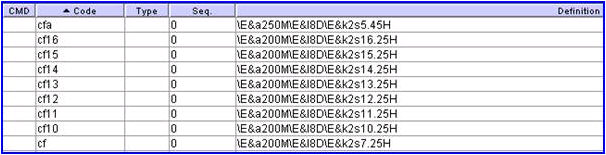
13. Condense code ![]()
13.1 To increase or decrease the size of the font, select the appropriate size code from the Condense Code Table shown below.
• The default for the <Condense code> field is blank, which is the same as cf12. Most Intellect portrait style reports use this size font.
• The smaller the number the smaller the font.
• The larger the number the larger the font.
• cfa is used on the Financial Report.
The codes as set up in the Utility --►Set Up --►Printer --►Capability table (For Printers) are:
• The last few characters of each line determine the size of the font.
• Any code can have the size changed by modifying the font size. For example if cf10 is just a little too small, but cf11 is a little too large, add a new code by changing only the font size to a value between cf10 10.25 and cf11 11.25.
NOTE: PCS does not recommend changing the font size on existing Codes because the codes may also be used in other users reports and their fonts will also be changed.
14. Landscape code ![]()
![]()
14.1 Accept the default 'No' (portrait forms) OR use the drop-down list to make an alternate selection. If the form to be used is landscape, change this to 'Yes.'
15. Row per page ![]()
15.1The default for this field is 62. When writing a custom report, the value should be changed to 60 for portrait or 45 for landscape when the Condense code is set to font cf12 (or blank). Setting this field to a value greater than 60 may cause a blank page to print between each page of the report.
16. Column per page ![]()
16.1 The default is 80 for portrait and is correct when the Condense code is set to font cf12. If printing a report in landscape, change to 120 and set the Condense code to font cf10. If a smaller/larger font than these is preferred, this needs to be modified.
NOTE: The <Row per page> and <Column per page> setting are dependent upon a combination of the font size and whether the report is portrait or landscape. Therefore, you may need to experiment a little to get the correct combination for your report.
When the Report Properties box is completely set up, click on the [Ok] button to save the information.
Step Four - Opening the Query Designer:
The next step in writing a report is to create the SQL query needed to select the desired data. If you know SQL, you can write the script manually. For those who are not familiar with writing SQL, follow Step Four through Step Nine and Intellect Report Designer creates the SQL query for you. The SQL query must be created before you may continue writing your report.
NOTE: If you have created a report, then want to modify the data dictionary for that report, steps 6 though 9 need to be repeated for the existing report. If you wish to modify the data dictionary for future reports, do NOT open a report - select the Query Designer immediately after opening Report Designer and before opening a report!
SQL Designer
Open the SQL Designer by selecting the Query Designer icon. 

While the program is loading, this dialog box may display:
Step Five - Selecting the Data Dictionary Tab:
Selecting the Data Dictionary Tab is the first step in creating your SQL query.
A Data Dictionary is a group of tables and fields with logical relations defined between the tables based on the business domain. Data Dictionaries have been set up on your server, using the most commonly used fields for reporting within the database. The Data Dictionary Tab allows you to add to the list already defined, or remove any fields not needed.
1. With the Data Dictionary Tab selected, click on Select a data dictionary
![]() .
.
1.1 Intellect displays the list of data dictionaries set up on your server. Common data dictionaries found in Intellect are:
1.1.1 Patient: Contains patient demographic and insurance information, and account balance information.
1.1.2 Treatment History: Contains the charge, payment, and adjustment information, and some current patient demographic and insurance information.
1.1.3 Appointments: This dictionary is in the process of being built, and contains appointment history, current patient demographic and insurance information.
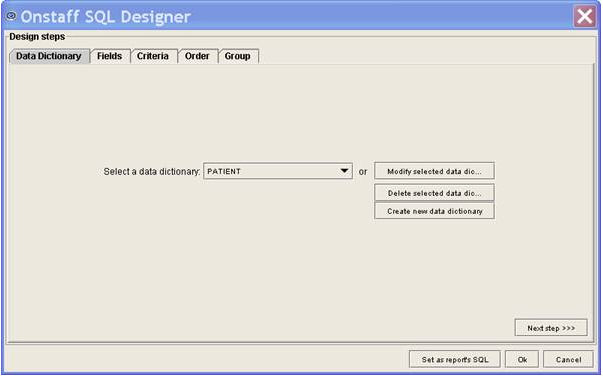
2. After choosing a data dictionary item from <Select a data dictionary>, click on Modify selected data dic
![]()
NOTE: Delete selected data dic and Add new data dictionary are tasks normally maintained by Prime Clinical Systems, Inc. Call PCS for assistance if needed.
2.1 The Data dictionary creator/Design Steps dialog box displays with the 'Tables' screen defaulted.
Documentation follows for the three tabs on the Data dictionary creator screen:
3. Schema name: 
3.1 Displays the name of the selected data dictionary.
4. Database tables: 
4.1 Displays a list of all the tables in the database.
5. Report source tables: 
5.1 Displays a list of all the tables selected for this data dictionary.
NOTE: If you need to add another table to your data dictionary, please contact Prime Clinical for assistance. Many tables require the logical relation between it and other tables defined before you may use them when creating your report.
This screen is used to define the relations between the database tables, which is the core architectural design of the database and an integral piece needed for the Query Designer to create the SQL query. The data on this screen should not be modified.

NOTE: This Relations section of the data dictionary is maintained by Prime Clinical. It defines the relation between tables used for report writing in Report Designer. Call PCS for assistance when needed.
The name assigned to a field within the database does not always clearly indicate what data is contained in the field. Therefore, PCS has set up Alias names for the most commonly used fields. Through the Field Alias screen, you may assign user-friendly names to fields being used on your reports. You may modify the Aliases PCS assigned to fields, select fields for reporting which are not already included, or remove fields which have been selected. Follow the steps outlined below to maintain your Alias names in the data dictionary.
6. Table: ![]()
6.1 Displays the table names selected in the Tables Tab for this data dictionary. This is a read-only field and may not be accessed for modification of data.
7. Field: ![]()
7.1 Displays the field names for the tables selected for this data dictionary. This is a read-only field and may not be accessed for modification of data.
8. Alias: ![]()
8.1 Displays an alias name which shows up as the field name in query designer, replacing the <Field> name.
8.2 This field is optional and may be left blank, though assigning an alias name which better describes the fields is useful when selecting the fields to print on the report.
8.3 When the same field name is used in more than one table, an Alias must be set up if the field is used when creating a report. Failure to do so results in a ‘columnar ambiguity’ error. For this reason, the records in this screen have been listed in Field name order. If you are selecting a field to be added to the report SQL listing, be sure to verify that there is not another field with the same name. If there is, you must assign a unique Alias.
9. Invisible: ![]()
9.1 If checked, the field does not display in the Query Designer.
9.1.1 To add a field to the programming list, click on the check box to un-check the field.
9.1.2 To remove a field from the programming list, click on the check box to check the field.
When this screen is completed, click on the [Ok] button to save any changes and return to the SQL Designer screen.
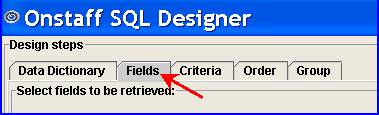
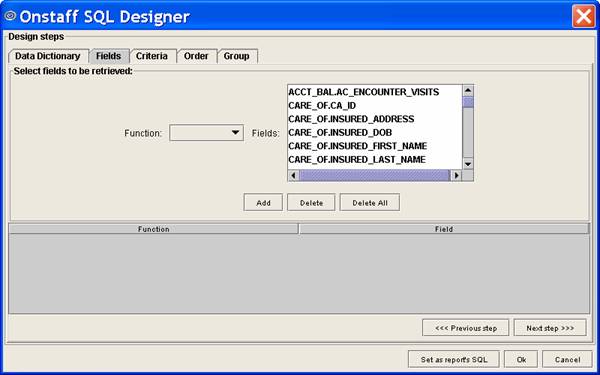
The Fields Tab screen has two purposes:
• To select each field that will be printed on the report. The order which you select the fields here is not the order in which they print on the report.
• Assign a function to selected fields. For example, you may choose to sum (total) the charge balance, count the number of visits, or calculate an average. Functions only apply to fields which may be calculated; i.e., numbers or dollar amounts. Assigning functions is used only if you are grouping like records. If you plan to print detailed information with the total at the end of the report, you should not assign the sum function. Adding the total to the end of the report is covered in another step.
To continue to the Fields screen, click on either the Fields Tab or the [Next Step >>>] button at the bottom of the screen. This displays:
1. Functions ![]()

1.1 This is used to select any field which is printed on the report and does not have a function assigned.
1.2 Accept the blank default OR use the drop-down list to make an alternate selection.
1.2.1 Sum: Calculates a sum (total) of the selected field. For example, you may total the dollar amount of charges, payments, and adjustments, or total the number of days/units entered.
1.2.2 Average: Calculates an average of the selected field.
1.2.3 Min: Returns the lowest value for the selected field.
1.2.4 Max: Returns the highest value for the selected field.
1.2.5 Count: Counts the number of records selected.
Select from <Functions> then select from the <Fields> list.
2. Fields ![]()
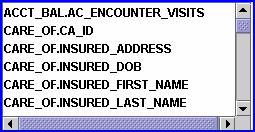
2.1 The list includes those fields which have been set up in Step Five assigning a Field Alias. This is all un-checked from the Invisible column.
After Function and Fields are selected, click on the [Add] button to insert the record/row into the table (as shown below).
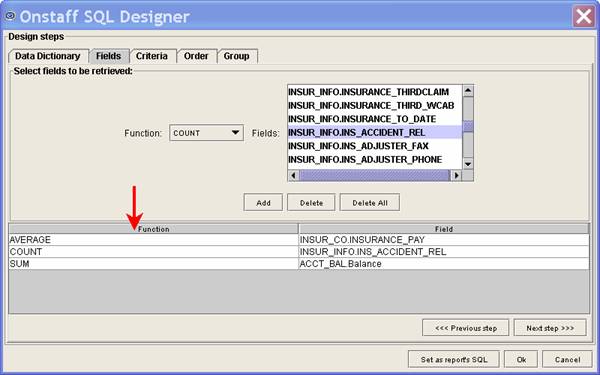
NOTE: If the data will not be grouped, do not assign Functions to any of the fields.
Delete: To delete a single row/field from the functions list, click on the record then click on the [Delete] button.
Delete All: To remove all rows/fields from the functions list, click on the [Delete All] button.
When you have completed/selected all the fields to include on your report, click on either the Criteria Tab or the [Next Step >>>] button to continue to the next step.
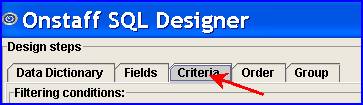
This step lets you create the user-friendly names for the criteria selection parameters that appears on the users screen. This step is also used to create (underlying SQL code) filtering conditions to apply when printing the report. For example, to select patient records entered within a specific date range, charges posted to a single provider or facility, etc.
The first step of defining the Criteria is to create a Parameter for each applicable field.
After clicking on either the Criteria Tab or the [Next Step >>>] button in Step Six, this displays:
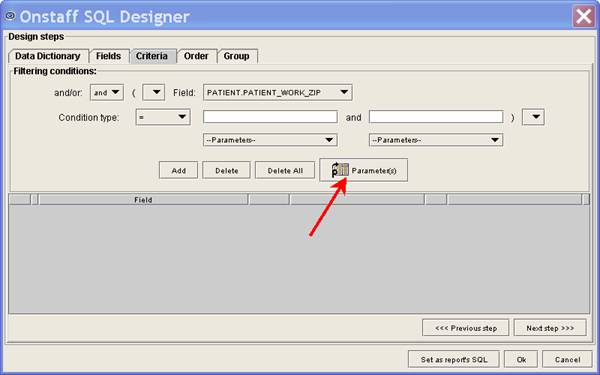
Click the [Parameter(s)] button (see above) to display:
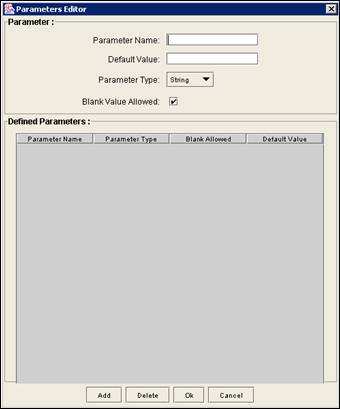
1. Parameter Name: ![]()
1.1 Enter the description to view when selecting the report to print. For example, From DOS for the starting date of service to include in the report.
2. Default Value: ![]()
2.1 To have a default value populate the field when printing the report, enter that value here. Usually this field is left blank.
3. Parameter Type: ![]()

3.1 Select the correct field type from the drop-down list; i.e.:
3.1.1 String: Most fields are defined in the database as String unless they are a date or currency.
3.1.2 Date: Select this type if the data is a date field. For example: Date of Service.
3.1.3 Currency: Select this type if the data is a dollar field. For example: Charge amount.
4. Blank Value Allowed: ![]()
4.1 The default is a checked box which allows the field to be left blank while completing the selection criteria when printing the report. Accept the default OR deselect the check box.
5. Parse as List:
5.1 When requesting a report to print, if you may want to print for multiple codes you should click Parse as List to select as doing so automatically inserts the tick symbols around your codes. For example, if the report should include records for provider codes 1, 2, 3 & 4:
• If Parse as List is selected, enter the codes as: 1,2,3,4
• If Parse as List is NOT selected, enter the codes as: '1','2','3','4'
After completing the above fields for each parameter selected, click on the [Add] button to insert the record/row into the table as shown below:
Repeat the process adding as many defined parameters as desired.
[Delete]: To remove one of the records/rows, highlight the record and click on the [Delete] button.
[Ok]: Click [OK] to exit the Parameter box and save the records/rows inserted into the table.
[Cancel]: Exits the Parameter box without saving the records/rows.
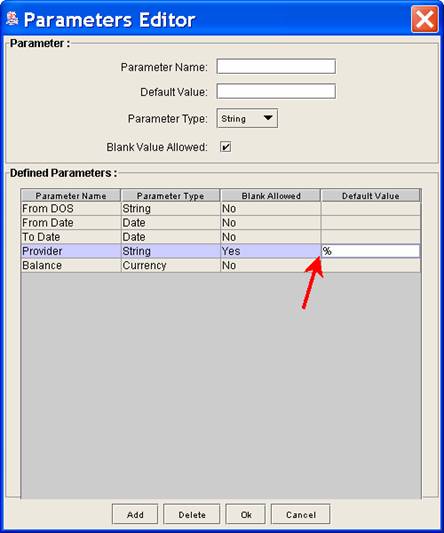
5.2 If ![]() <Blank value allowed> is selected on any of your Parameters, make these changes to each of those records:
<Blank value allowed> is selected on any of your Parameters, make these changes to each of those records:
• Double-click in the Default Value column of the record.
• Type in a percentage symbol: %
• Click once in either the cell above or below the record being modified.
The record should look similar to this for Provider:
When all of your parameters are entered, click on the [Ok] button to save the records and return to the Criteria Tab screen:

There are several items to complete when adding selection criteria to filter the data which is included on the report.
6. and/or: ![]()
![]()
6.1 The field is defaulted to 'and' with the assumption that usually filters are in addition to previously set up filters. When adding a filter, the first one may always use the defaulted value of 'and.'
6.2 The only time the 'or' filter would be used is to apply more than one condition to the same field. For example, to include records where the patient's category is either Medicare or Medicaid, use the 'and' filter for the first category record, and the 'or' filter on the second category record. The category filters do NOT have to be the first and second filters added.
7. Left parenthesis and down arrow drop-down ![]()
7.1 Select the parenthesis from the drop-down, if required. If this is selected, be sure to select the right parenthesis to close the bracket.
8. Field: ![]()
8.1 Select the field to apply the filter to from the drop-down list. The field names in the list are a combination of the table, field (table name period field name or alias if so created), and are in alphabetical order.
9. Select the Condition type: ![]()
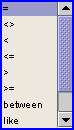
Choose the type of condition to apply to the selected field. These are the options in the drop-down list with a brief description of each:
9.1 = Is equal to the value which is entered when printing the report, or in the case of a date field, is equal to the date entered. Do not use this Condition type if your Parameter may be left blank when running the report. If able to leave the Parameter blank, use the Condition type 'like.'
9.2 <> Is NOT equal to the value which is entered in the Parameter when running the report, or, in the case of a date field, is not equal to the date entered.
9.3 < Is less than the value entered when printing the report, or, in the case of a date field, is prior to the date entered.
9.4 <= Is less than or equal to the value entered in the Parameter when running the report, or, in the case of a date field, is prior to or equal to the date entered.
9.5 > Is greater than the value entered in the Parameter when running the report, or, in the case of a date field, is after the date entered.
9.6 >= Is greater than or equal to the value entered in the Parameter when running the report, or, in the case of a date field, is after or equal to the date entered.
9.7 Between: Is between or equal to the two values entered in the Parameter when running the report, or, in the case of a date, is between or equal to the dates entered.
9.8 Like: The value entered in the Parameter when running the report is contained in the field to which the condition is applied. This Condition type should be used if your Parameter may be left blank when running the report.
9.9 is null: Used to select records where the field you are applying the condition to is blank. For example, to print a report for only those charges which have not been billed.
9.10 is not null: Used to select records where the field you are applying the condition to is NOT blank. For example, to print a report for only those charges which have been billed.
10. Parameter: ![]()
10.1 Apply the filter for the selected parameter.
10.2 For all Condition types other than 'between,' click on the left <Parameters> drop-down and select the field where the selected Condition type should be applied from the drop-down list of your Parameters (added in Step 7 [Parameter(s)].
10.3 Highlight the correct Parameter and click on the [Add] button to insert the record/row into the table.
10.4 When applying the 'between' condition, select from the left <Parameters> drop-down for the first field where the Condition type should be applied. Then select from the right <Parameters> drop-down for the second field where the Condition type should be applied.
Click on the [Add] button to insert the record/row into the table. This example applies the Condition type to a date of service range:
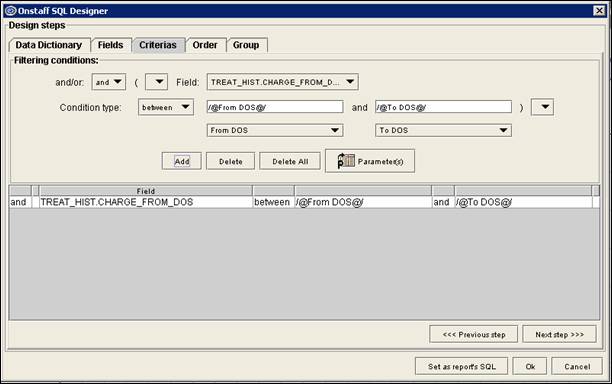
When the Parameters and Filtering conditions have been completely set up, click on either the Order Tab or the [Next Step>>>] button.
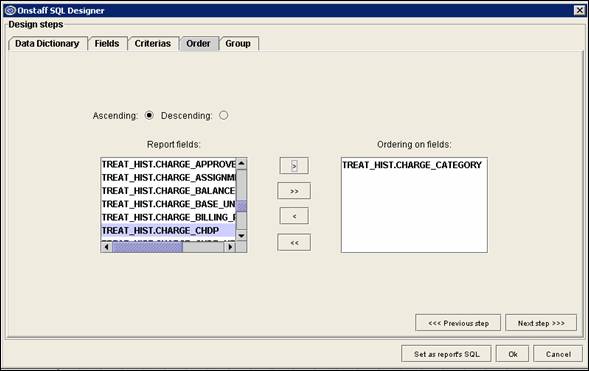
The Order function allows the order to be defined in which the rows of data are printed on the report.
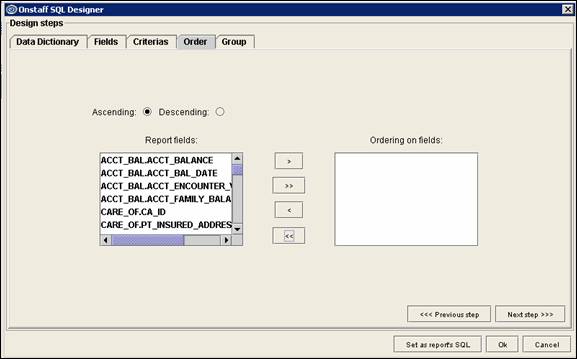
1. Ascending: The default setting is ![]() Ascending.
Ascending.
2. Descending: To order the data in descending order, click the ![]() Descending radio button.
Descending radio button.
3. Report fields: 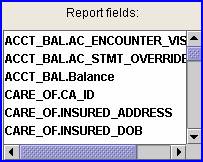
3.1 Select/highlight the Report fields to use as the primary sort option on the report, then click on the > (right arrow) key to insert the record in the Ordering on fields box. Continue this step until you have defined the primary, secondary, tertiary, etc. order for the data, as in the example below. In this example, the only sort order is by the charge category:
When the order has been selected, click on either the Group Tab or the [Next step >>>] button.
Use the Group function to define how the information should be grouped on the report.
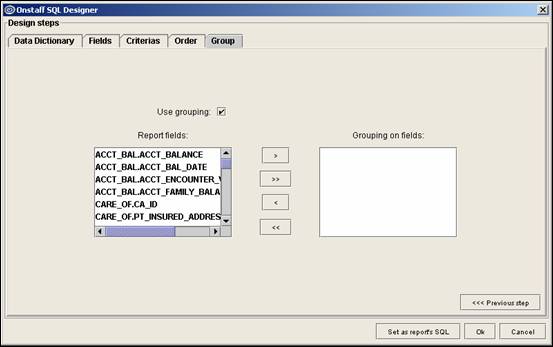
1. Use grouping: ![]()
1.1 To use the group function, check the ![]() <Use grouping> check box.
<Use grouping> check box.
2. Report fields:
2.1 This displays a list of all the data fields selected for this data dictionary. If using the group function, each data column on the report must be included in the group. Select/highlight the primary group data field, then click on the [>] (right arrow) key to insert the record in the <Grouping on fields> box. Continue this step until all the data fields have been selected to include on the report.
To remove a record from the <Grouping on fields> box, select/highlight the record and click on the [<] (left arrow) key:

When this step is completed, click on the [Set as reports SQL] button. Report Designer creates the SQL script based on the parameters defined in the previous steps.
Step Ten - Programming the Report:
NOTE: For PCM Clients: SuperBill forms generated in Intellect may include a barcode. These forms may be printed in Intellect and then auto-scanned into Patient Chart Manager (PCM) via the barcode. To include a barcode on the Superbill, open the Superbill in Report Designer, select the Bar Code component (from the left side) and place it on the Superbill where it should print, dragging it so the field has enough characters for the barcode. The barcode properties need to look like this:
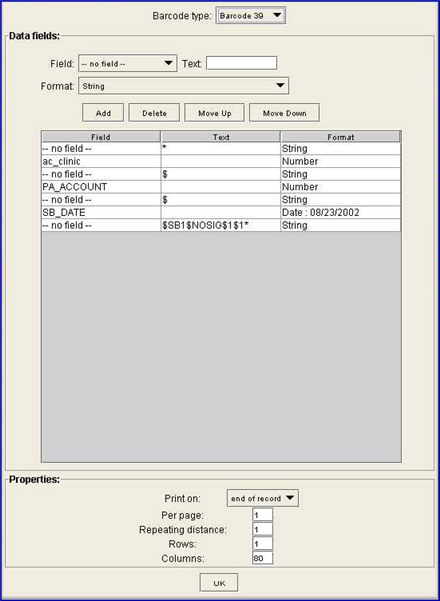
A code also needs to be set up in PCAP for the barcode. This is done in Utility --►Set Up --►Printer --►Capability --►Add.
For additional information on using Report Designer, see Utility --►Tools --►Report Designer --►Scanning and Programming Forms.
Most of the set up is in Intellect. The only set up in PCM is to have a Fax/Scan doc with a code that matches the form code set up in Intellect for the super bill, which is how PCM determines the doc name and chart tab.
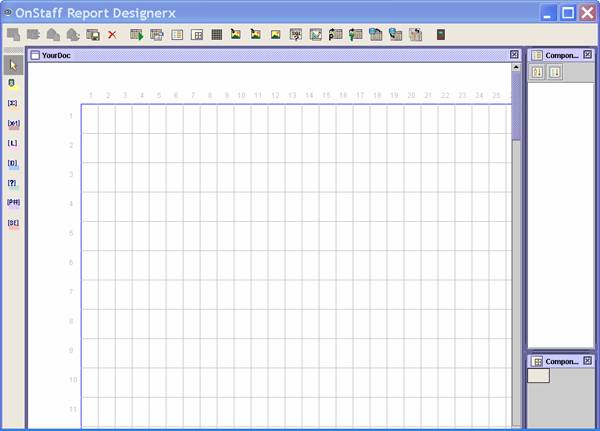
With a report opened in Report Designer, the screen should look like the following graphic. Each square on the grid represents one character.
The remainder of Step Ten includes set up information for these:
A - Programming Database Fields
D - Adding the Calendar Date on the Form
A - Programming Database Fields:
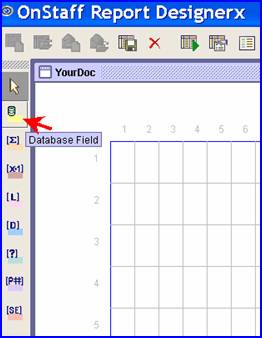
1. Select the Database Field icon, located on the left side of the screen:
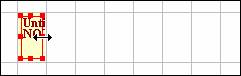
2. Click on the square within the grid where the data should start printing. A yellow box is placed in the square:
3. Click on the yellow square and hover over the dot on the right side, click again and hold. Drag the yellow box to the length needed to print. Remember that each square in the grid represents one character.
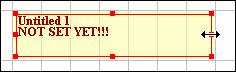
4. Double-click in the yellow area of the field.
• When using a software version prior to 13.06.24, go to step 4.1.
• When using software version 13.06.24 or greater, go to step 4.2.
4.1 After double-clicking on the yellow area, versions prior to 13.06.24. display this window:
With the Data Source Tab highlighted, use the <Field> drop-down list to select the field from which to print:
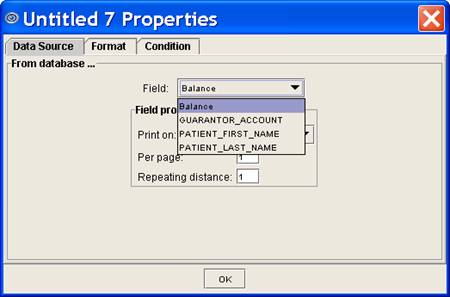
Go to step 4.3.
4.2 After double-clicking on the yellow area, version 13.06.24 and greater displays the window shown in 4.2.1.
Effective version 13.06.24, programming data fields within Report Designer was made more user-friendly with changes to the <Field> field on the Data Source tab. In the past, <Field> had a drop-down list (see step 4.1 above). As of version 13.06.24, <Field> has a tree which categorizes available choices using table groups and field names for ease of selection and accuracy.
With the Data Source Tab selected (highlighted), view the table groups and field names in <Field properties> as indicated:
4.2.1 When using the SQL Editor, the table groups, with field names within each group, are automatically created when the SQL is created by using the SQL Editor. Click on the table folder to display the list of fields available in the SQL, as shown in the example below.
4.2.2 When writing the SQL from scratch, assign an alias* for both the table and the field; i.e., select Account.ac_account AcctNo, Account.ac_name PatientName, Account.ac_category PatientCategory from acct_bal Account.
NOTE: Do NOT leave spaces between words within an alias*. For example, Acct No must be entered as AcctNo or Acct_No. If there is a space between, the field name displays as No.
* For additional information on aliases, refer to Step 5 - Field Aliases Tab.
If an alias is not assigned to both the tables and fields, the Properties Datasource <Field> displays as shown:
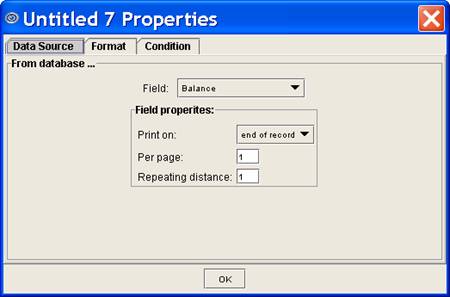
4.3 Click on the Format Tab (see highlighted tab below). This displays:
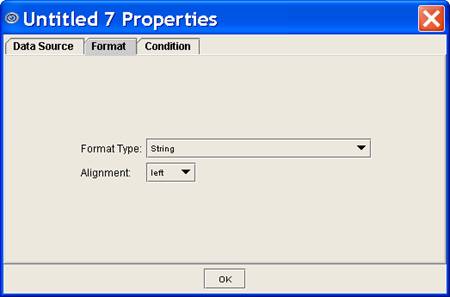
4.3.1 Format Type: ![]()
Select the correct formatting from the drop-down list. This setting needs to be changed only when selecting a date or currency field. All others may be left at the String default.
4.3.2 Alignment: ![]()

Select whether to have the data aligned to the left, the right, or centered in the space allowed for this information. For example, patient name would usually be left justified, where a dollar amount would be right justified.
Repeat this step until all the fields to print on the form are completed.
Click on [Ok] to save.
4.4 The Condition Tab is discussed in training.
B - Using the Report Key Icon: 
The Report Key icon at the top of the screen is used when it is required to have data pull from the database table, and to add information on the screen. The type of information needed determines what is selected through the Report Key.
Click on the Report Key icon to display this screen, as of version 13.07.08:
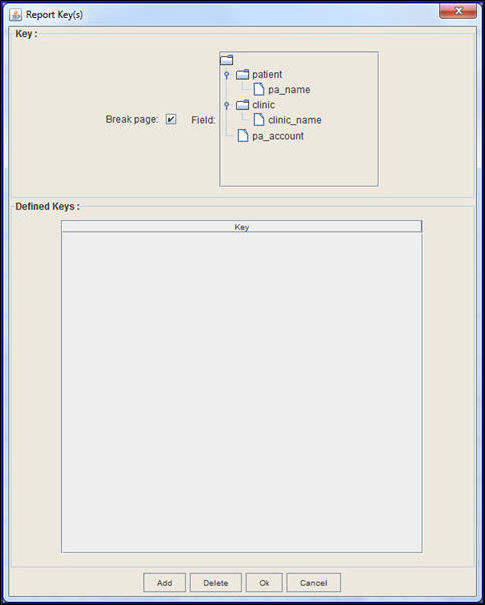
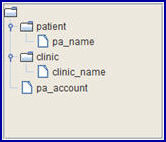
The database tables and fields shown in the <Field> table correlate to field names on Intellect's screens.
This example displays the patient and clinic database tables with applicable fields:
C - Adding Labels to the Form:
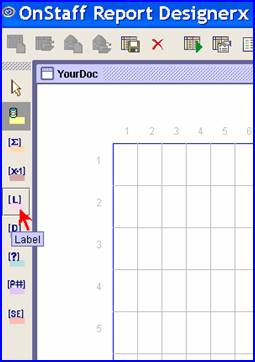
5. To have a label or column heading on the report, select the Label icon located on the left side of the screen:
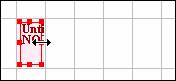
6. Click on the square within the grid where the label should start printing. A pink box is placed in the square:
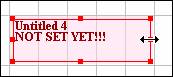
7. Click on the pink square and hover over the dot on the right side, click again and hold. Drag the pink box to the length needed to print. Remember, each square in the grid represents one character. The option to justify the text is not available for Labels, therefore, set the length of the field to the same number of characters in the label description.
8. Double-click in the pink area of the field to display a window. Complete as indicated:
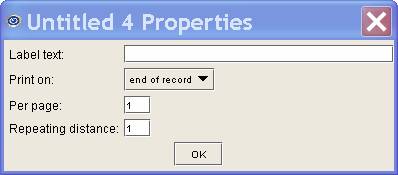
9. Label text: ![]()
9.1 Enter the text for the label. For example: 'Date'.
10. Print on: ![]()

10.1 This is a reset point/function in which clicking on the field displays the following list of options. Select the appropriate option for your report:
10.1.1 end of record: Inserts the label at the end of each row. This option does not usually apply when writing reports.
10.1.2 end of group: Inserts the label at the end of each group/page.
10.1.3 end of report: Inserts the label at the end of the report.
11. Per page: ![]()
11.1 When adding a label, leave the default of '1.'
12. Repeating distance: ![]()
12.1 When adding a label, leave the default of '1.'
Continue this step until all the labels to print on the form are completed.
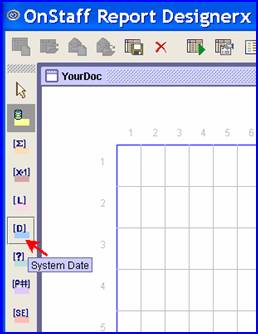
D - Adding the Calendar Date on the Form:
13. To include the calendar date the report was printed, click on the System Date icon located on the left side of the screen:
14. Click on the square within the grid where the date should start printing. A blue box is placed in the square:

15. Click on the blue square and hover over the dot on the right side, click again and hold. Drag the blue box to the length needed to print. Remember each square in the grid represents one character.

16. Double-click in the blue area of the field to display this window. Complete as indicated:
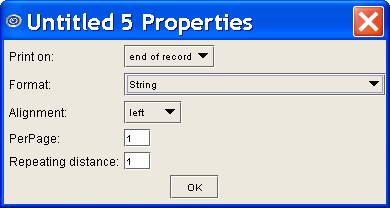
17. Print On: ![]()
17.1 end of record: Does not apply when creating reports.
17.2 end of group: Inserts the label at the end of each group/page.
17.3 end of report: Inserts the label at the end of the report.
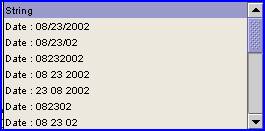
18. Format: ![]()
18.1 Select the date format from the drop-down list.
19. Alignment: ![]()
19.1 Select whether the data should be aligned to the left, the right, or centered in the space allowed for this information. For example, patient name would usually be left justified, where a dollar amount would be right justified.
20. Per page: ![]()
20.1 When adding a label, leave the default of '1.'
21. Repeating distance: ![]()
21.1 When adding a label, leave the default of '1.'
Step Eleven - Placing the New Report or Letter on the Management/Custom Reports Menu:
Follow these instructions to place a report on the Management/Custom Reports menu and set up security to limit which users may run the report. Custom reports do not need to be added to a menu. They may be run from the Report Designer application.
PCS is continuing to add new reports and letters to Intellect. If a new report or letter is added to a menu where you have placed a custom report or letter, your report is replaced by the new report. The only menu to which PCS does not add items is the Custom Report menu. Therefore, it is recommended that ALL custom reports and letters be placed on the Custom Reports menu.
Please refer to these, as applicable:
1. Add a record in the Utility --► Set Up --► Menus --► Programs table.
In the example below, the report name of YourDoc is used. When completing the screen, replace the YourDoc descriptor with the name you assigned to your report or letter in Report Designer.
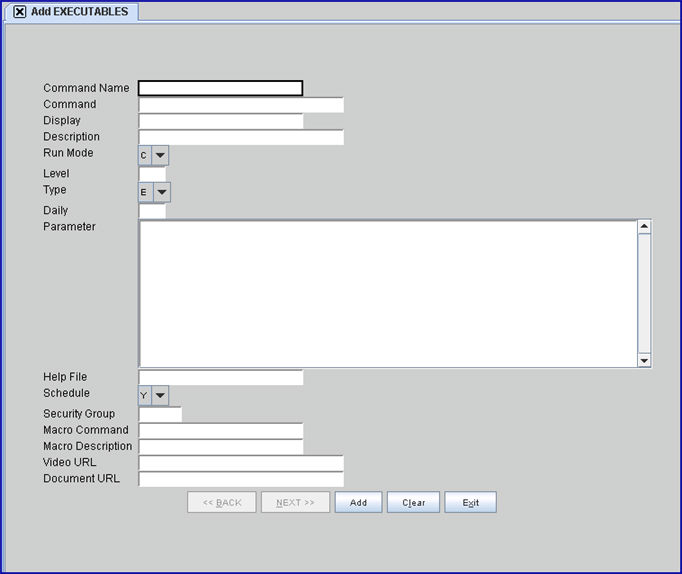
2. Command Name: 
2.1 Enter your report or letter name assigned in Report Designer.
2.2 This is a required field. If [Enter] is pressed before this field is populated, an error message displays:
Press [Ok] to return to the <Command Name> field.
3. Command: 
3.1 Enter your report or letter name twice, separated by a / (slash). Do NOT leave a space before or after the slash.
4. Display: 
4.1 Enter your report or letter name.
5. Description: 
5.1 Enter your report or letter name, then a / (slash), then REPORTGENERATOR. DO NOT leave a space before or after the slash and do NOT leave a space between REPORT and GENERATOR.
6. Run Mode: 
6.1 Leave the default option 'C.'
7.1 Enter the level of security to assign to the report or letter.
8. Type: 
8.1 Select option 'F' (Internal Function) from the drop-down list:
9. Daily: 
9.1 Leave this field blank.
10. Parameter:
10.1 Leave this field blank.
11. Help File: 
11.1 Leave this field blank.
12. Schedule: 
12.1 Select 'N' (No) from the drop-down list.
13. Security Group: 
13.1 Offices using Security Groups should enter the appropriate number; if not, enter '1.' If left blank, Intellect assumes the Security Group is '1.'
14. Macro Command: 
14.1 Enter REPORTGENERATOR&&YourDoc
• Do NOT leave a space between REPORT and GENERATOR.
• Do NOT leave a space before or after &&.
• Replace the YourDoc descriptor with the name you assigned to your report or letter in Report Designer.
15. Macro Description: 
15.1 Enter REPORTGENERATOR-YourDoc
• Do NOT leave a space between REPORT and GENERATOR.
• Do NOT leave a space before or after the - (dash).
• Replace the YourDoc descriptor with the name you assigned to your report or letter in Report Designer.
16. Video URL: 
16.1 This field is maintained by Prime Clinical Systems. Please do not modify.
17. Document URL: 
17.1 This field is maintained by Prime Clinical Systems. Please do not modify.
18. WARNING: VERIFY that the entered information is correct BEFORE selecting [Add]. After the information is saved, the first four fields: <Command Name>, <Command>, <Display>, and <Description> may NOT be modified.
19. After you have verified that the information is correct, select one of these options.

19.1 Click [Add] to clear the screen and return the focus to the <Command Name> field, saving the new record. See WARNING in step 18.
19.2 Click [Clear] to clear all information and return the focus to the <Command Name> field without saving.
19.3 Click [Exit] to clear the screen and return the focus to the main Intellect screen without saving.
To modify, go to the Utility --► Set Up --► Menus --► Menus --► Modify table.
If a report or letter has already been placed on your Custom Reports menu, your screen may look different than our example.
NOTE: Depending on the date the system was installed, a Custom Report record may not be set up. In which case, go to Utility --► Set Up --► Menus --► Menus --► Add. Enter the Menu Name and Menu Description as shown in this example.
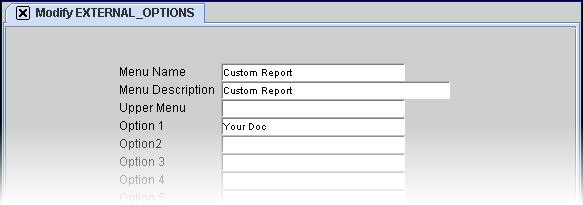
1. Menu Name: 
1.1 Enter Custom Report, as shown above.
1.2 This is a required field. If [Enter] is pressed before this field is populated, an error message displays:

Press [Ok] to return the focus to the <Menu Name> field.
2. Menu Description: 
2.1 When modifying an existing menu record, 'Custom Report' displays.
2.2 When adding a new menu record, enter 'Custom Report' as shown in the sample above.
3. Option 1: 
3.1 Enter your report or letter name. Note: The sample above is just an example.
4. Select [Modify].
Log out and log back in to see your new menu.
NOTE: If Option 1 already has a custom report or letter entered, add your new report or letter to Option 2. If Option 2 is already used, add your report or letter to Option 3, and so on.
NOTE: Do NOT use the Upper Menu field for a custom report or letter.
