
Intellect™
END OF DAY PROCEDURES

It is recommended that clinics end the day by performing these procedures:
1. Pre-Billing Report: This report shows errors on claims so they can be fixed before they are submitted. Verify claims and correct any ****, which represent missing information.
2. Journal Report: This report shows the clinics daily activity. This report must be printed to compare against the Financial Report.
3. Financial Report: This report must be printed to balance the system. Total Charges, Total Deletions, Total Payments, and Total Adjustments should match in the Financial Report and Journal Report. Warning: If these totals do not match, STOP ALL FINANCIAL POSTING, DO NOT CHANGE THE DATE, and contact Prime Clinical Support.
4. Electronic Billing: Submit to Clearing House or Direct (e.g., Office Ally, Ingenix [formerly ENS], MCAR)
5. Print out black and white HCFAs and any red and white HCFAs.
6. Change the Clinic Date (if applicable).
7. Additional recommended optional reports.
Videos Available: Click End of Day Procedures, End of Month Procedures, End of Year Procedure, or Pre-Billing Report to access the links. Depending on the system set up, the media player may need to be activated. Speakers need to be attached to the workstation to hear the instructions.
Note: To view the videos, log-in through the www.primeclinical.com website. Current support is required.
To get up-to-speed with end of day procedures, sign up for one of our webinars/workshops. For more information, contact PCS support.
1. To access the Print GOP Insurance screen in Intellect, go to Billing --► Insurance --► Group of Patients

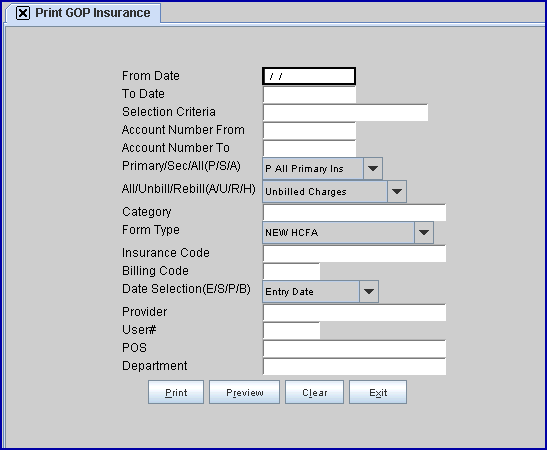
The Print GOP Insurance screen opens:
Note:
Billing --►Insurance --►Group of Patients includes everything for the day.
Billing --►Insurance --► Batch of Patients can include up to 99 accounts.
1.1 From Date/To Date: This defaults to the current entry date.
Note: The clinic date is the current entry date.
1.2 Selection Criteria: Press [Enter].
1.3 Account Number From: Press [Enter].
1.4 Account Number To: Press [Enter]. Select Yes when the Warning appears on the screen.
1.5 Primary/Sec/All(P/S/A): Select the default, P All Primary Insurances.
1.6 All/Unbill/Rebill(A/U/R/H): If this is being run for the first time, select the default Unbilled Charges.
1.7 Category: Leave blank.
1.8 Form Type: Select PRE BILLING REPORT.
Warning: If the <Form Type> is not changed to PRE BILLING REPORT, claims drop to paper.
1.9 Insurance Code: Leave blank.
1.10 Billing Code: Leave blank.
1.11 Date Selection(E/S/P/B): Select the default Entry Date.
1.12 Provider: Leave blank.
1.13 User#: Leave blank.
1.14 POS: Leave blank.
1.15 Department: Leave blank.
2. Review the Pre-Billing Report -- Corrections should be made BEFORE the claims are billed.
2.1 Asterisks (i.e., ***) indicate missing information. This is not necessarily an error but it should be determined if that information is needed.
2.2 If the claim is to transmit electronically, the EB column should have a value (e.g., 'I,' 'O,' 'M,' 'X'). Typically 'I' = Any clearing house that the office is using. 'M' = Medicare, 'X' = Medical. This field may be modified under Utility --► Insurance --► Insurance <Electronic Billing>.
2.3 Check the EN# field. If there is an encounter attached, this field is > 0.
2.4 For patients with 'MM' insurance, make sure Subscriber #=MCAR #.
2.5 Compare PINS with Category. The Insurance and Category code should match or make sense (i.e., MCAR PINS with MCR2 Category makes sense but MCAR PINS with AET category does not).
After the claims are billed (or the next morning if billing is automated to run at night), this report can be used to verify that all claims were either submitted electronically or printed on paper. Check-off all claims on the electronic submission reports and the printed paper claims. Any unchecked items are unbilled.
1. Display the Journal Screen in Intellect by going to Management --► Journal
![]()
The Print JOURNAL screen displays:
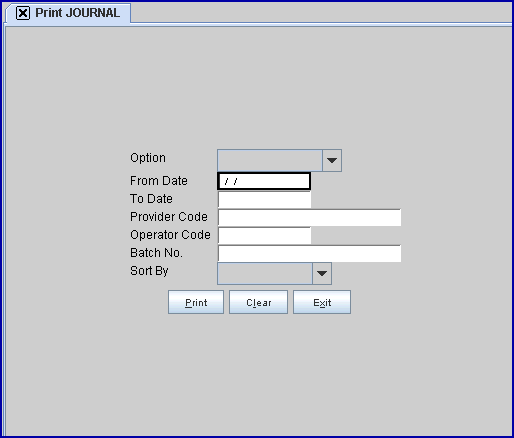
1.1 Option: Select Clinic Journal (formerly C).
The Clinic Activity Journal prints a report that includes all Providers.
The Journal by Provider allows the user to print one journal for a designated provider, or a separate report for each provider.
1.2 From Date/To Date: Enter the clinic date.
1.3 Provider Code: Leave blank.
1.4 Operator Code: Leave blank.
1.5 Batch No: Leave blank.
1.6 Sort by: Sorting options are 'Account Number,' 'Patient Name,' 'Posting Order,' or 'Super Bill #.'
This is required to balance the system.
1. Display the Print Financial in Intellect by going to Management --► Financial

The Print Financial Dialog Box displays:
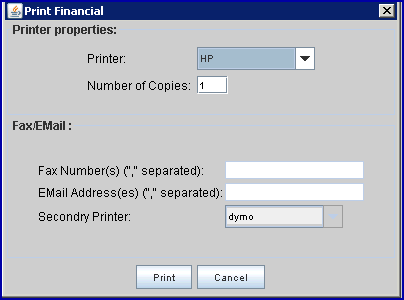
2. Print or View the Financial Report.
3. Verify that these four totals on the Summary Journal match the Financial Report:
|
Journal Report fields = |
Financial Report fields in Day Column |
|
Total Charges |
Net Charges |
|
Charge Deleted/Modified |
Total Deletions |
|
Total Payments |
Total Payments |
|
Total Adjustments |
Total Adjustments |
• If the Clinic Journal and Financial Totals match, continue with the End of Day Procedures. Go to the section titled Sending Electronic Claims.
• If the Clinic Journal and Financial Totals do NOT match, determine why there is an imbalance by following the steps below.
NOTE: If the discrepancy cannot be found, STOP ALL POSTING, as it makes it difficult for Prime Clinical to solve the problem if posting is continued. DO NOT close the day until Support gives the instruction to do so.
Step A: Go to Management --► Journal. In the <Option> field, select All Provider Journal (formerly A). Leave the other fields blank and click on [Print] to print a Daily Activity Journal.
Step B: Subtract the amount shown in Charge Deleted/Modified on the Daily Activity Journal from the Total Charges amount on the Financial Report.
Step C: Compare the new Financial Total with the Total Charges from the Journal Report.
If the 'Daily Activity Journal' Total Charges NOW match the Financial Today's Charges, keep all three reports together so that it shows a history/trail of the discrepancy. Continue with the End of Day Procedures (go to the section titled Sending Electronic Claims) and skip the following steps.
If the Financial Today's Charges is LESS than the Total Charges on the 'Daily Activity Journal' Report go to Step D.
Step D: Go to Management --►Detail and enter the information in these fields:
• <Report Code>: Deleted Charge Report
• <From Date> and <To>: Enter the same as the Journal dates used or the current clinic date.
• Click the [Print] button to run the Management Detail report.
Step E: On the Management Detail report, any charges that have a Posting Date prior to the current clinic date should be added back into the number obtained after subtracting the deleted charges from the total charges on the Financial Report.
NOW, THE JOURNAL & FINANCIAL SHOULD MATCH.
IF THERE IS STILL A DISCREPANCY:
1. STOP POSTING CHARGES & PAYMENTS
2. FAX the ‘DAILY ACTIVITY JOURNAL’ and FINANCIAL REPORT to Prime Clinical Systems at 626-449-5615, ATTN: SOFTWARE SUPPORT.
3. After Faxing the reports, contact us at 626-449-1705.
STOP! STOP! STOP!
MANUAL BILLING (DROPPING CLAIMS TO PAPER)
FIRST SUBMIT A GROUP OF ELECTRONIC CLAIMS AND THEN DROP THE OTHER CLAIMS TO PAPER.
WARNING:
IF AN ATTEMPT IS MADE TO PRINT PAPER CLAIMS THROUGH BILLING --►INSURANCE --►GROUP OF PATIENTS, if a group of the ELECTRONIC CLAIMS was not sent first, ALL OF THE CLAIMS WILL DROP TO PAPER!
Refer to this section for more information on:
II. Electronic Billing Reports
III. Pick Up Electronic Billing Reports for Medicare
WARNING: Users must submit Group of Patient electronic claims first, and then print Group of Patient paper claims.
1. Create a group of electronic claims in Intellect by going to Billing --►Tele Com --► Submit Claim --►Group of Patients

The Submit GOP EBilling screen displays:

Complete the fields as indicated.
Fields in bold are for a Basic Electronic Billing.
1.1 From Date/To Date: This should be the entry date range of the charges being billed (e.g., Today's date).
1.2 Carrier Type: The Carrier code comes from the Utility --►Insurance --►Insurance screen <Electronic Billing> field. Enter the Carrier being billed.
1.3 Selection Criteria: Press [Enter].
1.4 Account Number From: Press [Enter].
1.5 Account Number To: Press [Enter], and select 'Yes' when the Warning appears on the screen.
1.6 Primary/Sec/All(P/S/A): Select the default: P All Primary Insurances.
1.7 All/Unbill/Rebill(A/U/R/H): Select the default: Unbilled Charges.
1.8 Category: Leave blank.
1.9 Insurance Code: Enter the code for the carrier being billed; e.g.:
| IMS | MedAvant/Capario/Emdeon |
| OA | Office Ally |
| ENS | Ingenix/Optum Intelligent EDI |
| MCAR | Medicare |
| MCAL | Medi-Cal |
| GW | Gateway/TriZetto |
| WCEDI | Worker's Comp EDI |
Clients should contact support or a trainer if the carrier type and insurance codes are unknown.
1.10 Billing Code: Leave blank.
1.11 Date: Select the default: Entry Date.
1.12 Claim Type: Enter the appropriate claim type: Professional Claims, or Institutional Claims.
1.13 User#: Leave blank.
1.14 POS: Leave blank.
1.15 Department: Leave blank.
2. Select [Submit] and send to the printer.
WARNING: The printer must be working in order for claims to submit to the clearinghouse.
Note: Optum Intelligent EDI (formerly Ingenix/ENS) first time submission takes 2-3 days for a response. They call the user and set up training.
3. Repeat the above steps for EACH carrier (e.g., Ingenix [ENS], Office Ally, Medicare, Medi-Cal).
See the next section, Electronic Billing Reports.
3.1 Press [CNTRL + J] to ensure the Electronic Billing File is being created/transmitted.
3.1.1 Ensure that the Task Log says Connected to the Clearinghouse.
II. Electronic Billing Reports
REPORT 1 (Transmission Report from OnSTAFF Intellect )
After the transmission is completed, OnSTAFF Intellect prints out a report of all the claims that were sent electronically. This report should generally print within five minutes of submitting claims to a clearinghouse.
NOTE: The header of the report reads ONSTAFF ELECTRONICALLY BILLED.
REPORT 2 (277 Report from the Clearinghouse)
1. *Manually print via OnSTAFF Intellect. Instructions on how to manually print are noted below (Select 'A' for Acknowledgment).
- OR -
2. If set up for Automation, the 277 report prints after 9pm the next evening.
- OR -
3. If a clinic electronically bills claims today (e.g., 7/2/14), and then electronically bills claims tomorrow (e.g., 7/3/14), a 277 report automatically prints, acknowledging claims from the PREVIOUS DAY (e.g., 7/2/14) if it is available.
*To manually print a 277 report, see the Instructions below (re: Medicare)
REPORT 3 (Payor Response Acknowledgment Report - If available via the Clearinghouse)
The turnaround time varies per Payor. The Payor Response Reports come from the Payor via the Clearinghouse.
1. *Manually print via OnSTAFF Intellect. Instructions on how to manually print are noted below (select 'A' for Acknowledgment).
- OR -
2. If set up for Automation, the Payor Response Acknowledgment report prints after 9pm the next evening.
Neither Prime Clinical Systems nor the clearinghouse has any control over the turnaround time of when the Payor Response Report prints.
III. Pick Up Electronic Billing Reports for Medicare
IF A CLINIC SUBMITS DIRECTLY TO MEDICARE:
Once a clinic has passed testing with California Medicare, they may run a 997 Report & Error Summary (Acknowledgement) Report 24 hours after each submission.
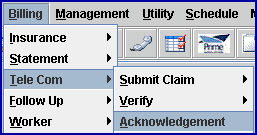
1. Electronically pick-up a claim or eligibility information in Intellect by going to Billing --►Tele Com --► Acknowledgement
The Ansi Features screen displays:
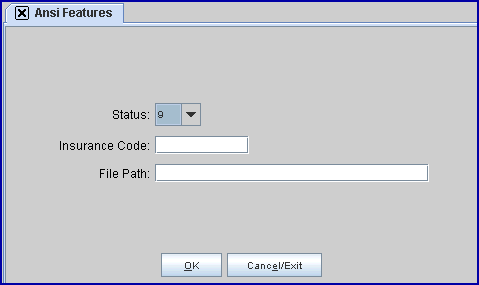
1.1 Status: Click the down arrow to display the valid options, then click on 9 or A:
• 9 - 997 Report. Note: Effective January 2012, this retrieves the 999 Report.
• A - Acknowledgement Report (Error Summary Report).
1.2 Insurance Code: Enter MCAR.
The Ansi 997 Report indicates if the claims sent the previous business day were accepted. The printout displays rows AK5 and AK9. 'A' indicates it is Accepted; 'R' indicates Rejections. For rejections, Prime Clinical asks that clinics fax us the report with their client ID on it as that tells us where the error is.
To pick up the Provider Error Summary Report, use Status A. The Provider Error Summary Report is available for pick up 2 business days after the claims were received. This report indicates rejected claims.
WARNING: Users must submit Group of Patient electronic claims first before printing Group of Patient paper claims.
To print paper claims on CMS-1500 Forms:
1. Open the Print GOP Insurance screen in Intellect by going to Billing --► Insurance --► Group of Patients

The Print GOP Insurance screen displays:

Complete the fields as indicated.
Fields in bold are for Printing Paper Claims.
1.1 From Date/To Date: This should be the entry date range of the charges being billed (e.g., Today’s date).
1.2 Selection Criteria: Press [Enter].
1.3 Account Number From: Press [Enter].
1.4 Account Number To: Press [Enter]. Select Yes if a warning appears on the screen.
1.5 Primary/Sec/All(P/S/A): Select the 'P All Primary Insurances' for Primary insurance, OR select 'S All Secondary Insurances' for Secondary insurance.
1.6 All/Unbill/Rebill(A/U/R/H): Select the default, Unbilled Charges.
1.7 Category: Leave blank.
1.8 Form Type: Select HCFA (formerly C) for black & white CMS1500 OR select HCFA RED (formerly B) for red & white CMS1500.
1.9 Insurance Code: Leave blank.
1.10 Billing Code: Leave blank.
1.11 Date Selection (E/S/P/B): For the date range in <From Date/To Date>:
• Entry Date (formerly E): This option selects charges based on the entry date. Select 'Entry Date' for printing paper claims.
• Service Date (formerly S): This option selects charges based on the date of service.
• First Billed Date (formerly B): This option selects charges based on the first billed date.
• Last Payment Date (formerly P): This option selects charges based on the last payment date.
1.12 Provider: Leave blank.
1.13 User#: Leave blank.
1.14 POS: Leave blank.
1.15 Department: Leave blank.
2. Click on [Print] to send to the clinic's printer.
To change the date of a Clinic:
1. Verify that everyone who is posting charges is logged out of Intellect.
2. Verify that Today's Charges are set to $0 on the Management Financial Report.
Warning: If there are still monies under Net Charges, Total Deletions, Total Payments, or Total Adjustments, then the day did NOT properly close. STOP ALL FINANCIAL POSTING, DO NOT CHANGE THE DATE, and contact Prime Clinical Support.
3. Open the System Date screen in Intellect by going to Date --► Change Clinic Date

The System Date screen displays:
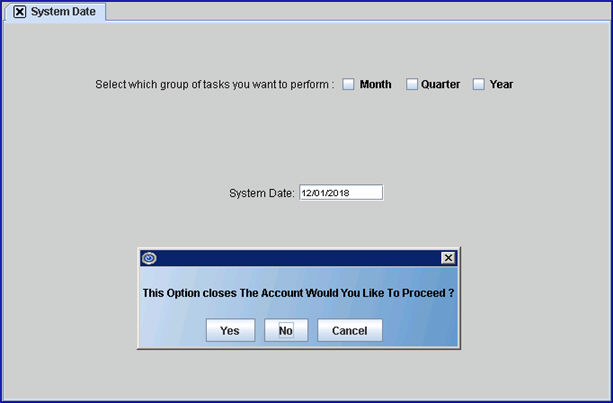
4. NEVER check the Month, Quarter, or Year boxes!
5. Select [Yes]. On each workstation, Intellect warns all users not to post, that the date is being changed, and to log out and then log back in to see the new clinic date.
For additional information on this screen, please refer to the online documentation under the main menu option Date.
It is suggested that these additional reports be run each day:
• Management/Check Slip Report
• Schedule/Appointment/Receipt/Print Receipt Report
• Schedule/Appointment/Tracking Superbill
• Payment/Apply Receipt